How to Change Where New Apps Will Save to in Windows 11

By default, Windows 11 installs every new Microsoft Store app on your system drive (C:). Over time that eats into your free space, especially if you install large apps and games. You can change the default so that future Store downloads go to a second hard drive, a solid-state drive (SSD), or a USB drive instead.
This is a good fix when C: is getting full and you have another drive with room to spare. The same setting is available in Windows 11 Home and Pro.
Before you start, check these points:
- The drive must be formatted as NTFS. Windows will not use a drive with another file system, such as FAT32 or exFAT, for new apps. If your drive uses one of those, the option may not work for it.
- The drive must be connected and visible in File Explorer . If you pick an external drive, keep it plugged in. Apps stored on a USB drive will not open when the drive is unplugged.
- The change only affects apps you install afterward. Apps already on C: stay where they are. They are not moved automatically.
- It only applies to Microsoft Store apps. Traditional desktop programs installed from an .exe or .msi file ask for their own install location during setup, so this setting does not control them.
You do not need to restart your PC after changing the setting. If you want to undo it later, go back to the same setting and choose C: again. Apps you installed on the other drive in the meantime will stay there.
Open Settings with Win+I, click System Storage Advanced storage settings Where new content is saved, then select your preferred drive from the New apps will save to dropdown and click Apply. Only future Store apps install there; existing apps remain on C:.
Important Things to Know:
Before you change app install location Windows 11, you need to know that this setting only applies to future downloads and will not move apps already on your computer. If you choose an external drive, you must keep it plugged into your PC so those applications continue to work properly every time you want to use them.- Windows 11 only installs new apps to your selected location. It will not move apps that are already installed.
- If you unplug the drive you selected, apps on that drive will stop working until you plug it back in.
- If you unplug the drive, Windows will install new apps back to your “Local Disk (C)” drive until you reconnect it. Apps installed during this time will stay on your C drive.
- Windows will create a WindowsApps folder on the root of your selected drive when you install a new app there.
Here’s How:
- Open Settings . Press
Win+Ion your keyboard. - Click on System on the left side. Then click on Storage on the right side.
- [ADMIN PRIVILEGES REQUIRED] Click on Yes if prompted by User Account Control. Starting with Windows 11 build 26100.7705 (24H2) and build 26200.7705 (25H2), Windows now shows a User Account Control (UAC) prompt when you open Storage settings to protect system files. Open Storage settings UAC
- Click on Advanced storage settings on the right side to expand it. Then click on Where new content is saved. Open “Where new content is saved” settings
- Click on the New apps will save to drop-down menu. Select the drive you want to use.
- Click on Apply to save your changes.
- If you see a prompt asking “Delete other apps?”, click Yes or No depending on what you want to do. If you click No, this drive will not be used to save new apps.
- When you’re done, you can close Settings.
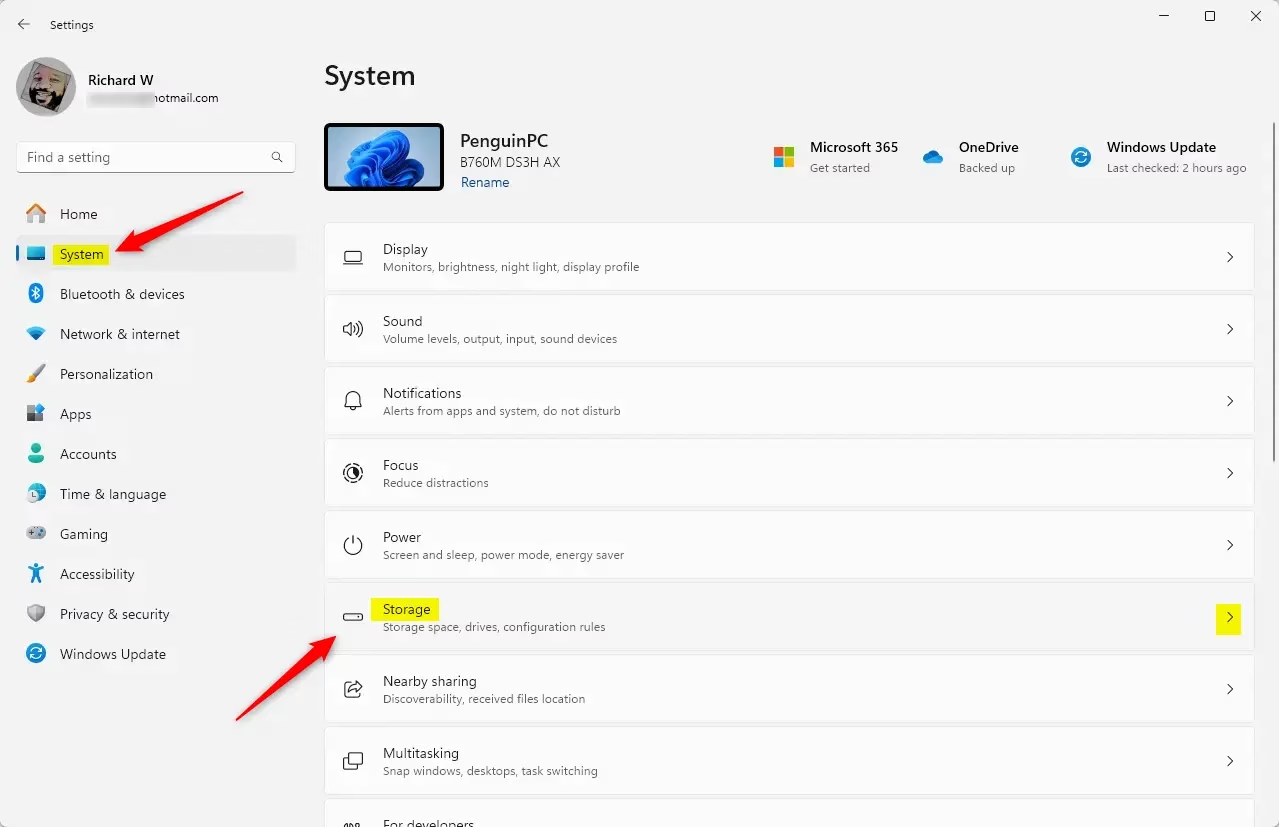
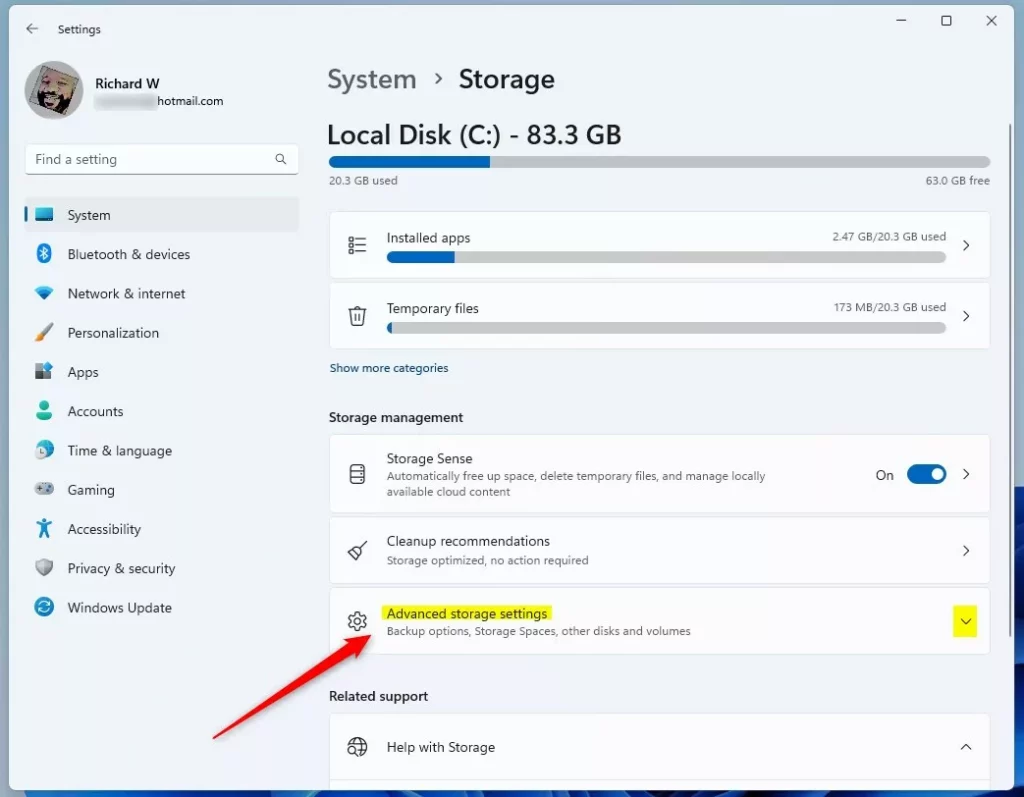
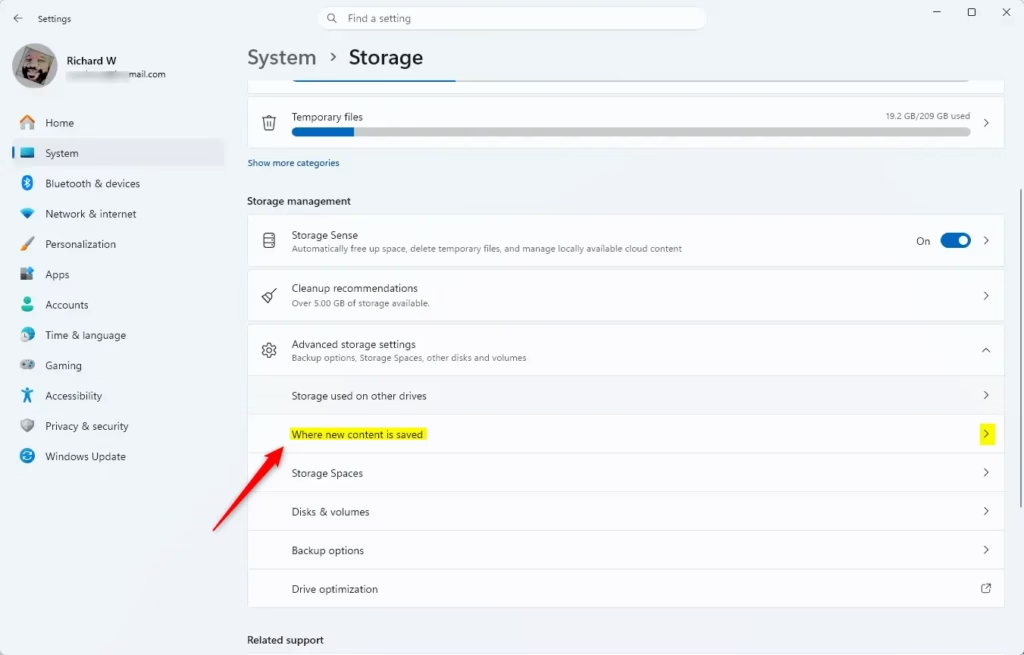
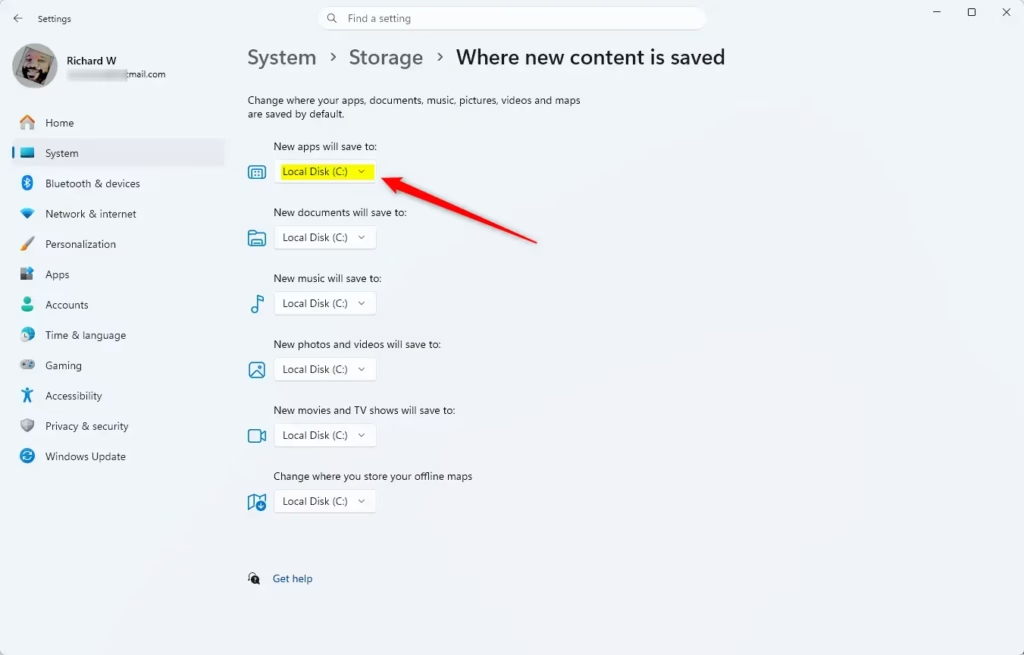
To change app install location Windows 11, open the Settings app by pressing the Win plus I on your keyboard. From there, select System on the left menu and click on Storage to find the option that lets you choose where new applications and games save on your hard drive.
Summary
You can easily change where new apps will save to in Windows 11 if your C drive is running low on space, by adjusting a simple setting.
How do I change a default app in 🪟 Windows 11?
Open Settings, then go to Apps Default apps. Search for the app or the file type, such as .pdf or .jpg, and click it. Choose the app you want from the list. Windows 11 sets defaults one file type at a time, so repeat this for each type you want to change.
How do I change the directory of an installed program?
Windows 11 has no Change folder option for most desktop programs. Open Settings and go to System Storage Advanced storage settings Disk & volumes. Select the app and click Move if it appears. If it does not, uninstall the program and reinstall it on the other drive.
How to save files in 🪟 Windows 11?
Open the app you want to save from, such as Word or Paint. Select File Save As, or press Ctrl+S for a new file. Choose a folder in the Save dialog, type a file name, and click Save. Your file goes wherever you pick, so check the folder path first.
How do I move apps to the desktop in 🪟 Windows 11?
Click Start and open All apps to find the app. Drag it from the list onto your desktop, and Windows creates a shortcut there. You can also right-click the app, select More, and choose Open file location to find its shortcut and copy it to the desktop.
Was this guide helpful?
0% of readers found this helpful (1 votes)

About the Author
Richard
Tech Writer, IT Professional
Richard is a writer at Geek Rewind who turns complex IT tasks into clear, step-by-step guides. He draws on years of hands-on experience in system administration and enterprise IT operations, focusing on Windows, Linux and WordPress: the problems people actually run into, and the fixes that work. His server and WordPress guides come from systems he runs himself. Richard builds and maintains the platform behind Geek Rewind, from its Ubuntu servers and Nginx configuration to its custom WordPress plugins. Many new tutorials start with readers' questions, and he's always glad to answer them in the comments.
No comments yet — be the first to share your thoughts!