How to See Devices Connected to Your Microsoft Account in Windows 11

Open Settings , click Accounts, then select Linked devices. This page shows all devices connected to your Microsoft account and allows you to manage them.
What is a Microsoft Account?
A Microsoft account is the single login used across services like OneDrive, Outlook, Xbox, and Windows. When you sign into a PC or console with these credentials, that hardware is linked to your profile automatically. Over the years the list can grow longer than you expect, especially if you have replaced PCs or traded in a console.
Why Check Your Linked Devices?
It is worth checking this list now and then. Old PCs and unused Xbox consoles can be removed from your profile. That keeps your account tied only to hardware you still own and use.
- Know which PCs or Xbox consoles are signed in with your account
- Spot a device you do not recognize, which can be a sign that someone else has signed in with your credentials
- Remove old or unused devices for security
- Manage your devices all in one place
Removing a device from your account list does not erase the files stored on that device. If you are selling or giving away a PC, reset it as well.
How to View Linked Devices Online
You can see your linked devices from any browser, on any computer, through the Microsoft website. This is also the better route if you no longer have access to the PC you want to check.
- Open the devices page of your Microsoft account: Head over to your Microsoft Devices page
- Sign in with the Microsoft account you use on your PCs and consoles. You should now see your account’s devices page.
- Look through the list of devices. Check the device names and types against what you actually own.
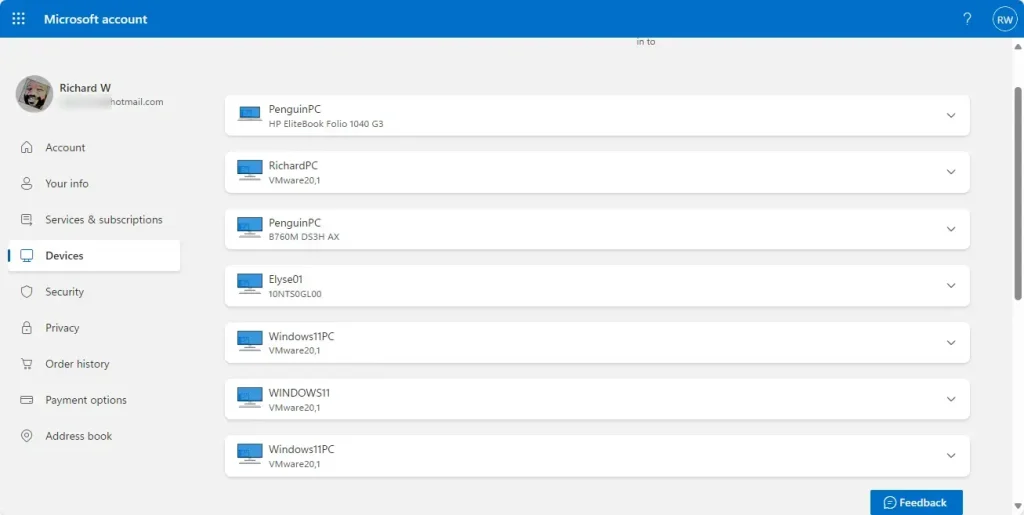
Reviewing registered hardware online takes a minute or two. If a device you no longer use is still listed, use the options shown on that device’s entry to remove it. If something looks unfamiliar, change your account password and review your security settings.
How to View Linked Devices Right on 🪟 Windows 11
Windows 11 can also show your connected hardware inside the Settings app . This works on both Home and Pro editions, as long as you are signed in with a Microsoft account. If you sign in with a local account, there is nothing to list, so use the web page above instead.
Steps to Check Linked Devices in 🪟 Windows 11
- Open the Settings app in one of two ways:
- Click the Start menu and select Settings, or
- Press Windows key + I on your keyboard.
- In Settings, click Accounts on the left side. The account options appear on the right.
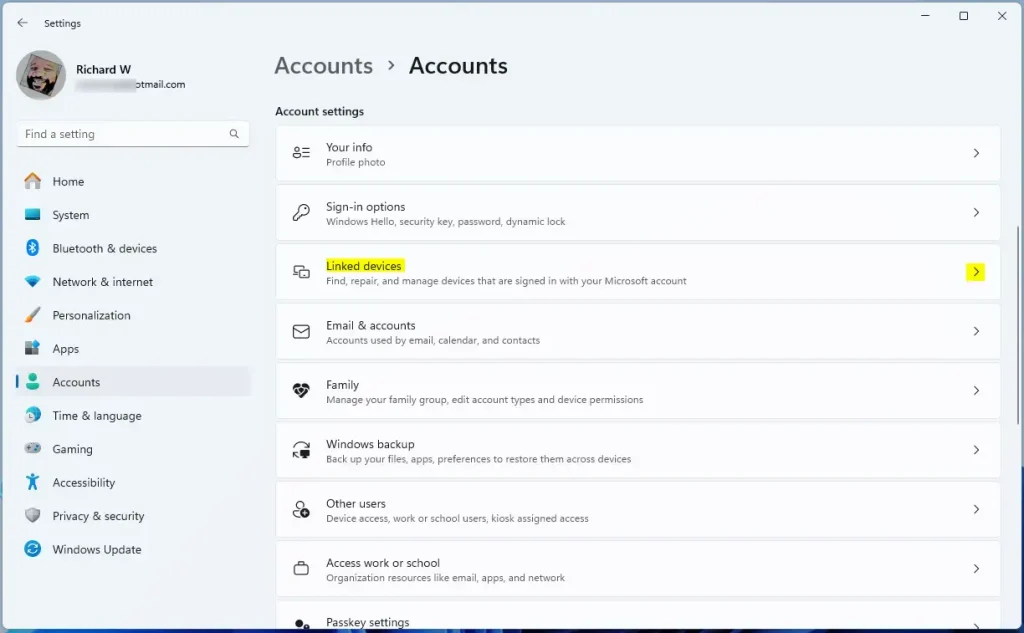
- On the right, click the Linked devices tile to open it. The full path is Settings Accounts Linked devices
- Review the list of devices connected to your Microsoft account. From here, you can manage them.
If you do not see a Linked devices tile, first confirm that you are signed in with a Microsoft account and not a local account. If you are, the tile may not be in your version of Windows 11. In that case, use the web page from the previous section, which shows the same information.
This page lists the hardware currently tied to your profile, so you can compare it with what you actually own. A device you used recently may take a little while to appear.
The Linked Devices tile in the Windows 11 Settings app
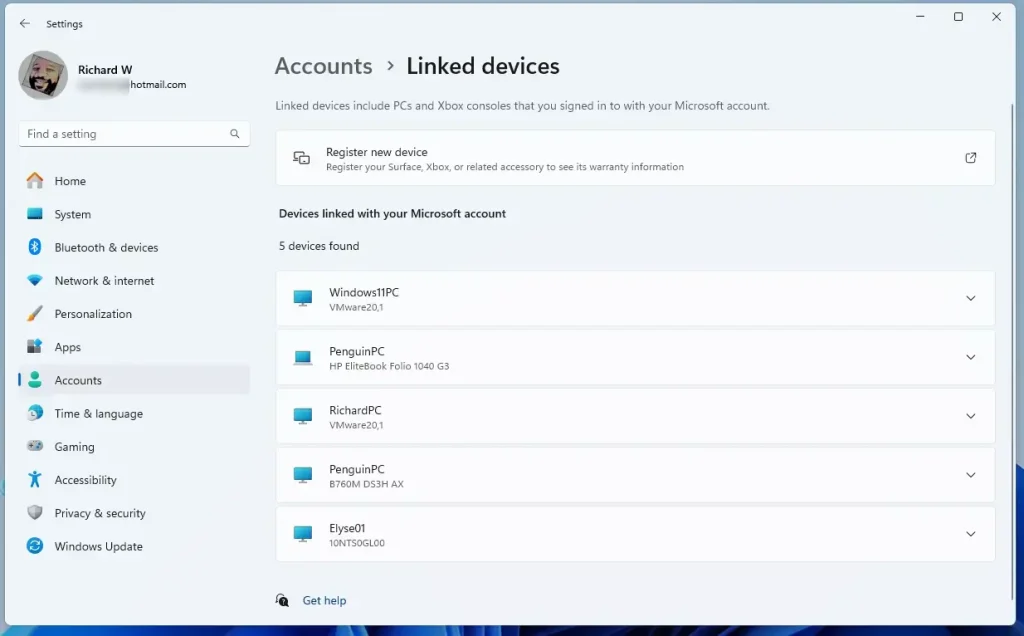
Use the list to spot old or unknown entries, then manage them from here or on the web. Changes you make apply to your account, so you do not need to restart your PC.
Manage your connected devices
Summary
You can audit your hardware either inside Windows 11 Settings or through the web dashboard. The two show the same account, so use whichever is more convenient. Repeat the check every few months, and always before you sell or hand down a PC or console.
Have a question about this guide?
Answered by AI from this guide. Good questions may be added to this page — please don't include personal details.
Did this guide fix your problem?

About the Author
Richard
Tech Writer, IT Professional
Richard is a writer at Geek Rewind who turns complex IT tasks into clear, step-by-step guides. He draws on years of hands-on experience in system administration and enterprise IT operations, focusing on Windows, Linux and WordPress: the problems people actually run into, and the fixes that work. His server and WordPress guides come from systems he runs himself. Richard builds and maintains the platform behind Geek Rewind, from its Ubuntu servers and Nginx configuration to its custom WordPress plugins. Many new tutorials start with readers' questions, and he's always glad to answer them in the comments.
No comments yet — be the first to share your thoughts!