How to Change Text Size in Windows 11

Changing the text size in Windows 11 makes the words in menus, apps, and windows larger, so you can read without straining your eyes. Windows 11 lets you scale text up to 225% of the default size from the main Settings app. The same setting is available on Home and Pro, and you don’t need to restart.
Larger fonts help with headaches and eye fatigue during long hours at your PC. The change takes only a few clicks, and you can reverse it just as quickly.
Open Settings , go to Accessibility, click Text size, drag the slider right to your preferred size between 100% and 225%, then click Apply. The text across menus and apps enlarges immediately without requiring a restart.
Why Change Your Text Size?
- Small letters are hard to read, especially on a high-resolution laptop screen or a monitor you sit a few feet from.
- Bigger text reduces eye strain. You can work longer without discomfort.
- It makes your computer easier to use for everyone, including family members or colleagues who share the same PC.
- You can always change it back at any time. Drag the slider back to 100% and click Apply.
How to Change Text Size in 🪟 Windows 11
The short version: open Settings, go to Accessibility, and click Text size. Drag the slider to the right to make the words larger, then click Apply. This setting changes only the text. It does not blur your apps or images, because it doesn’t scale the whole screen.
The full steps are below. They apply to current versions of Windows 11, on both Home and Pro.
- Open Settings . Click the Start button (the Windows icon) in the taskbar , then click the Settings gear icon. If you don’t see the gear, type “Settings” in the Start menu search. The quickest way is to press
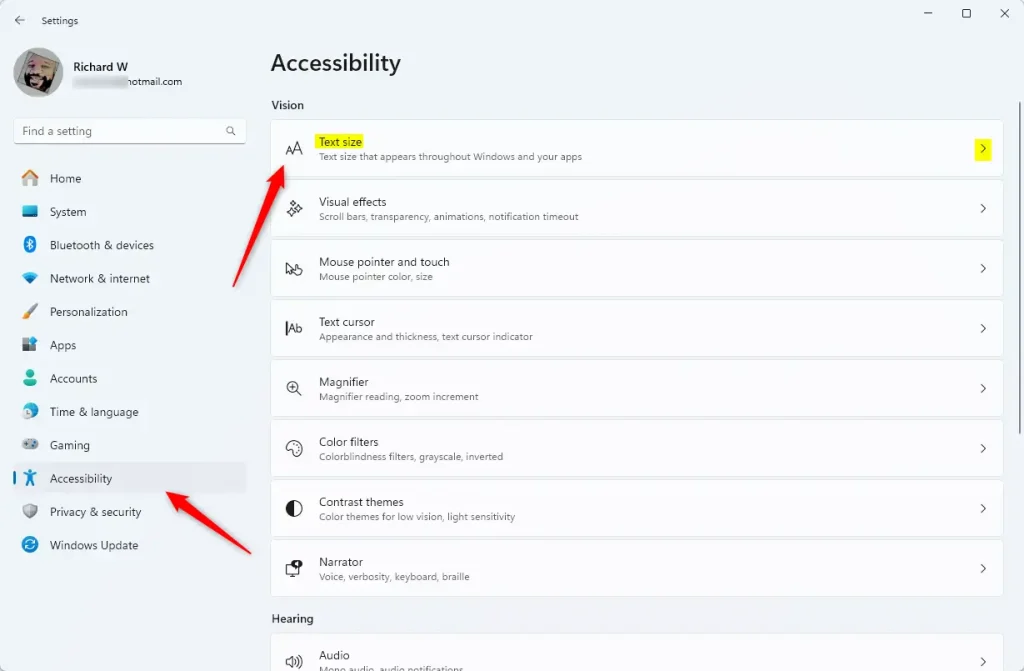
Windows key + Ion your keyboard. The Settings window should now be open. - Go to Accessibility. Look at the menu on the left side of the Settings window and click Accessibility. The right side now shows the accessibility options, grouped under headings such as Vision, Hearing, and Interaction.
- Find Text size. In the Vision group on the right, click Text size. A page opens with a preview box and a slider.
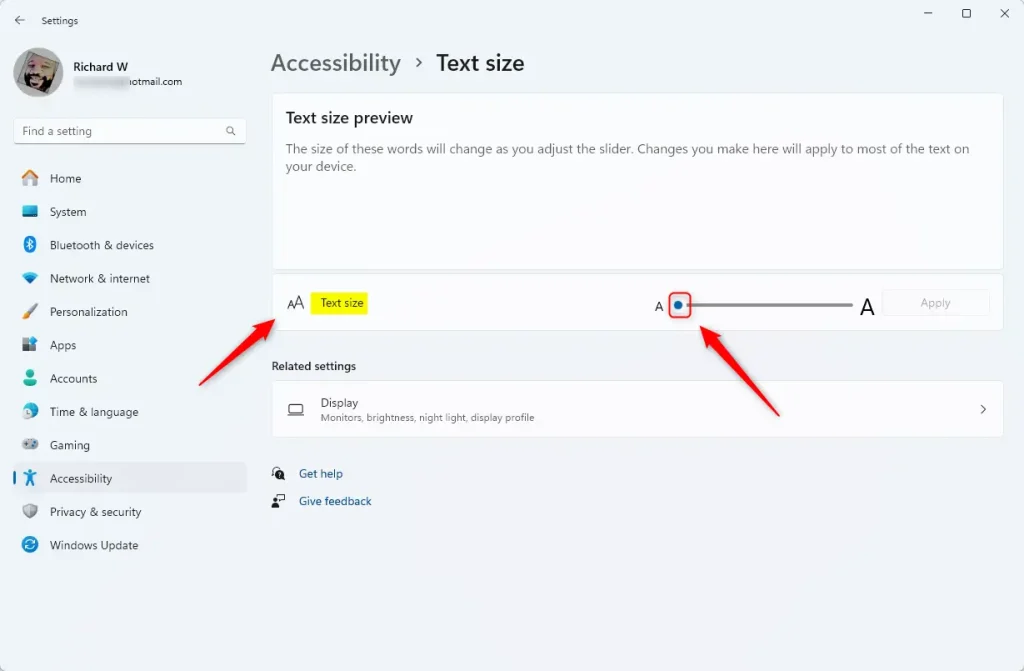
- Use the slider. Drag the slider bar to the right to make text bigger, or to the left to make it smaller. It runs from 100% (the default) up to 225%. Try a small increase first, such as 125% or 150%, since a big jump can make some windows crowded.
- Check the preview. Just below the slider is a preview box. It updates as you drag and shows how text will look at your new size. If it still looks too small, keep dragging until it reads comfortably.
- Apply your changes. When you are happy with the size, click the Apply button. The screen may show a brief “Please wait” message while Windows updates, then your menus, apps, and windows will redraw at the new size. You don’t need to sign out or restart. To undo it later, return to this page, set the slider to 100%, and click Apply again.
Here is what the Accessibility Text size screen looks like:
And here is the slider you use to change the text size:
What Happens When You Change Text Size?
Once you click Apply, the new size takes effect across Windows. Menus, buttons, and the words in most programs scale together.
If one app still looks too small, check its own settings for a zoom or font size option.
If you want everything larger, including icons and images, that is a different setting. Look for Scale under System and then Display in Settings. Text size alone only enlarges the words.
For more tips on using Windows 11, visit the Windows Settings guide.
Summary
Changing text size in Windows 11 takes a minute and makes reading more comfortable. Open Settings, go to Accessibility and then Text size, set the slider, and click Apply. If the result isn't right, set the slider back to 100% and apply again.
Have a question about this guide?
Answered by AI from this guide. Good questions may be added to this page — please don't include personal details.
Did this guide fix your problem?

About the Author
Richard
Tech Writer, IT Professional
Richard is a writer at Geek Rewind who turns complex IT tasks into clear, step-by-step guides. He draws on years of hands-on experience in system administration and enterprise IT operations, focusing on Windows, Linux and WordPress: the problems people actually run into, and the fixes that work. His server and WordPress guides come from systems he runs himself. Richard builds and maintains the platform behind Geek Rewind, from its Ubuntu servers and Nginx configuration to its custom WordPress plugins. Many new tutorials start with readers' questions, and he's always glad to answer them in the comments.
No comments yet — be the first to share your thoughts!