How to Show or Hide Empty Drives in Windows 11
Showing or hiding empty drives in Windows 11 lets you declutter your File Explorer.
This feature controls whether drives without any files or folders appear in your File Explorer window.
Many people choose to hide empty drives, like a USB stick that’s currently not in use, to make navigating their computer simpler and quicker.
Windows 11 provides a straightforward setting to manage this visibility.
Open Settings and navigate to System > For developers, then toggle “Show empty drives.” Alternatively, open File Explorer, click the three dots, select Options, go to the View tab, and check or uncheck “Hide empty drives.
What Are Empty Drives?
Empty drives in Windows 11 are storage slots that show up in File Explorer but don’t actually hold any files or data.
Why Manage Drive Visibility?
You should manage drive visibility to keep your File Explorer tidy and make it easier to find the drives you actually use.
Best Method for Your Needs
| Method | Best For | Difficulty |
|---|---|---|
| Settings App | Quick toggling | Easy |
| File Explorer Options | Standard users | Easy |
| Registry Editor | Advanced power users | Hard |
| PowerShell | Automation | Advanced |
Method 1Using the Settings App
- Press Windows key + I to open Settings.
- Click System on the left.
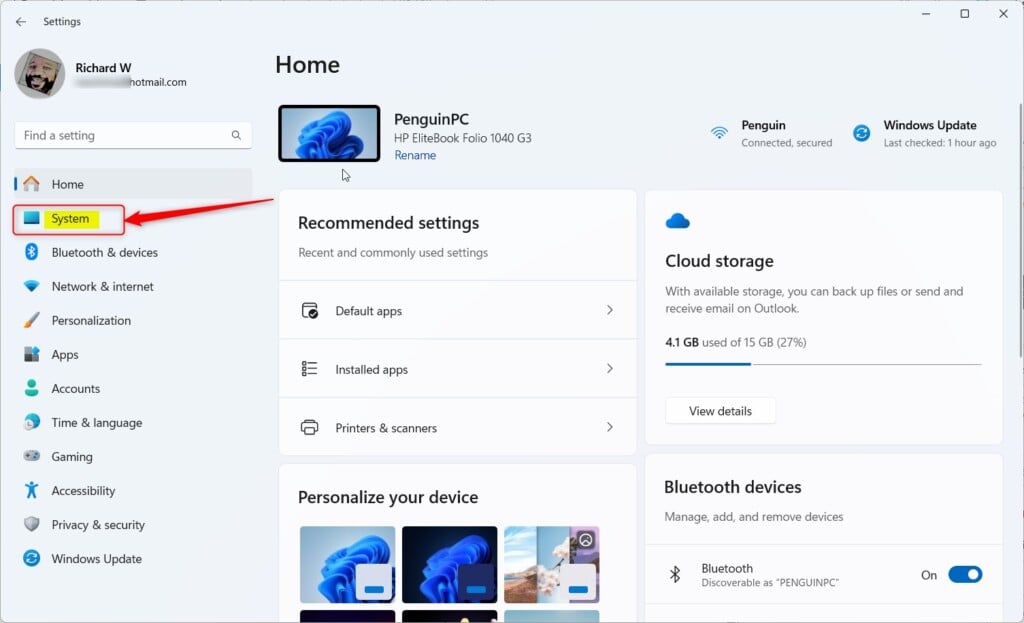
Windows 11 Settings app System button location - Select For developers.
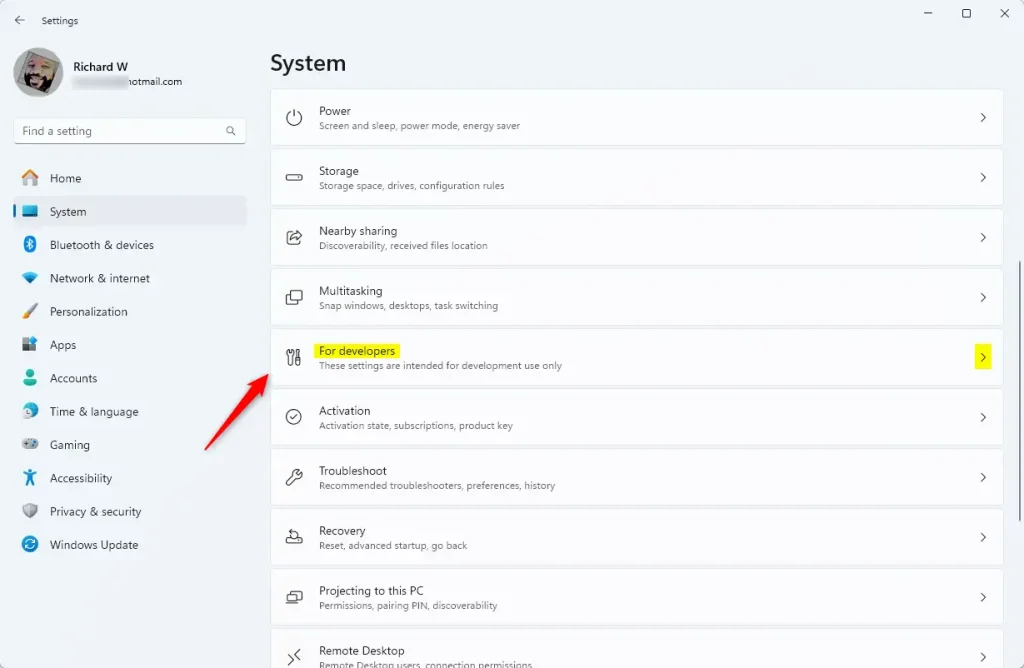
Windows 11 For developers tile - FLAG: Admin privileges may be required Expand the File Explorer section.
- Toggle Show empty drives to your preference.
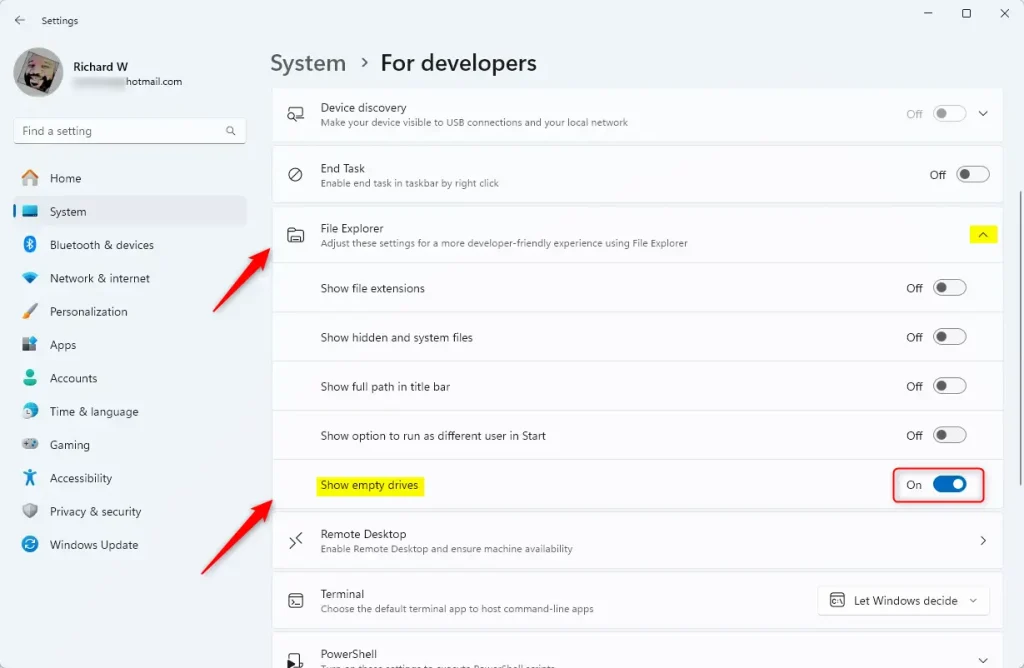
show empty drives tile
Method 2Using File Explorer Options
You can hide or show empty drives in Windows 11 using the File Explorer Options. First, open File Explorer. Click the three dots (…) in the top menu and select Options. Then, go to the View tab. Find the setting "Hide empty drives" and check or uncheck it to change whether empty drives appear.

Method 3Advanced Registry Configuration
You can show or hide empty drives in Windows 11 by changing a setting in the Registry Editor. This tool lets you adjust how Windows works, but you need to be careful when using it to avoid making mistakes.
- Press Windows key + R, type regedit, and hit Enter.
- Navigate to: 🗝️HKEY_CURRENT_USER\Software\Microsoft\Windows\CurrentVersion\Explorer\Advanced
- Find the DWORD named HideDrivesWithNoMedia.
- Set the value to 1 to hide or 0 to show.
Method 4Using PowerShell
# To hide empty drives
Set-ItemProperty -Path 'HKCU:\Software\Microsoft\Windows\CurrentVersion\Explorer\Advanced' -Name 'HideDrivesWithNoMedia' -Value 1
Troubleshooting Common Issues
If your drives still appear, check your Disk Management settings. Sometimes, a drive is not empty but simply lacks a file system. If you see a card reader that won’t go away, you may need to update your card reader drivers in Device Manager.
Summary
Keeping your Windows 11 File Explorer tidy involves managing empty drives, which you can do easily through Settings or more advanced registry tweaks.
Does hiding empty drives affect external hard drives?
No. This setting only hides drives that have no media inserted or no data structure. If your external hard drive is plugged in and has files, it will remain visible in File Explorer regardless of this setting. It only affects empty slots like card readers or unformatted partitions.
Why do my card reader slots show up as empty drives?
Windows assigns a drive letter to every available slot in a multi-card reader to ensure they are ready for use. If no card is inserted, Windows treats the slot as an empty drive. This is normal behavior for hardware controllers that reserve drive letters for potential storage media.
Is it safe to modify the registry to hide drives?
Modifying the registry to hide drives is generally safe if you follow the exact steps, but it’s always best to create a restore point first.
Was this guide helpful?

About the Author
Richard
Tech Writer, IT Professional
Richard, a writer for Geek Rewind, is a tech enthusiast who loves breaking down complex IT topics into simple, easy-to-understand ideas. With years of hands-on experience in system administration and enterprise IT operations, he’s developed a knack for offering practical tips and solutions. Richard aims to make technology more accessible and actionable. He's deeply committed to the Geek Rewind community, always ready to answer questions and engage in discussions.


No comments yet — be the first to share your thoughts!