How to Enable Generative AI Access in Windows 11


Generative AI access in Windows 11 controls which desktop apps can share your personal data with built-in artificial intelligence features. Available on Windows 11 version 23H2 and later, this privacy control lets you block or allow specific programs from using your personal files to feed AI tools.
You manage these permissions in the main Settings app . This stops unwanted programs from reaching your data. If you manage several PCs or user accounts, you can also set the rule system-wide with Group Policy or the registry, both covered below.
Open Settings , navigate to Privacy & security, then Generative AI. Toggle the main switch to On or Off to control access for all apps, or manage individual app permissions below.
What is App Access to Generative AI?
Generative AI access is a privacy setting that controls which apps can use intelligent tools to create text and pictures. Microsoft puts it under your privacy settings so you can block or allow individual programs from using AI features on your computer.
Starting with Windows 11 build 26236 (Canary), Microsoft added a Generative AI section to Privacy & security settings. It lets users control which apps can use AI features.
This section is rolling out in stages, so it may not be on every PC. If you can’t find it later in this guide, your build probably doesn’t include it yet. Check Settings Windows Update to see whether you are on the latest build for your channel.
Why Would You Want to Control This?
You can turn the AI access setting on or off to suit your workflow. Some people want AI features available in their apps. Others turn them off for privacy or performance reasons. Neither choice is permanent, and you can switch at any time.
Method 1Use the Settings App
Enabling generative AI access with the Settings app takes a few clicks. You open Settings, go to the privacy section, and turn on generative AI access. After that, individual programs can use intelligent tools to build content on your computer.
Once it is enabled, apps can use generative AI features. You still decide app by app, as described below.
- Open the Settings app. Click the Start menu and select Settings, or press Windows key + I. The Settings window opens with a list of categories on the left.
- Click Privacy & security on the left side. The privacy options appear on the right.
- Find the Generative AI tile on the right and click it to expand it. If you don't see it, your Windows build doesn't have this section yet.
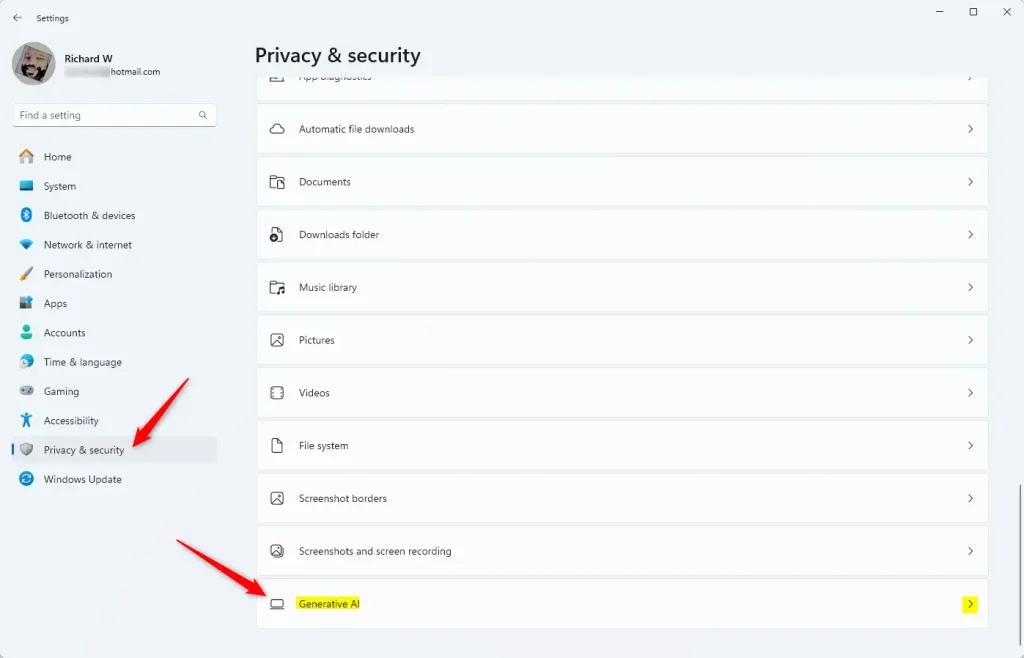
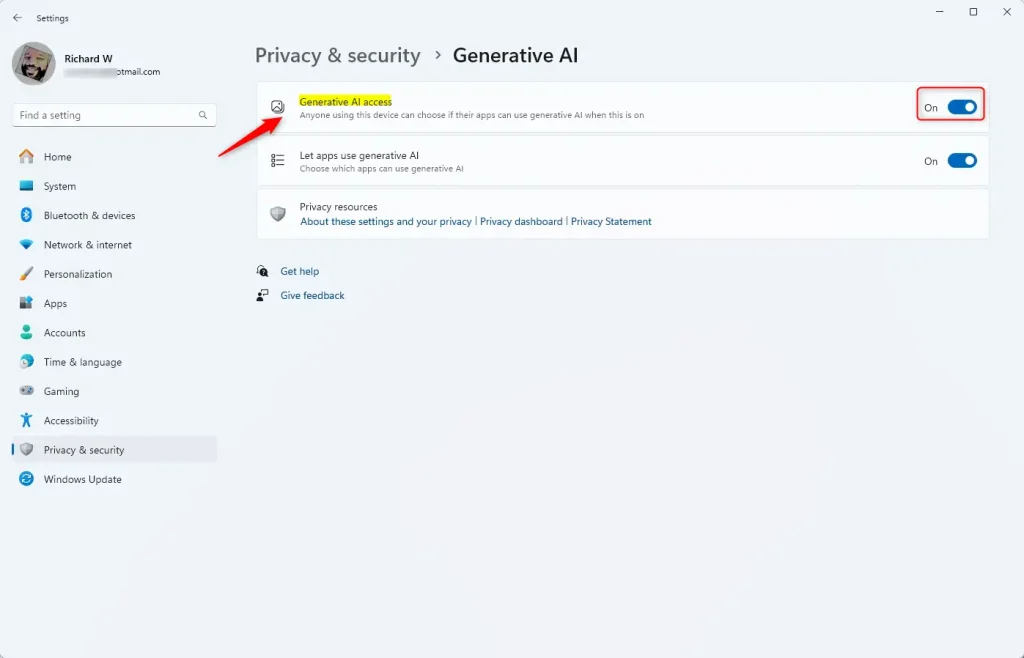
- Click the Generative AI access tile. Use the switch to turn it On or Off for all users. The switch label changes to show the new state.
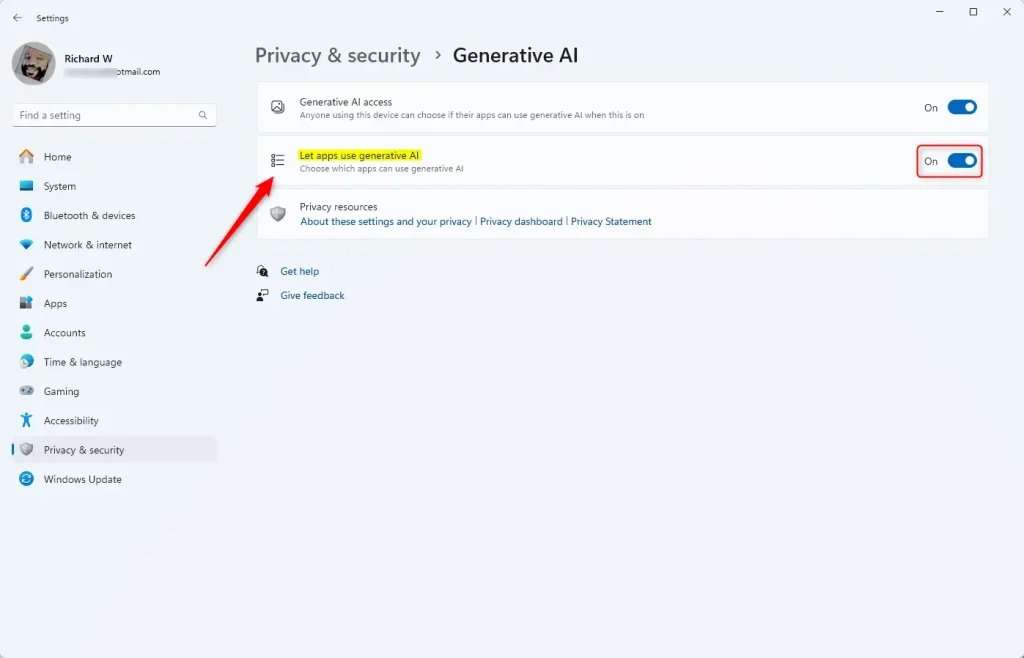
- Click Let app use generative AI to choose which apps can use AI. A list of apps appears. Turn individual apps on or off with the switch next to each one.
If the switches are greyed out, an administrator has probably set a policy that overrides your choice. See the Group Policy section below.
- Close the Settings app when you are finished. Changes in Settings apply right away, and you don't need to restart. To undo them, come back to the same page and flip the switches back.
Method 2Use the Local Group Policy Editor
To manage generative AI access for every user account at once, use the Local Group Policy Editor. Administrators can use it to force-allow or force-deny AI features for all users on the computer with a single rule.
This policy applies to the entire system, so individual users can't override it in Settings.
The Local Group Policy Editor is only included in Windows 11 Pro, Enterprise and Education. Windows 11 Home doesn't have it, so Home users should use Settings or the registry instead.
⚠️ Admin privileges required
- Open the Local Group Policy Editor. Click Start, type Edit group policy, and select the matching result. The editor opens with a folder tree on the left.
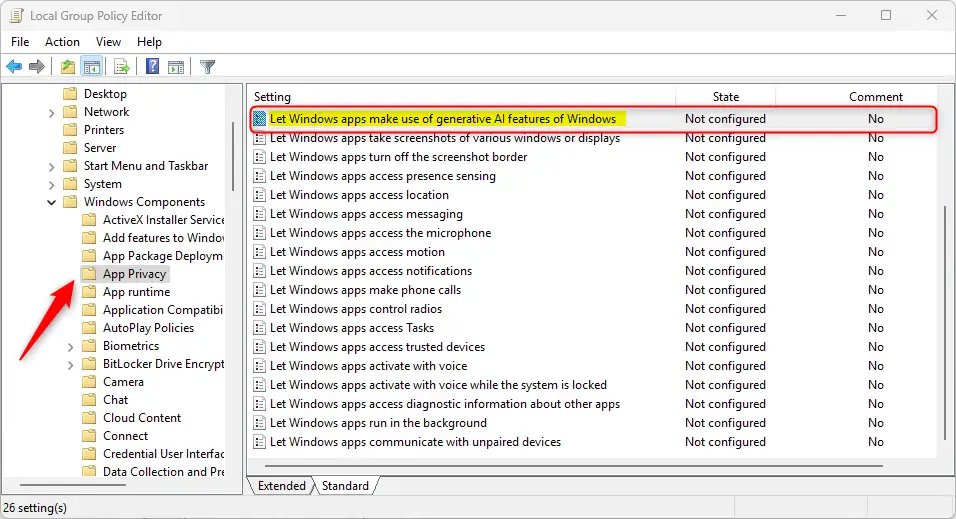
- Navigate to Computer Configuration Administrative Templates Windows Components App Privacy The policies in that folder are listed in the right pane.
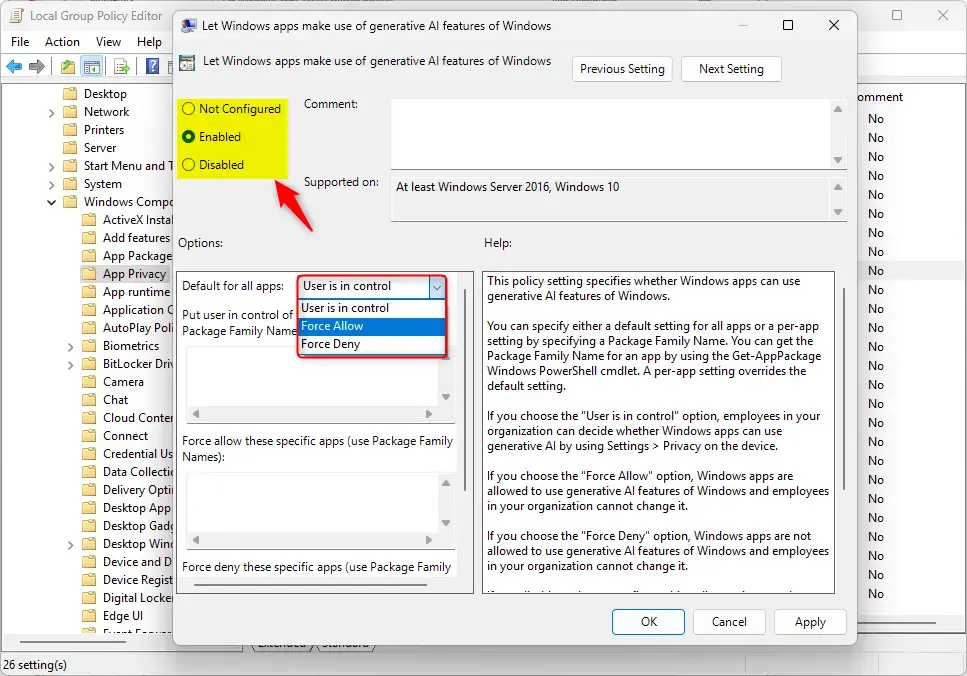
- In the right pane, find and double-click Let Windows apps make use of generative AI features of Windows. A settings window for that policy opens.
- Choose one of these options:
- Not Configured (default) – Users decide if apps can use AI.
- Enabled – Choose one of these:
- Force Allow – Apps can use AI. Users cannot change this.
- Force Deny – Apps cannot use AI. Users cannot change this.
- Disabled – Users decide if apps can use AI.
To undo a forced setting later, return to this policy and select Not Configured.
- Click OK to save. You may need to restart your computer before the policy takes effect. If a user is signed in, signing out and back in can also be enough.
Method 3Use the Windows Registry Editor
The Windows Registry gives you another way to configure system-wide AI behavior. It is the option to use on Windows 11 Home, which has no Group Policy Editor.
Specific registry values control whether apps keep access to AI features. These values are the same ones the policy and Settings pages use, so a registry change can show up in those places too.
⚠️ Admin privileges required
Back up the registry before you change anything. In Registry Editor, choose File Export and save a copy, or create a restore point first. Incorrect registry edits can cause problems, and a backup lets you undo them. Restart the PC after making changes so they apply everywhere.
For All Users:
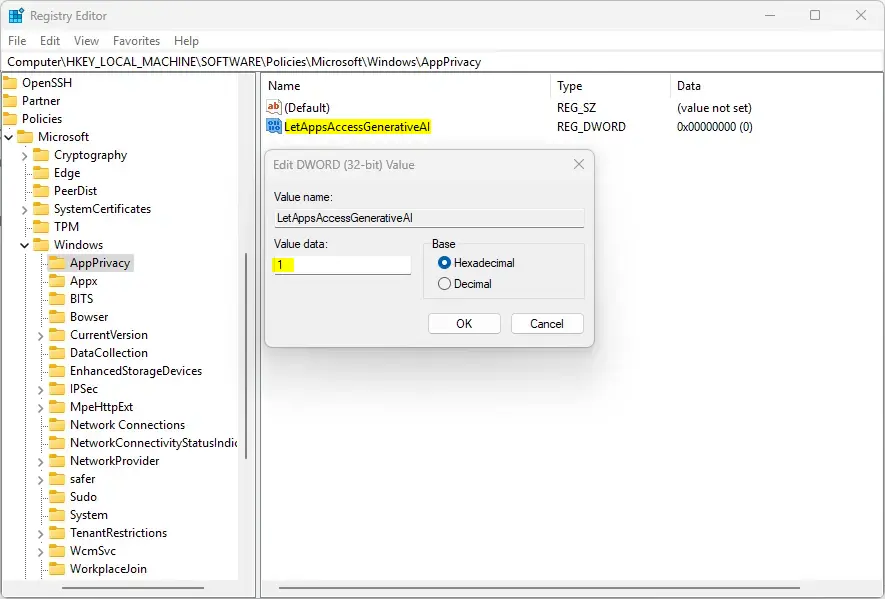
Enabling generative AI access for all users on a Windows 11 computer requires a registry change in the local machine hive. Navigate to Computer\HKEY_LOCAL_MACHINE\SOFTWARE\Policies\Microsoft\Windows\AppPrivacy and adjust the value to control AI permissions globally.- In the Registry Editor, navigate to this location:
Computer\HKEY_LOCAL_MACHINE\SOFTWARE\Policies\Microsoft\Windows\AppPrivacy - In the right pane, double-click "LetAppsAccessGenerativeAI" (DWORD 32-bit Value).
- Type
1to enable AI access. Type2to disable it. - If you don't see "LetAppsAccessGenerativeAI", right-click in the blank area and create a new DWORD (32-bit) Value. Name it "LetAppsAccessGenerativeAI" and enter
1or2.
- Save your changes and restart your computer.
Summary
Managing generative AI access in Windows 11 is possible through the Settings app, the Group Policy Editor, or the Registry Editor. The Settings app works best for individual programs, while the policy and registry options let you control AI permissions for all users at once.
- Settings App: The easiest method. Control AI access for individual apps.
- Local Group Policy Editor: Control AI access for all users at once. Requires admin access.
- Registry Editor: Direct control over AI settings. Requires admin access.
Choose the method that best suits specific workflow preferences. All three options enable administrators and users to toggle AI features on or off according to operational requirements.
For the Current User Only:
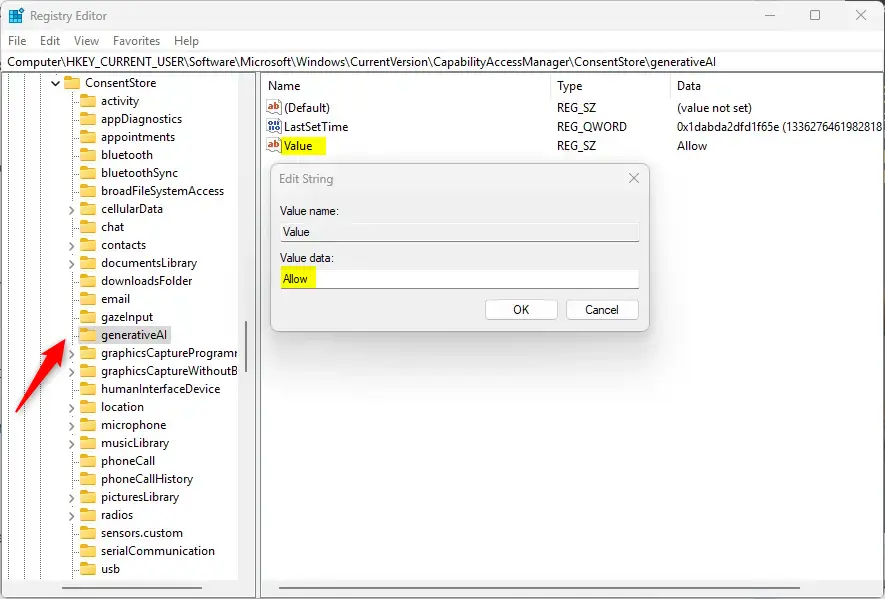
Changing generative AI access for a single user account in Windows 11 involves editing a specific registry key. Open the Registry Editor and go to Computer\HKEY_CURRENT_USER\Software\Microsoft\Windows\CurrentVersion\CapabilityAccessManager\ConsentStore\generativeAI to update the settings for your personal account.- Open the Registry Editor as administrator. Search for "regedit" on the Start menu.
- Navigate to this location:
Computer\HKEY_CURRENT_USER\Software\Microsoft\Windows\CurrentVersion\CapabilityAccessManager\ConsentStore\generativeAI - In the right pane, double-click the "Value" string to open it.
- Type
Allowto turn on AI access. TypeDenyto turn it off. - If you don't see "Value", right-click in the blank area and create a new String Value. Name it "Value" and enter
AlloworDeny.
For All Users:
Enabling generative AI access for all users on a Windows 11 computer requires a registry change in the local machine hive. Navigate to Computer\HKEY_LOCAL_MACHINE\SOFTWARE\Policies\Microsoft\Windows\AppPrivacy and adjust the value to control AI permissions globally.- In the Registry Editor, navigate to this location:
Computer\HKEY_LOCAL_MACHINE\SOFTWARE\Policies\Microsoft\Windows\AppPrivacy - In the right pane, double-click "LetAppsAccessGenerativeAI" (DWORD 32-bit Value).
- Type
1to enable AI access. Type2to disable it. - If you don't see "LetAppsAccessGenerativeAI", right-click in the blank area and create a new DWORD (32-bit) Value. Name it "LetAppsAccessGenerativeAI" and enter
1or2.
- Save your changes and restart your computer.
Summary
Managing generative AI access in Windows 11 is possible through the Settings app, the Group Policy Editor, or the Registry Editor. The Settings app works best for individual programs, while the policy and registry options let you control AI permissions for all users at once.
- Settings App: The easiest method. Control AI access for individual apps.
- Local Group Policy Editor: Control AI access for all users at once. Requires admin access.
- Registry Editor: Direct control over AI settings. Requires admin access.
Choose the method that best suits specific workflow preferences. All three options enable administrators and users to toggle AI features on or off according to operational requirements.
Have a question about this guide?
Answered by AI from this guide. Good questions may be added to this page — please don't include personal details.
Did this guide fix your problem?

About the Author
Richard
Tech Writer, IT Professional
Richard is a writer at Geek Rewind who turns complex IT tasks into clear, step-by-step guides. He draws on years of hands-on experience in system administration and enterprise IT operations, focusing on Windows, Linux and WordPress: the problems people actually run into, and the fixes that work. His server and WordPress guides come from systems he runs himself. Richard builds and maintains the platform behind Geek Rewind, from its Ubuntu servers and Nginx configuration to its custom WordPress plugins. Many new tutorials start with readers' questions, and he's always glad to answer them in the comments.
No comments yet — be the first to share your thoughts!