How to Enable or Disable Diagnostics Access in Windows 11

Managing diagnostic data access in Windows 11 lets you control what information apps can see and what leaves your computer. Windows has more than one diagnostics-related setting, so it helps to know which one you are changing. This tutorial covers the App diagnostics setting. It can be changed in Settings, in Group Policy, or in the registry.
Open Settings , go to Privacy & security, then App diagnostics. Use the toggle switch to enable or disable app diagnostics access for your user account.
What is App Diagnostics Access?
App diagnostics access lets applications share performance data so developers can track down bugs and fix crashes. In practice, the setting controls whether apps can read diagnostic information about your other running apps, such as which processes are running and how much of the system’s resources they use.
Diagnostic tools check system health by gathering information about running apps. They show how different applications interact, which is useful for troubleshooting or performance analysis.
Turning this access off helps protect your privacy. It stops apps from collecting diagnostic information about the other software on your PC. Most everyday apps keep working normally without it. A few system utilities, monitoring tools and troubleshooters may ask for it, and you can turn it back on if one stops working.
This setting is separate from the Windows diagnostic data you send to Microsoft, which is under Privacy & security > Diagnostics & feedback. Changing one does not change the other.
How to Turn On or Off App Diagnostics Access (Using Settings)
The Settings app is the simplest method and works on every edition of Windows 11, Home and Pro. No restart is needed. Go to Privacy & security, then select App diagnostics.
- Open Settings: Click the Start menu (Windows icon) at the bottom left, then click Settings. Or press Windows key + I to open Settings directly. The Settings window opens with a list of categories on the left.
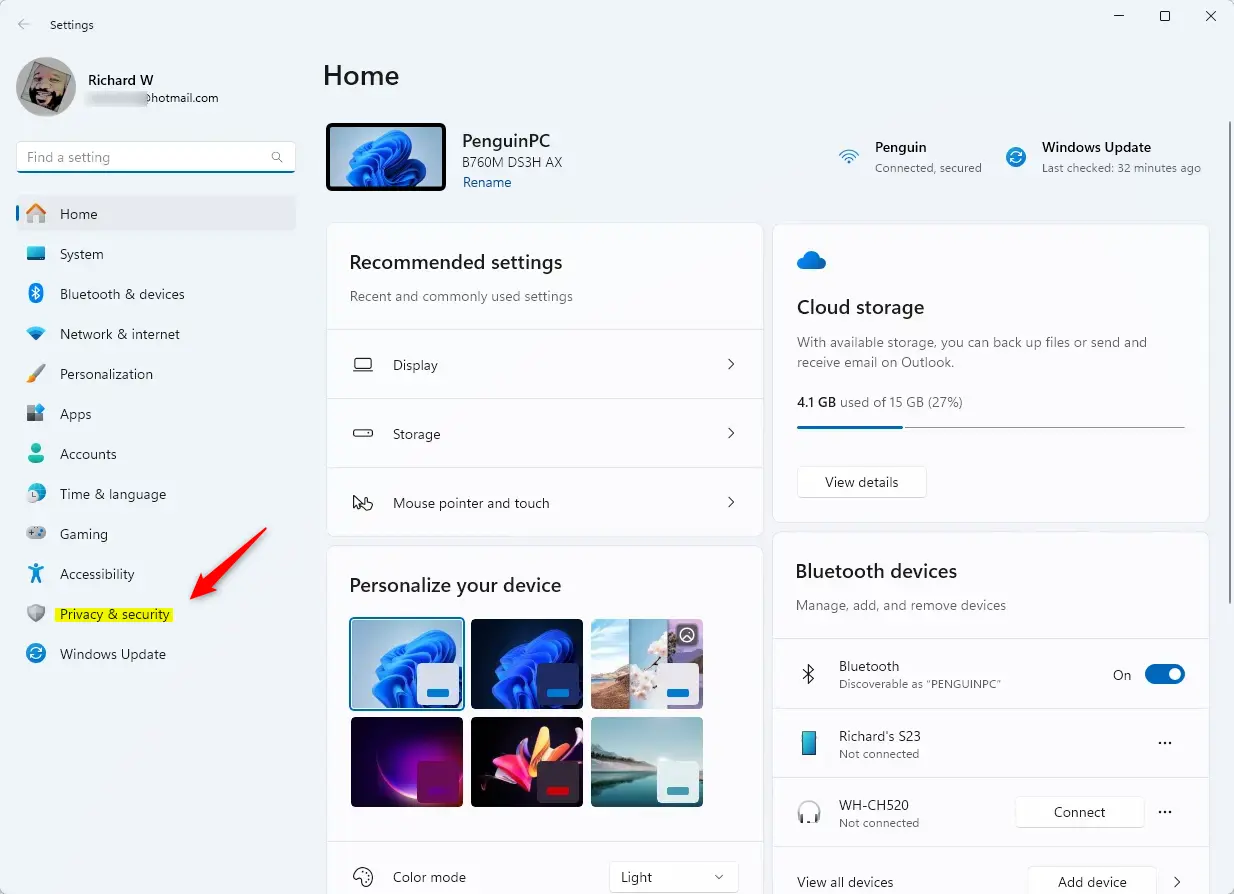
- Go to Privacy & security: In the Settings window, click Privacy & security on the left side. The privacy options appear on the right.
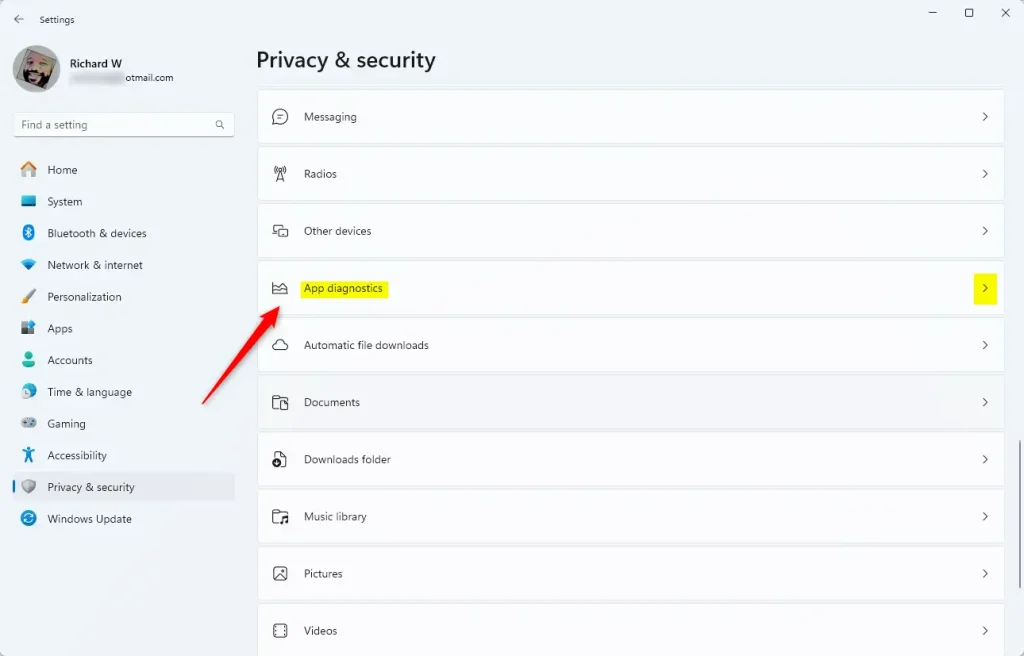
- Find App diagnostics: Scroll down on the right, under the App permissions group, and click App diagnostics. The App diagnostics page opens.
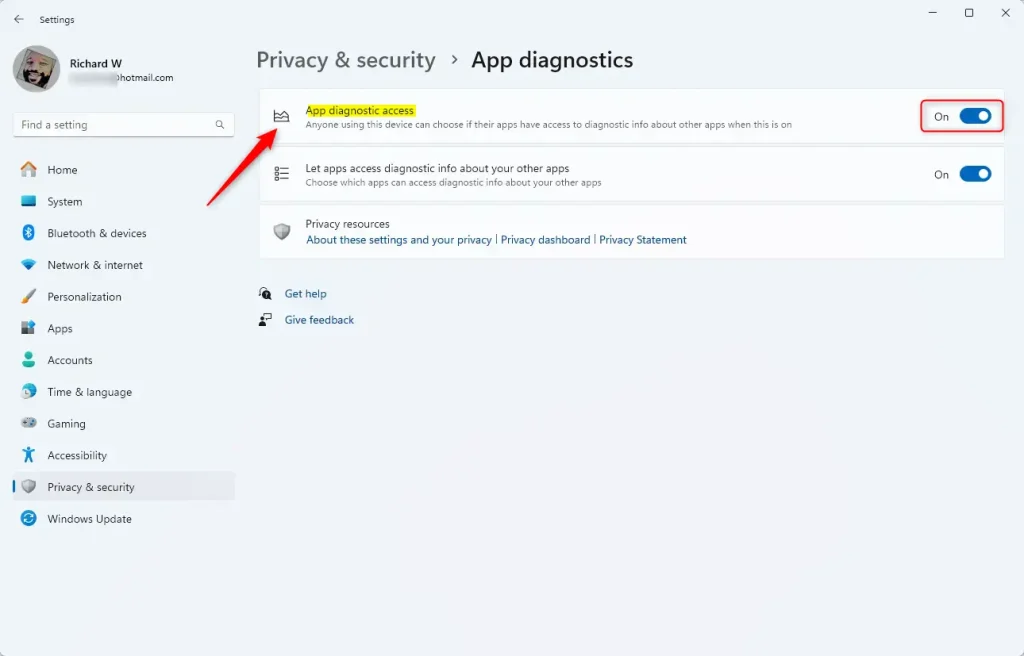
- Turn App diagnostics access on or off: Use the toggle switch under App diagnostics access to set it to On or Off. The switch label changes right away, and nothing needs to be saved.
- Control access for the current user: If you want to control diagnostics only for your own user account, use the toggle for Let apps access diagnostic info about your apps below it. If you see a list of apps on the page, you may also be able to allow or block individual apps there.
- Close Settings: When you are done, close the Settings window.
If the toggles are greyed out, or you see the message "Some settings are managed by your organization", a Group Policy or registry setting (see the next two methods) is overriding the page. On a work PC, your administrator controls it. On your own PC, change or remove the policy to get the toggles back. To undo any change here, flip the same toggle back.
How to Turn On or Off App Diagnostics Access (Using Group Policy Editor)
Use this method if you want to set the policy for every user on the PC, or manage several PCs. The Local Group Policy Editor is only included in Windows 11 Pro, Enterprise and Education. Windows 11 Home does not have it, so Home users should use the Settings or Registry method. You need an administrator account.
- Open Group Policy Editor: ⚠️ Admin privileges required Click the Start menu, type Edit group policy, and press Enter. The Local Group Policy Editor window opens. If nothing is found, you are probably on Home edition.
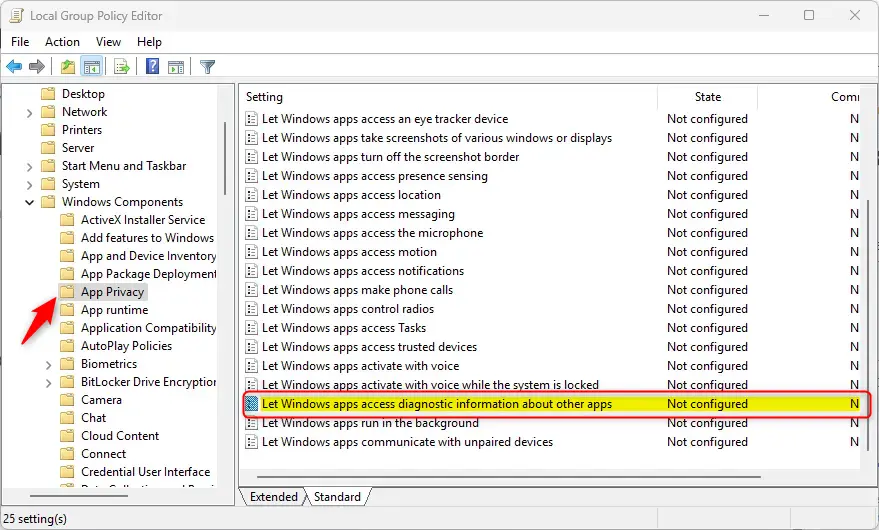
- Navigate to the setting: In the left pane, go to Computer Configuration Administrative Templates Windows Components App Privacy The policies for that folder are listed on the right.
- Find the policy: Scroll the list and double-click Let Windows apps access diagnostic information about other apps. The policy's settings window opens.
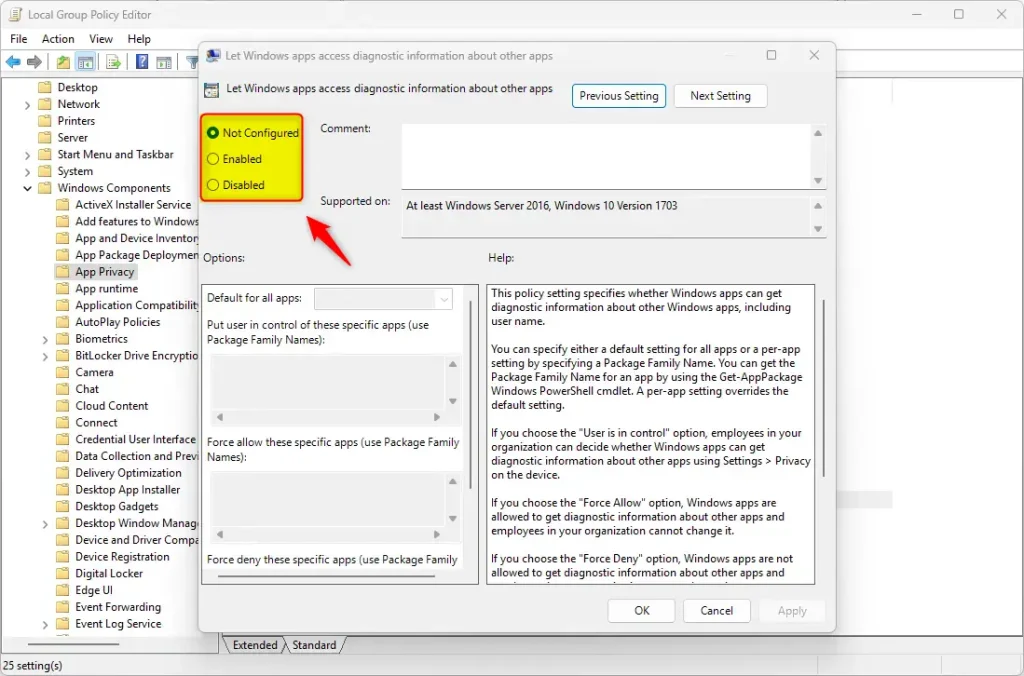
- Choose your option:
- Not Configured - Use Windows default settings.
- Enabled with Force Allow - Turns on diagnostics access for all users.
- Enabled with Force Deny - Turns off diagnostics access for all users.
- Disabled - Turns off the policy (similar to Not Configured).
- Click OK to save. The policy list now shows the new state.
When you pick Enabled, a drop-down list appears in the Options area. That is where you choose Force Allow or Force Deny. The change usually takes effect after you sign out and back in, or restart. To undo it, set the policy back to Not Configured. Once a policy is set, the toggles on the Settings page will be locked.
How to Turn On or Off App Diagnostics Access (Using Registry Editor)
The registry method works on all editions, including Home. Be careful here, because a wrong change in the registry can cause problems. Create a restore point first. You need an administrator account.
- Open Registry Editor: ⚠️ Admin privileges required Press Windows key + R, type
regedit, and press Enter. Click Yes if User Account Control asks for permission. Registry Editor opens. - Go to this folder: Browse to
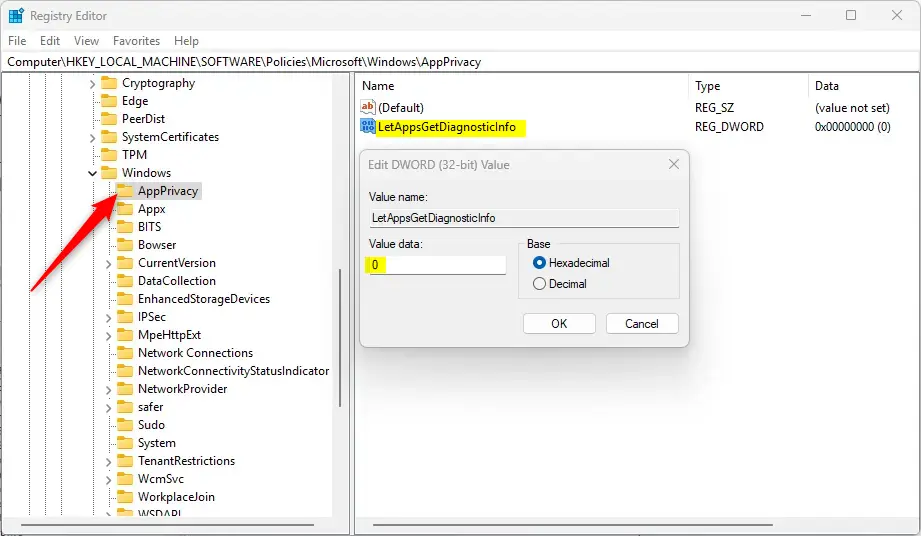
HKEY_LOCAL_MACHINE\SOFTWARE\Policies\Microsoft\Windows\AppPrivacyin the left pane. If you prefer, paste it into the address bar at the top of the window. If the AppPrivacy key does not exist, right-click its parent key, choose New Key, and name it AppPrivacy. - Create or edit a DWORD: Right-click in the empty area on the right of the AppPrivacy key and choose New DWORD (32-bit) Value. Name it
LetAppsGetDiagnosticInfo. If the value already exists, skip creating it and just edit it. - Set the value: Double-click the new DWORD and enter the number in the Value data box:
1to turn on App diagnostics access2to turn it off
- Close Registry Editor and restart your computer to apply the changes.
To undo the change, set the value back or delete the DWORD you created, then restart. Deleting it returns the setting to the Windows default.
Summary
App diagnostics in Windows 11 helps developers improve apps by collecting usage information, and you maintain control over this. Use the Settings app, Group Policy Editor, or Registry Editor to manage your privacy settings. Settings is the easiest and works on every edition. Group Policy and the registry are better for enforcing the setting across all users.
What happens when you turn it off? Your apps stop sharing diagnostic information, which increases your privacy and control over your computer data. If a utility that depends on this access stops working, turn the setting back on.
How to control it: Turn this feature on or off in Windows 11 using Settings, the Local Group Policy Editor, or the Registry Editor. If a policy or registry value is set, it overrides the Settings page.
Important reminder: Back up your data or create a restore point before making system changes.
Controlling diagnostic data sharing on a Windows 11 PC allows you to determine the amount of information applications send. This control ensures privacy by letting you decide which app activities are reported. For example, you might choose to limit the sharing of browsing history to protect personal preferences.
Reference: Microsoft Support - Windows App Diagnostics and Privacy
Was this guide helpful?

About the Author
Richard
Tech Writer, IT Professional
Richard is a writer at Geek Rewind who turns complex IT tasks into clear, step-by-step guides. He draws on years of hands-on experience in system administration and enterprise IT operations, focusing on Windows, Linux and WordPress: the problems people actually run into, and the fixes that work. His server and WordPress guides come from systems he runs himself. Richard builds and maintains the platform behind Geek Rewind, from its Ubuntu servers and Nginx configuration to its custom WordPress plugins. Many new tutorials start with readers' questions, and he's always glad to answer them in the comments.



No comments yet — be the first to share your thoughts!