How to Delete Diagnostic Data in Windows 11

Diagnostic data in Windows 11 is the background information your PC collects and sends to Microsoft about your hardware, apps, and how you use the system. Clearing this data removes your stored activity history from Microsoft servers. Blocking future reports is a separate job. Deleting does not switch collection off, so the later sections cover how to cut down or stop what Windows sends from now on.
Windows 11 saves this telemetry to help fix bugs and improve performance, but you can delete it at any time to keep your private information off Microsoft servers. For the basic cleanup you only need the Settings app, and it takes a few clicks. The service, registry and Group Policy methods are for people who also want to limit what gets sent afterwards.
Open Settings , go to Privacy & security, then Diagnostics & feedback, and click Del diagnostic data. This clears your local diagnostic history.
Why Remove 🪟 Windows 11 Diagnostic Data?
Why do this? You might want to stop Microsoft from tracking your habits. You might also want to ensure no sensitive system information remains on their servers. This is also common before you sell, hand down or repurpose a PC.
What happens when done? Your local and cloud-based diagnostic history is cleared, giving you a cleaner privacy profile. Windows will start collecting new data again unless you also turn off optional diagnostics or use one of the advanced methods below.
Required vs. Optional Diagnostic Data
Windows 11 collects two kinds of diagnostic data: required and optional.
Required diagnostic data is the minimum Microsoft says it needs to keep Windows secure, up to date and working properly. In the Settings app you cannot turn this level off.
Optional diagnostic data adds more detail, such as how you use apps and features and extra information for troubleshooting crashes. You can switch this off at any time under Settings Privacy & security Diagnostics & feedback by turning off Send optional diagnostic data. If privacy is your goal, do that before or right after you delete your data.
How to Delete Diagnostic Data via Settings
This is the easiest way to clear your history. It works on both Home and Pro, needs no admin tools, and needs no restart. It deletes the diagnostic data Windows has collected from this device. It does not change what Windows collects afterwards.
- Open Settings. The quickest way is to right-click the Start button and choose Settings, or press Win + I.
- Go to Privacy & security in the left-hand list. The privacy options appear on the right.
- Click Diagnostics & feedback. You should see the diagnostic data toggles, followed by sections such as View diagnostic data and Delete diagnostic data.
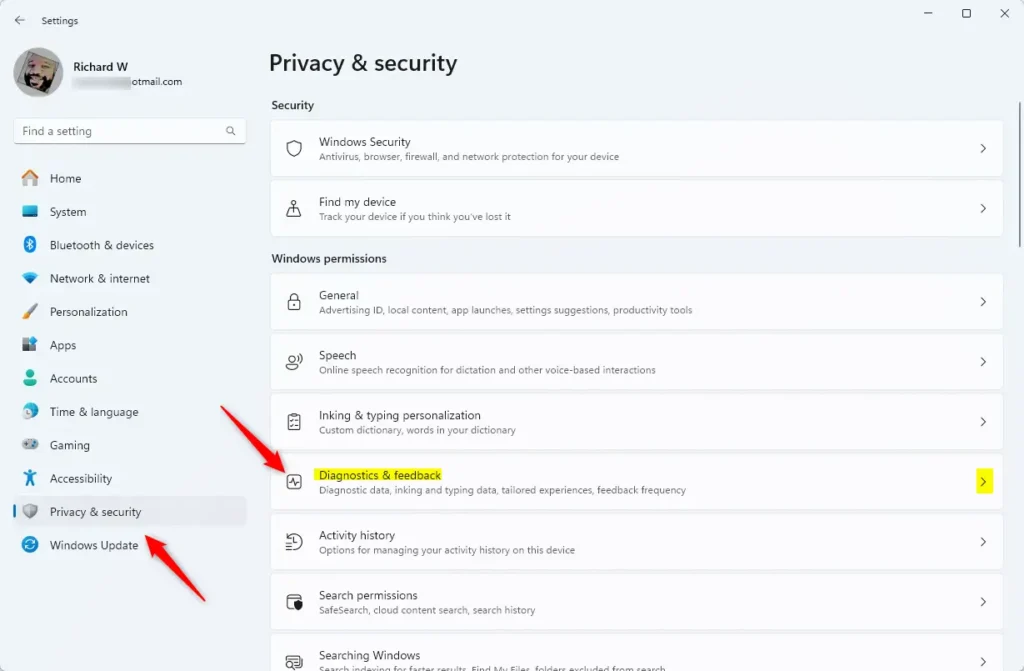
Windows 11 Diagnostics & Feedback settings tile location - Select Delete diagnostic data. The section expands and shows the Delete button. You may need to scroll down to reach it.
- Click the Delete button. Windows removes the data right away and usually shows a check mark or a confirmation next to the button. There is no undo, but Windows will simply start collecting fresh data.
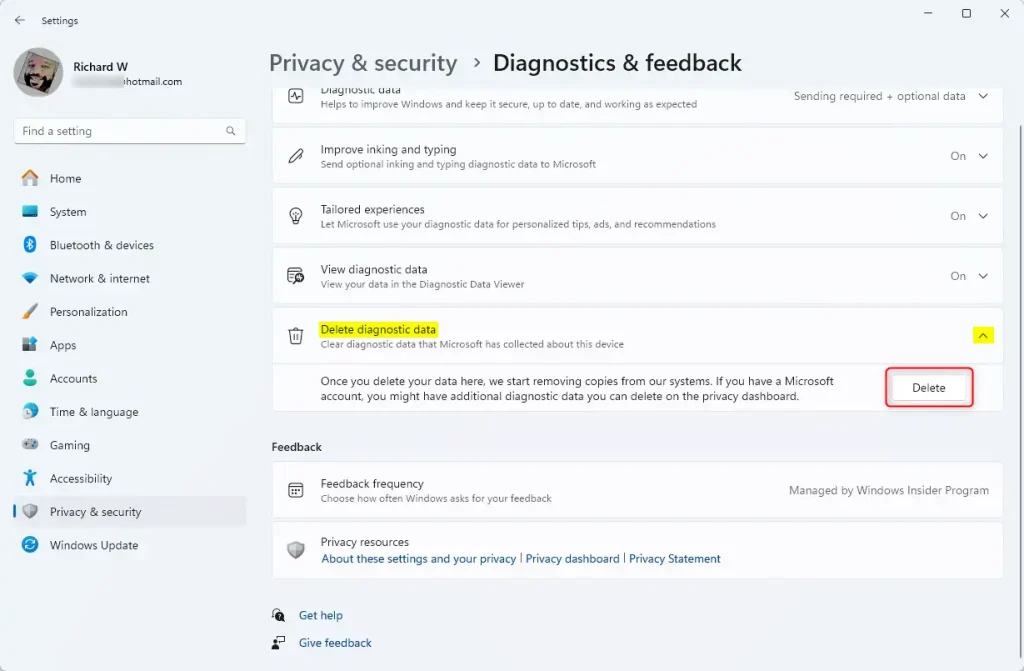
Delete diagnostic data in Windows 11
Advanced Telemetry Disabling
For power users, you can stop the telemetry service entirely. This service is the part of Windows that gathers and sends diagnostic data, so stopping it halts that activity on the PC. Note: This requires admin privileges. It works on Home and Pro. Some Windows updates or feature changes may re-enable the service, so check it again after major updates.
- Press Win + R, type services.msc, and hit Enter. The Services window opens. If Windows asks for admin approval, accept it.
- Find Connected User Experiences and Telemetry. The list is alphabetical, so look under the C entries.
- Right-click it and select Properties. A dialog opens on the General tab.
- Set Startup type to Disabled and click Stop. Then click Apply and OK. The Service status should now read Stopped. To undo this later, set Startup type back to Automatic and click Start.
Using the Registry Editor
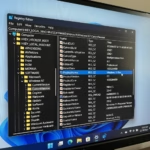
You can disable telemetry via the registry. Be careful, as incorrect changes can cause system issues. Before you start, back up the registry: in Registry Editor choose File Export, pick All as the export range, and save the file somewhere safe. Double-clicking that file later restores the backup.
HKEY_LOCAL_MACHINE\SOFTWARE\Policies\Microsoft\Windows\DataCollection
Go to the key shown above. In the right-hand pane, right-click an empty area and choose New > DWORD (32-bit) Value. Create a new DWORD (32-bit) Value named AllowTelemetry. Then double-click it and set it to 0. If a value with that name already exists, just double-click it and change the data instead of creating another one.
Restart the PC so the change takes effect. Be aware that on Windows 11 Home and Pro, Microsoft treats a value of 0 as the Required level, because only Enterprise and Education editions can fully turn diagnostic data off. To undo the change, delete the AllowTelemetry value or restore your exported backup.
Using Group Policy Editor
Using the Group Policy Editor is the fastest way to remove Windows 11 diagnostic data if you have Windows 11 Pro or Enterprise. This built-in tool lets you turn off telemetry so your computer stops sending usage reports to Microsoft. You just need to open the policy console and change one setting to block this data collection completely.
Windows 11 Home does not include the Group Policy Editor. If gpedit.msc will not open, you are probably on Home, so use the registry method instead. As with the registry, Microsoft only honors the lowest diagnostic level fully on Enterprise and Education. On Pro, the setting reduces data to the Required level.
- Press Win + R, type gpedit.msc, and hit Enter. The Local Group Policy Editor opens.
- Navigate to Computer Configuration Administrative Templates Windows Components Data Collection and Preview Builds. Policy settings appear in the right-hand pane when you select that folder.
- Double-click Allow Telemetry and set it to Disabled. On some builds this policy is named Allow Diagnostic Data. Click Apply and OK, then restart the PC. If the policy offers an Enabled option with a diagnostic data level, choose the lowest level your edition lists. To undo this, set the policy back to Not Configured.
These programs provide a simple interface to toggle privacy settings without manual configuration. Download them only from the developers' own sites, and create a restore point first so you can roll back if a setting causes trouble.
Summary
Removing Windows 11 diagnostic data helps you regain control over your privacy. By using the Settings app, you can clear existing data. For advanced users, the Registry or Group Policy Editor offers deeper control, and stopping the telemetry service goes further still. Always remember to visit the Microsoft Privacy Dashboard to manage your cloud data as well. You will need to sign in with your Microsoft account to see and clear what is stored there.
Was this guide helpful?

About the Author
Richard
Tech Writer, IT Professional
Richard is a writer at Geek Rewind who turns complex IT tasks into clear, step-by-step guides. He draws on years of hands-on experience in system administration and enterprise IT operations, focusing on Windows, Linux and WordPress: the problems people actually run into, and the fixes that work. His server and WordPress guides come from systems he runs himself. Richard builds and maintains the platform behind Geek Rewind, from its Ubuntu servers and Nginx configuration to its custom WordPress plugins. Many new tutorials start with readers' questions, and he's always glad to answer them in the comments.


No comments yet — be the first to share your thoughts!