How to Clear Cloud Synced Settings in Microsoft Account

Cloud synced settings in your Microsoft account store personal data such as desktop wallpapers, passwords, and language choices on Microsoft servers, so your preferences follow you to other PCs. Clearing this data stops old setups from carrying over when you install a fresh copy of Windows 11 or set up a new computer.
You can also manage the sync side of this on the PC itself. In Windows 11, open Settings Accounts Windows backup The options there control whether this PC keeps backing up and syncing your settings. The steps below remove what is already stored in the cloud.
To clear cloud synced settings, sign in at account.microsoft.com/devices, scroll to the Cloud synced settings section, and click Clear stored settings, then Clear. Your current wallpaper, language and saved Wi-Fi networks on your PCs stay in place; only the cloud copy that a new or reset PC would download is deleted.
Before You Begin
If you have more than one account (a personal one and an old one from years ago, for example), it is easy to wipe the wrong one. The data is deleted from the account, not from one browser tab.
Clearing the stored copy does not change the settings already on your PCs. Your current wallpaper, language, and saved Wi-Fi networks stay where they are. What goes away is the cloud backup that a new or reset PC would pull down.
Why Clear Cloud Synced Settings?
These are the usual times to clear cloud synced settings:
- You are selling or giving away a computer and don’t want your preferences to follow you or the buyer.
- You are setting up a new device and want a clean start instead of inheriting an old configuration.
- You want old configurations removed from Microsoft servers for privacy reasons.
- Sync has been misbehaving and you want to reset it.
How to Clear Cloud Synced Settings
To clear cloud synced settings, go to your Microsoft device page and remove the saved data from the cloud. This deletes stored preferences such as passwords and themes from your account, so you can start fresh across all your computers and other devices without old configurations carrying over. The process is the same on Windows 11 Home and Pro, because it happens in your browser on your Microsoft account.
Step 1: Sign in to your Microsoft account
- Open a web browser and go to the account.microsoft.com/devices page.
- Enter your username and password, then complete any verification prompt your account asks for.
- Check the name or email shown at the top right of the page. If it is the wrong account, sign out and sign in again with the correct one.
You should now see the Devices page for your account, with your registered PCs listed.
Step 2: Clear stored settings
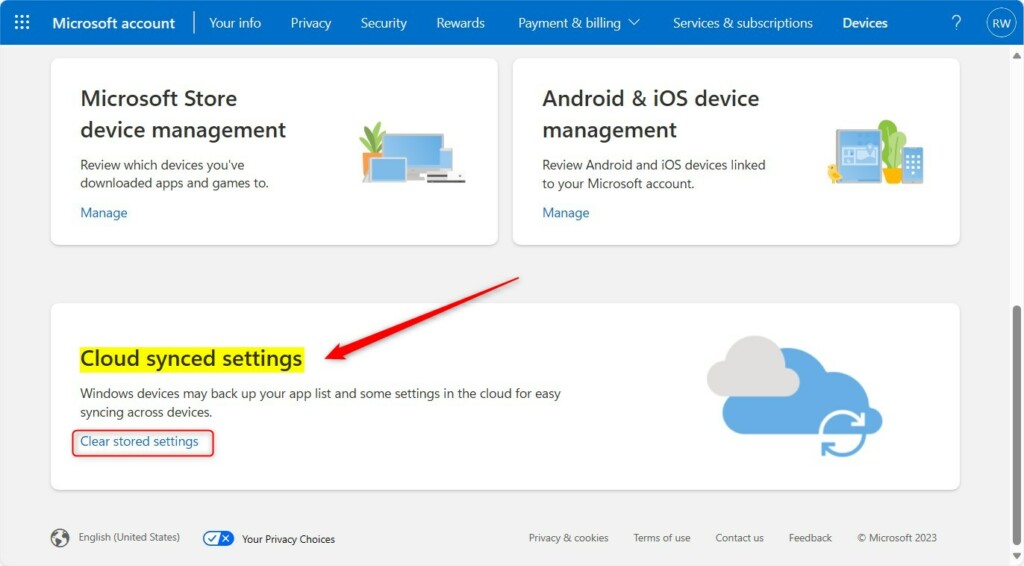
- On the Devices page, scroll down until you find the Cloud synced settings section.
- Click the Clear stored settings link.
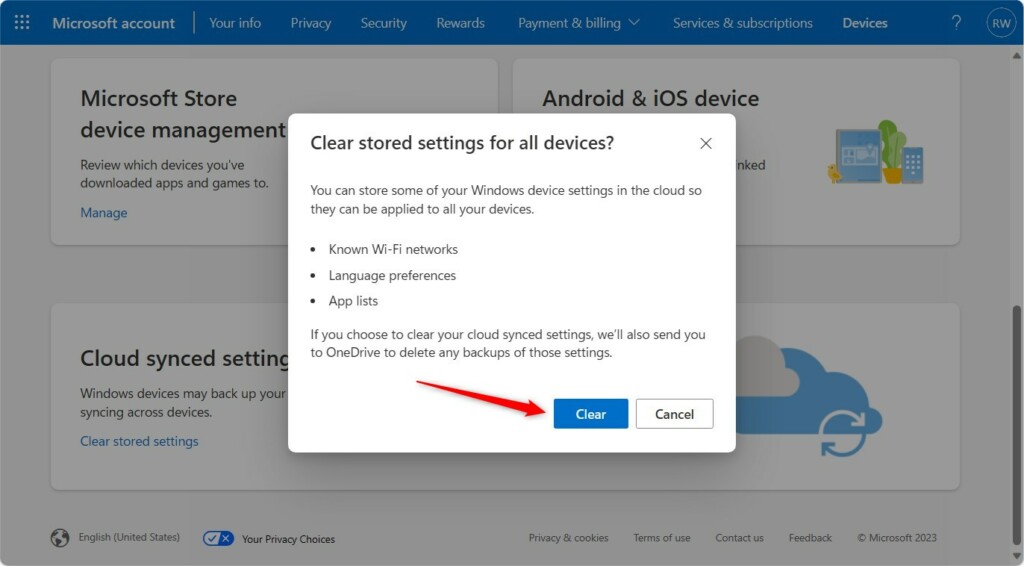
- When the confirmation box appears, click the Clear button.
The confirmation box closes and the page should report that your stored settings were cleared. If you don't see the section at all, make sure you are on the Devices page of the right account and try refreshing the page.
Step 3: Remove settings from OneDrive
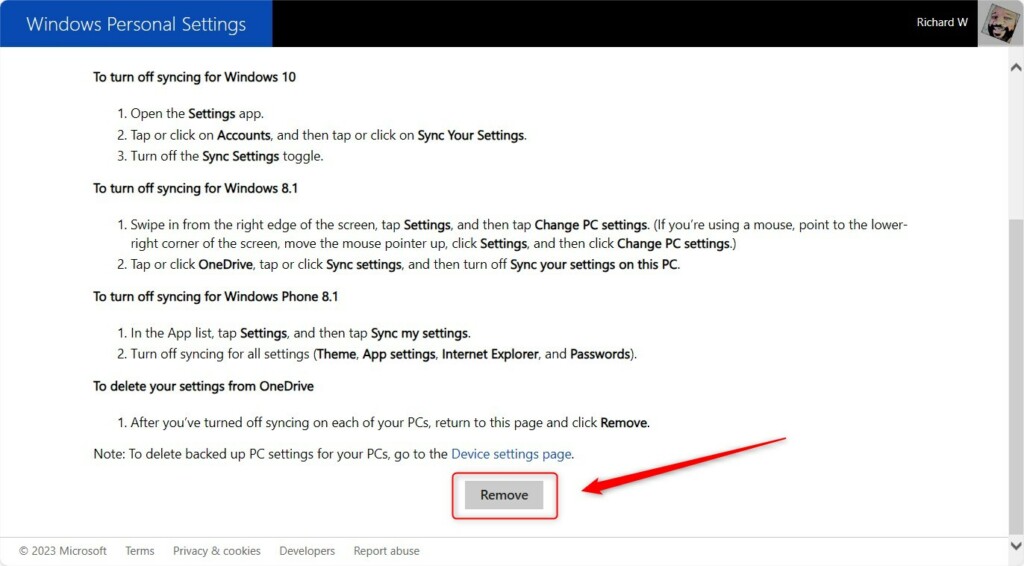
- Open the Microsoft account cloud settings portal at Microsoft account cloud settings portal.
- Scroll to the bottom of the page.
- Click the Remove button.
A confirmation message appears saying your personal settings were removed from the cloud.
Syncing itself is not locked off, though. If your preferences change later, you can turn syncing back on and Windows will upload your current settings again. Until you do, a new or reset PC signing in with this account will start from default settings.
Troubleshooting Failed Deletion and Sync Issues
If a button doesn't respond, or the page loads but nothing happens when you click, the cause is usually the browser rather than your account. Try these in order:
- Open a private browser window (InPrivate in Edge, Incognito in Chrome), sign in again, and repeat the steps.
- If that works, go back to your normal window and clear the cached data for the browser, then try again.
- If it still fails, switch to a different browser or disable extensions such as ad blockers for the Microsoft account pages.
Summary
Clearing cloud synced settings gives you a clean start, can resolve stubborn sync problems, and improves privacy by removing old configurations from Microsoft and OneDrive. If you want to keep sync from rebuilding the data right away, check the Windows backup options on your PC before you sign in on a new device.
Why does the 'Remove' button not respond in the cloud settings portal?
The 'Remove' button for cloud settings might not respond because of browser cache or cookies, so try an Incognito window or clearing browser data.
Does clearing cloud settings delete my local files?
No, clearing cloud-synced settings does not delete local files, photos, or documents stored on your hard drive. It only removes configuration data, such as themes, language preferences, and browser settings, stored on Microsoft servers to help sync experiences across multiple devices.
How long does it take for cloud settings to reset after removal?
The removal process happens almost instantly. Clicking the button and receiving confirmation marks the data for deletion on Microsoft servers. However, connected devices may take a few minutes to stop attempting to sync with the cleared cloud storage profile.
Was this guide helpful?

About the Author
Richard
Tech Writer, IT Professional
Richard is a writer at Geek Rewind who turns complex IT tasks into clear, step-by-step guides. He draws on years of hands-on experience in system administration and enterprise IT operations, focusing on Windows, Linux and WordPress: the problems people actually run into, and the fixes that work. His server and WordPress guides come from systems he runs himself. Richard builds and maintains the platform behind Geek Rewind, from its Ubuntu servers and Nginx configuration to its custom WordPress plugins. Many new tutorials start with readers' questions, and he's always glad to answer them in the comments.
No comments yet — be the first to share your thoughts!