How to Create a Storage Pool in Windows 11

A storage pool in Windows 11 combines two or more physical drives into one pool of space. You then carve virtual drives, called storage spaces, out of that pool. Windows manages the group as one large space, so you don’t have to juggle several drive letters.
You need at least 2 connected drives to build a pool. Depending on the protection type you pick, Windows can also save copies of your data across separate drives, so your files survive if one drive fails. Storage Spaces is built into both Windows 11 Home and Pro, so you don’t need a particular edition.
Open Settings, go to System, then Storage, and finally Advanced storage settings to access Storage Spaces. Click Add to create a new pool, name it, select at least two drives, and choose your desired protection type and size.
How to Create a Storage Pool in 🪟 Windows 11
Here is the short version. Open the Settings app, go to System, and select Storage. Open Advanced storage settings, choose Storage Spaces, and create a new pool. Pick the drives you want to combine, then follow the on-screen steps to set up the new combined drive.
Before you start, check the drives. Any drive you add to a pool is wiped, so copy off anything you want to keep. The drives can be internal or external USB drives, but they must show up as separate physical disks. A partition on your system drive can’t be pooled. Your Windows drive (usually C:) can’t be part of the pool either.
- Open Settings
Click the Start menu and choose Settings. Or press the Win+I on your keyboard. Learn more about opening Settings
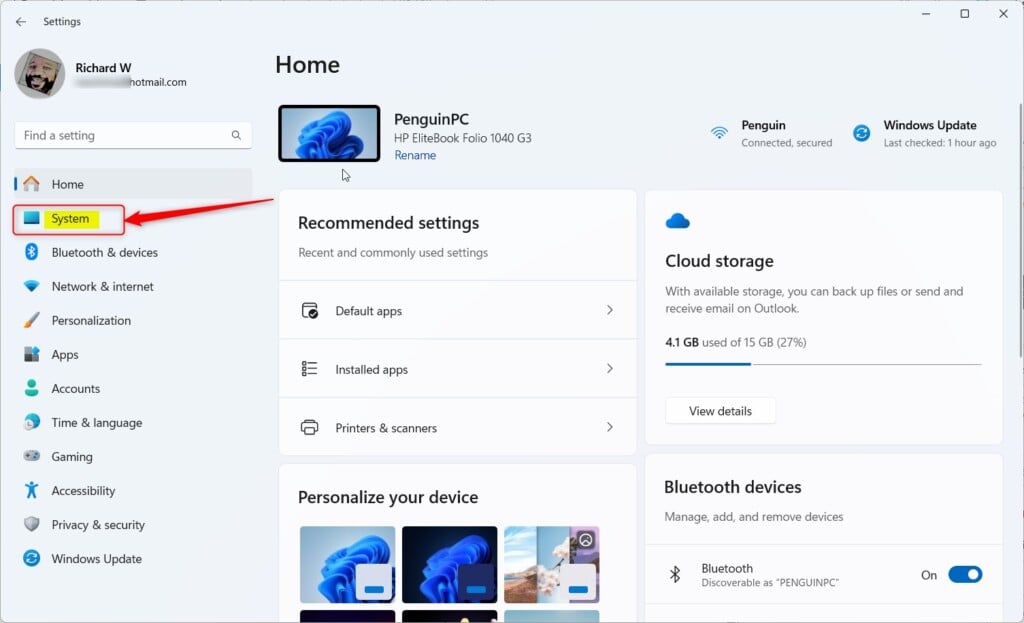
Windows 11 System button in Settings In the left-hand list, click System. The System settings page opens on the right.
- Go to Storage
In the System section, find and click Storage. You will see a bar showing how much space your main drive uses, plus a list of storage categories.
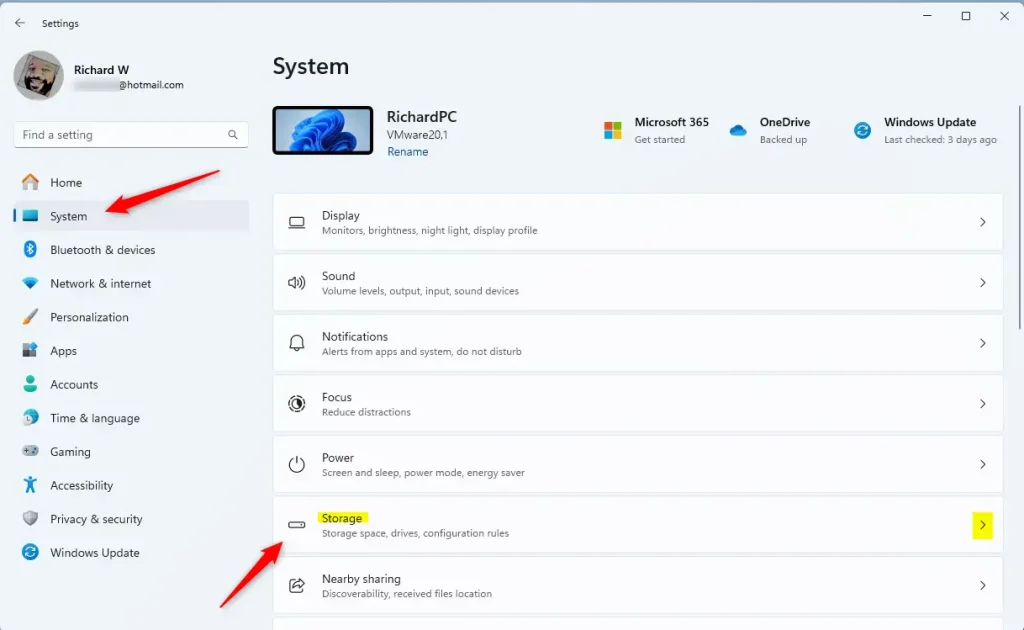
Windows 11 Settings app with System and Storage options highlighted. - Open Storage Spaces
Scroll down and click Advanced storage settings to expand it. Then select Storage Spaces. The Storage Spaces page opens, and any existing pools are listed there.
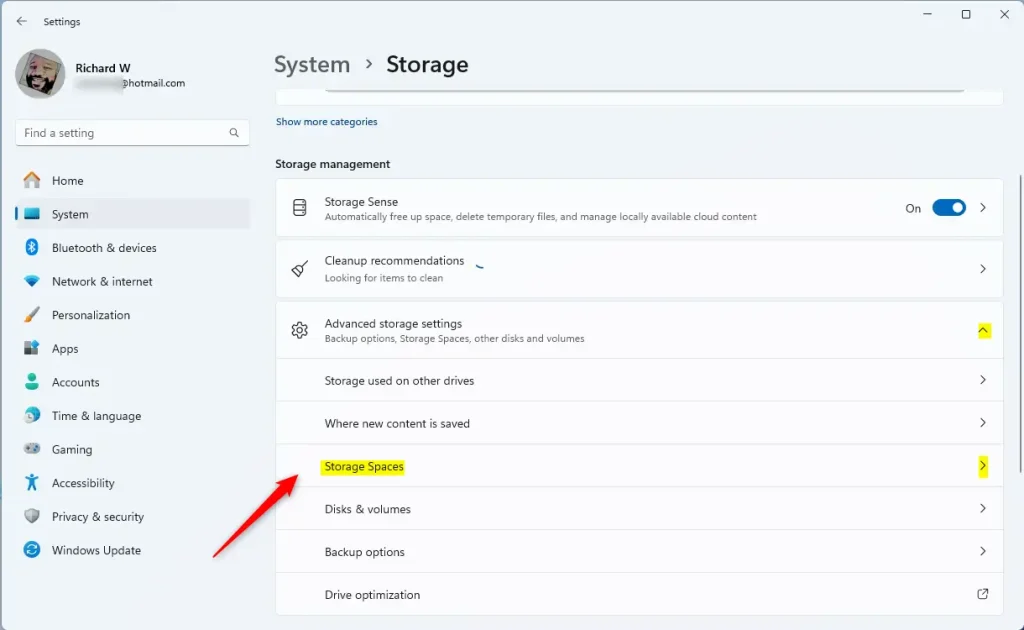
Windows 11 Storage Spaces tile in Settings app - Create a New Storage Pool
Click the Add button under "Add a new Storage Pool." A setup screen opens where you name the pool and choose its drives.
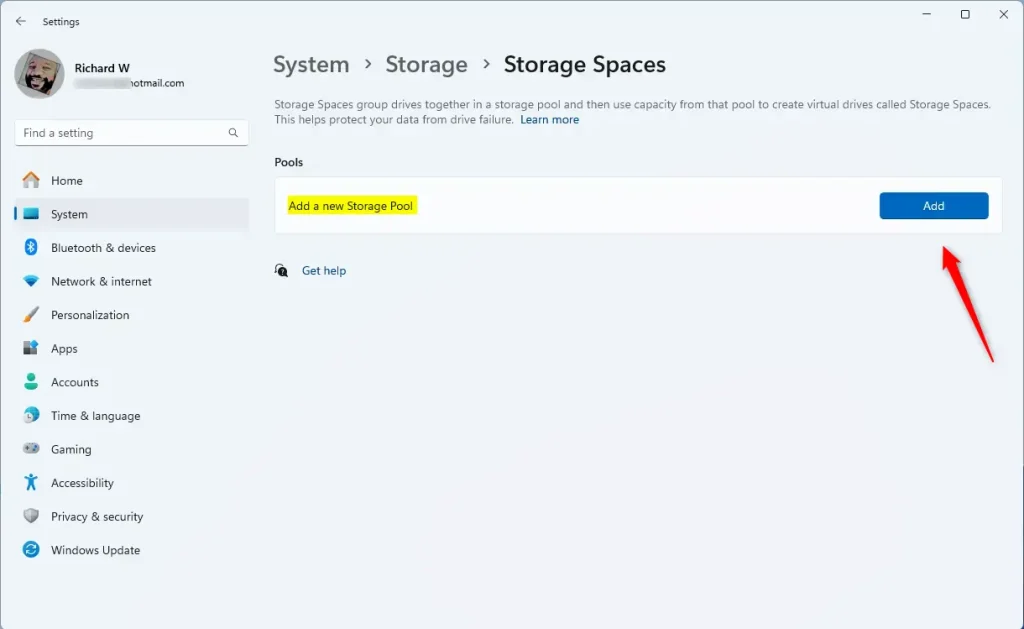
Windows 11 new storage pool button - Name Your Storage Pool and Pick Drives
Enter a name for your new storage pool. Pick something you will recognize later, such as "Media Pool."
Tick the boxes for at least two extra drives. If a drive isn't listed, make sure it is connected and powered on. A drive that already holds a pool or is in use by Windows may not appear. Remember that the drives you tick will be erased.
The drives combine into a larger, unified space. That gives you one location for all your files, which simplifies file management.
Then click Create.
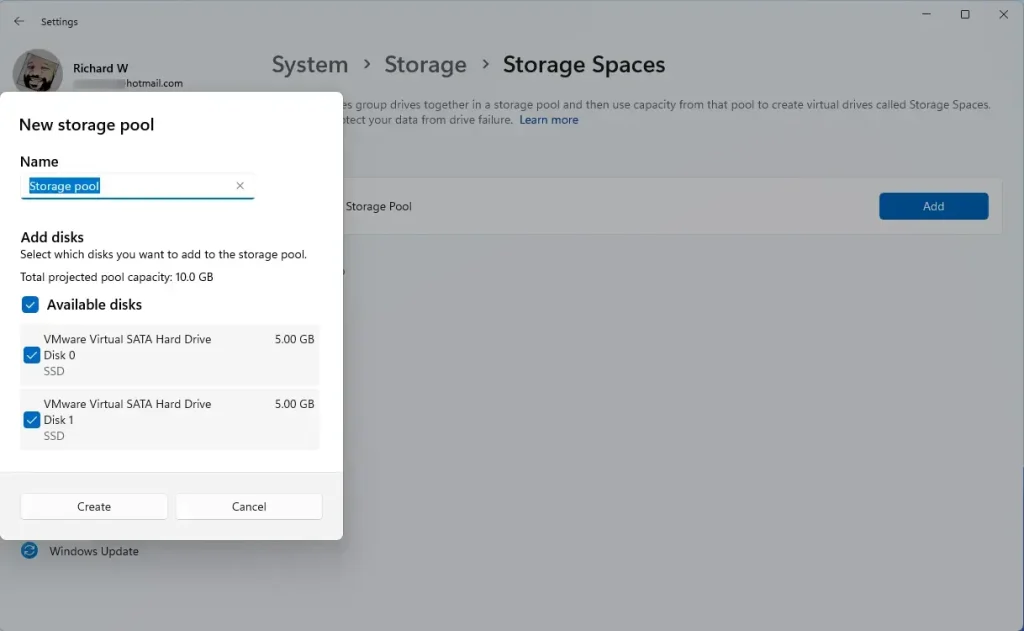
Windows 11 new storage pool disks - Choose Size and Protection Type
Pick the size of your storage space. Then choose how you want to protect your data. The number of drives you ticked in the previous step decides which types are available. If a type is greyed out, you haven't added enough drives for it.
- Simple: Uses at least 2 drives. No data backup. If one drive fails, you lose data.
- Two-way mirror: Uses 2 drives and keeps a backup in case one drive fails.
- Three-way mirror: Needs 5 drives. Protects against two drives failing.
- Parity: Needs 3 drives. Balances protection and speed.
- Dual parity: Needs 7 drives. Protects against two drive failures with good speed.
For most home setups with two drives, two-way mirror is the safe choice. It uses half your raw capacity for the copy, so two 4 TB drives give you about 4 TB of usable space.
Click Create when finished.
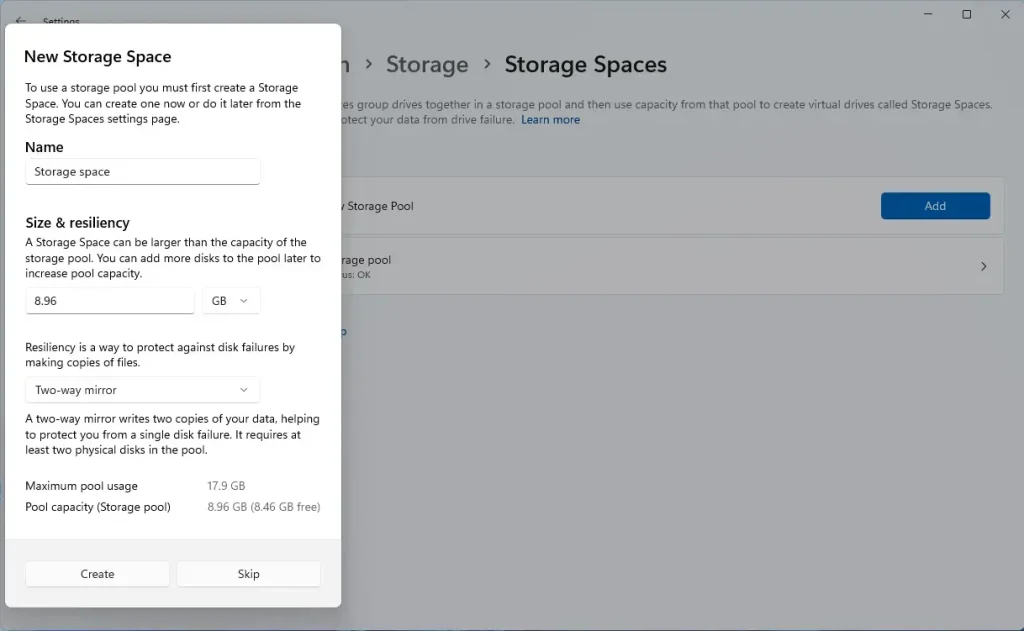
Windows 11 new storage pool options - Set Up Your New Drive
Give your new virtual drive a name. Pick a drive letter like D: or E:. Choose one that isn't already in use.
Choose a format:
- NTFS: Best for Windows computers. It handles large files and large drives well.
- FAT32: Works with some other devices. It can't store a single file larger than 4 GB, so it is a poor fit for big pools.
Then click Format.
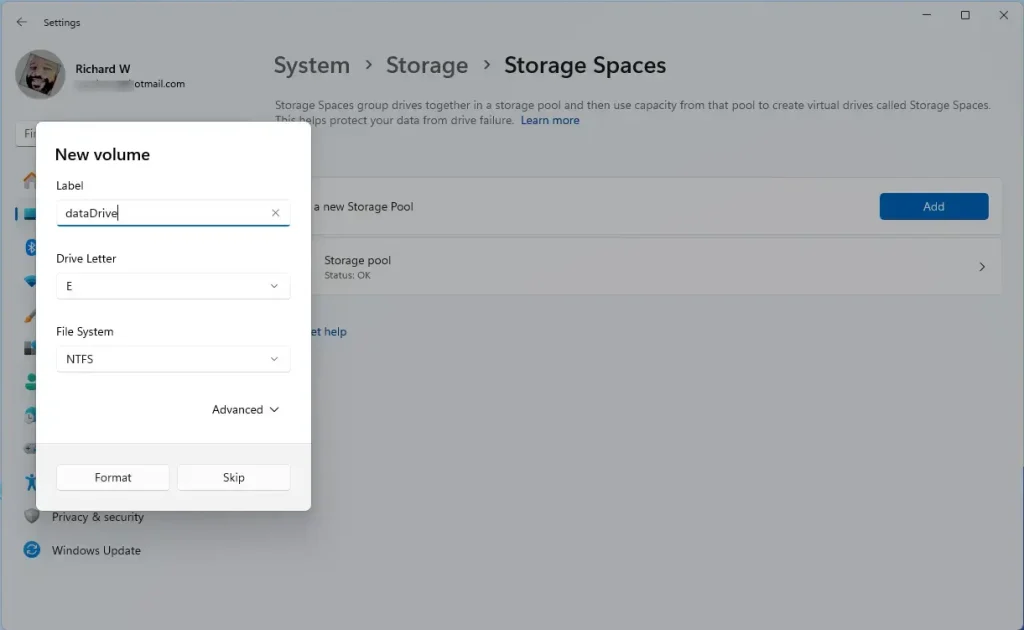
Windows 11 new storage pool drive letter Wait while Windows formats your new storage space. This is quick on small spaces and takes longer on large ones.
- Done!
Your new storage pool will now appear as a drive in File Explorer. Open File Explorer and look under This PC for the drive letter you chose. You can start saving files there just like with any other drive. No restart is needed.
To undo the setup later, go back to the Storage Spaces page, open the pool, and delete the storage space and then the pool. Move your files off first, because deleting them removes the data.
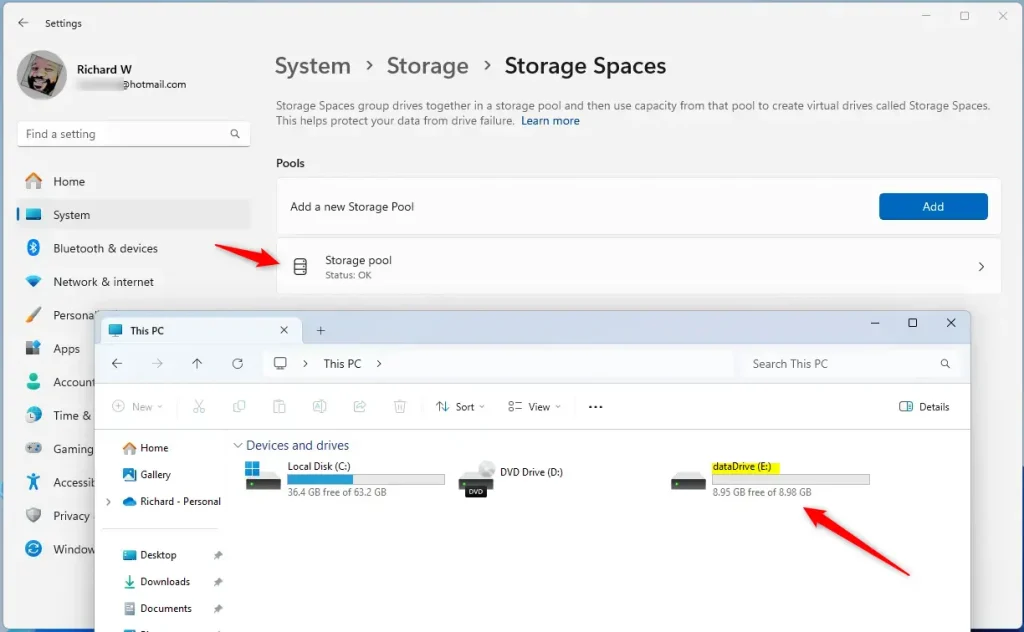
Windows 11 new storage pool complete
Why Use Storage Pools?
- You can combine many smaller drives into one big drive. This makes managing files easier, and you only deal with one drive letter.
- You get extra protection for your files. With a mirror or parity setup, if one drive breaks, your data stays safe. This is not a full backup, though. Deleted files and ransomware affect every copy, so keep a separate backup of anything important.
- You can add more drives later to increase your storage without hassle. The new space only becomes usable once you add the drive to the pool.
More Help
For official details and troubleshooting, visit Microsoft Storage Spaces Support. If a drive is missing from the list or a pool shows a warning, that page is a good place to check next.
Summary
- Storage Pools let you combine multiple drives into one virtual drive in Windows 11.
- They protect your data by keeping extra copies. The protection level depends on the option you choose, and the number of drives limits your choices.
- Setting one up is easy through the Windows Settings app. Just remember that the drives you add are erased.
- Once created, your new storage pool is ready to use. It shows up like a regular drive on your computer.
A storage pool in Windows 11 lets you group multiple physical hard drives together to act as one large virtual drive. This setup makes file management easier and can protect your files from drive failure by saving extra copies of your data across the different disks in the pool. Pick the protection type that fits the number of drives you have, and keep a separate backup of anything you can't afford to lose.
Have a question about this guide?
Answered by AI from this guide. Good questions may be added to this page — please don't include personal details.
Did this guide fix your problem?

About the Author
Richard
Tech Writer, IT Professional
Richard is a writer at Geek Rewind who turns complex IT tasks into clear, step-by-step guides. He draws on years of hands-on experience in system administration and enterprise IT operations, focusing on Windows, Linux and WordPress: the problems people actually run into, and the fixes that work. His server and WordPress guides come from systems he runs himself. Richard builds and maintains the platform behind Geek Rewind, from its Ubuntu servers and Nginx configuration to its custom WordPress plugins. Many new tutorials start with readers' questions, and he's always glad to answer them in the comments.
No comments yet — be the first to share your thoughts!