How to Optimize Storage Pools in Windows 11

Windows 11 Storage Pools perform better when you manage how data is spread across the drives. This guide shows how to optimize a pool in two ways: with the Settings app and with PowerShell. Both take only a few minutes of your time, though the optimization itself can run much longer.
Open Settings System Storage Advanced storage settings Storage Spaces, click your pool, then click the Optimize button. Windows redistributes your data evenly across all drives in the pool, which can take several minutes to hours depending on how much data you have.
What is a Storage Pool?
A storage pool lets you combine several physical drives into one large virtual drive, so you manage one pool instead of many separate disks. Once the pool exists, you can create it, rename it, add drives to it, and expand it. Optimizing is the step that keeps the pool balanced after you make those changes. Storage Spaces is available in both Windows 11 Home and Pro.
With Storage Spaces, you can:
- Create a Storage Pool
- Rename your Storage Pool
- Add more drives to your Storage Pool
- Add extra storage space to your pool
The new drive starts out mostly empty, while the older drives stay full. Optimizing tells Windows to redistribute the data so all drives share the load. That can make the computer faster, and it improves data safety because the information is spread across more than one location.
Why Optimize Your Storage Pool?
When you optimize a pool, Windows spreads your data evenly across all connected drives. No single drive becomes a bottleneck, so file access and saves are faster. A pool with several drives works best when every drive carries a fair share of the work and the space.
Optimizing a pool helps you:
- Use all your drive space efficiently
- Improve your computer's speed
- Lower the chance of losing data if a drive fails (this depends on the resiliency type you chose for your spaces, such as mirror or parity, since a simple space has no protection)
- Balance storage when you add new drives
The best time to optimize is right after you add a drive to the pool. If you have not changed the pool recently, there is usually little to rebalance.
How to Optimize Storage Pools Using Windows Settings
You do not need to type any commands. Make sure you are signed in with an administrator account, because changes to storage pools need administrator rights.
- Open Settings. Click the Start menu button and select Settings, or press Windows key + I on your keyboard. The Settings window opens.
- Go to System. In the left pane, click System. The System page appears on the right.
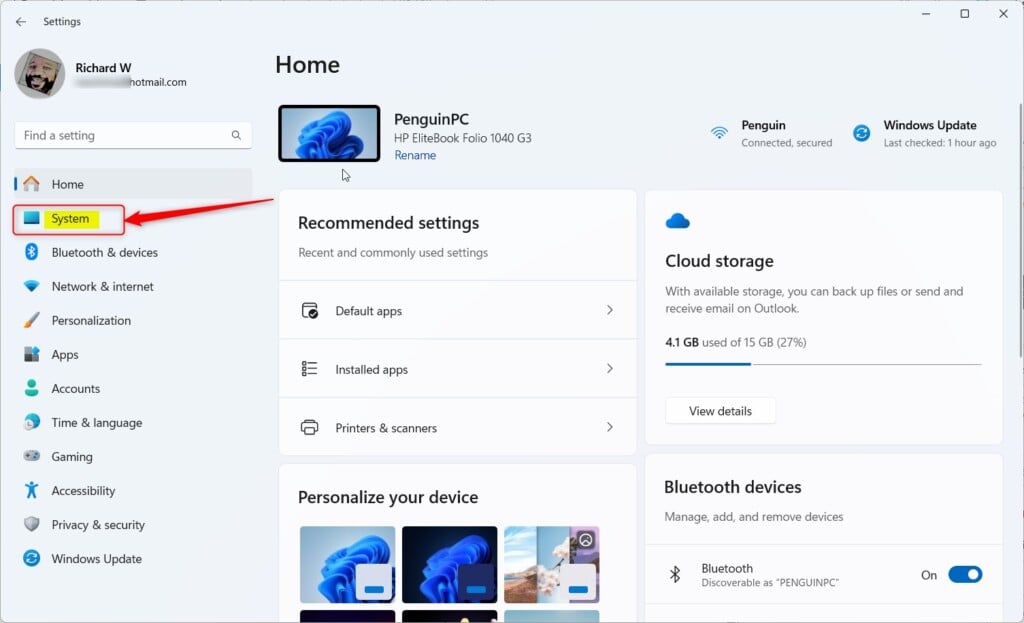
Windows 11 System button in Settings - Open Storage settings. On the right side, click the Storage tile. You will see a breakdown of how your drive space is used.
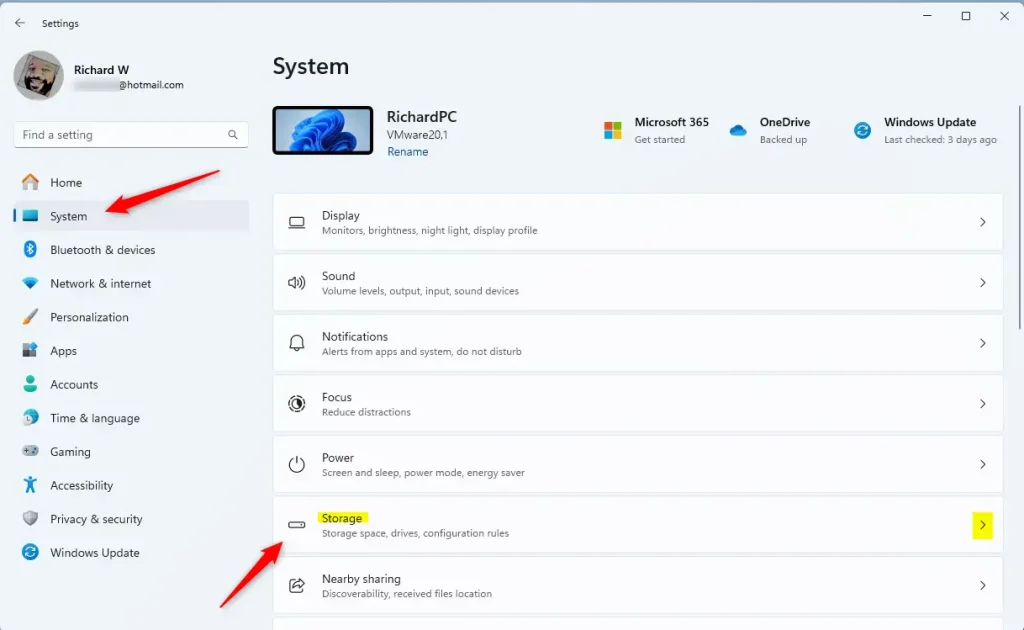
Windows 11 Settings app with System and Storage options highlighted. - Find Storage Spaces. Scroll down and expand Advanced storage settings, then click Storage Spaces. The full path is System Storage Advanced storage settings Storage Spaces. Any pools on your PC are listed here.
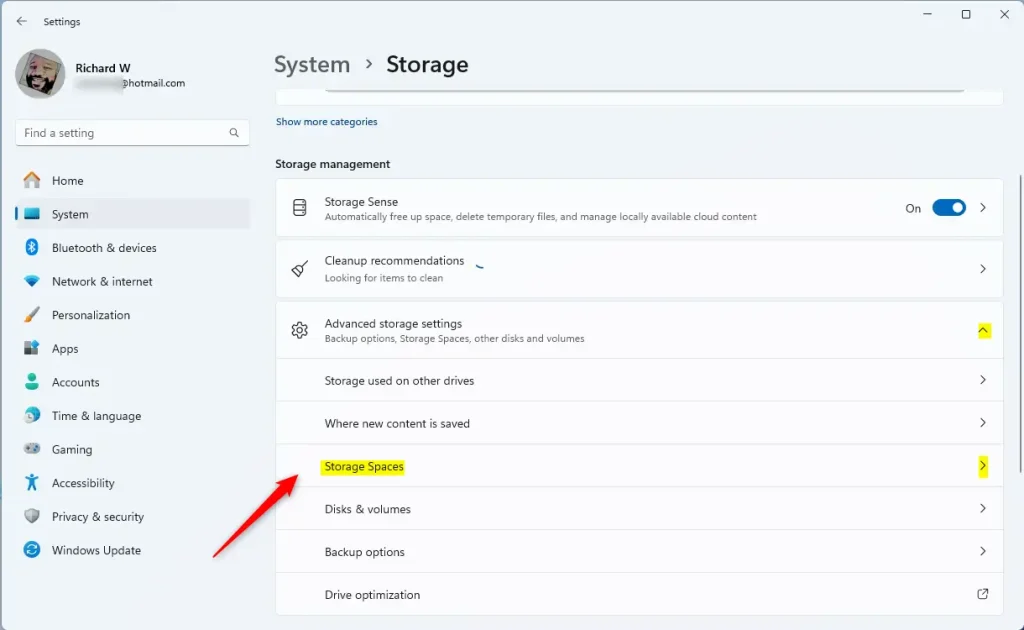
Windows 11 Storage Spaces tile in Settings app - Open your storage pool. Click your Storage pool to see its details, including the drives it contains and how much space each one uses. If nothing is listed, you have not created a pool yet, so there is nothing to optimize.
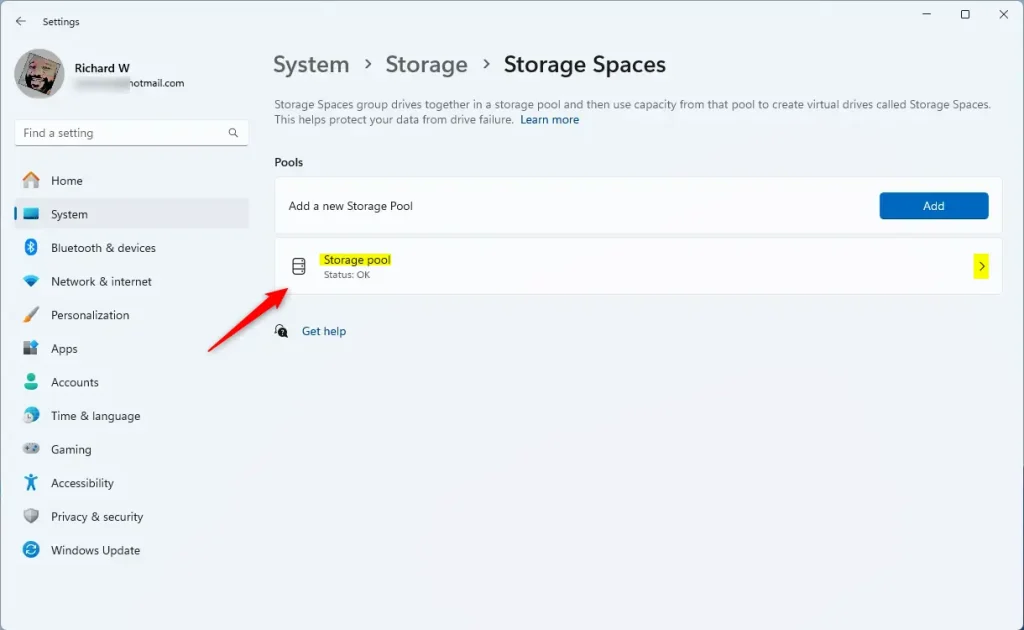
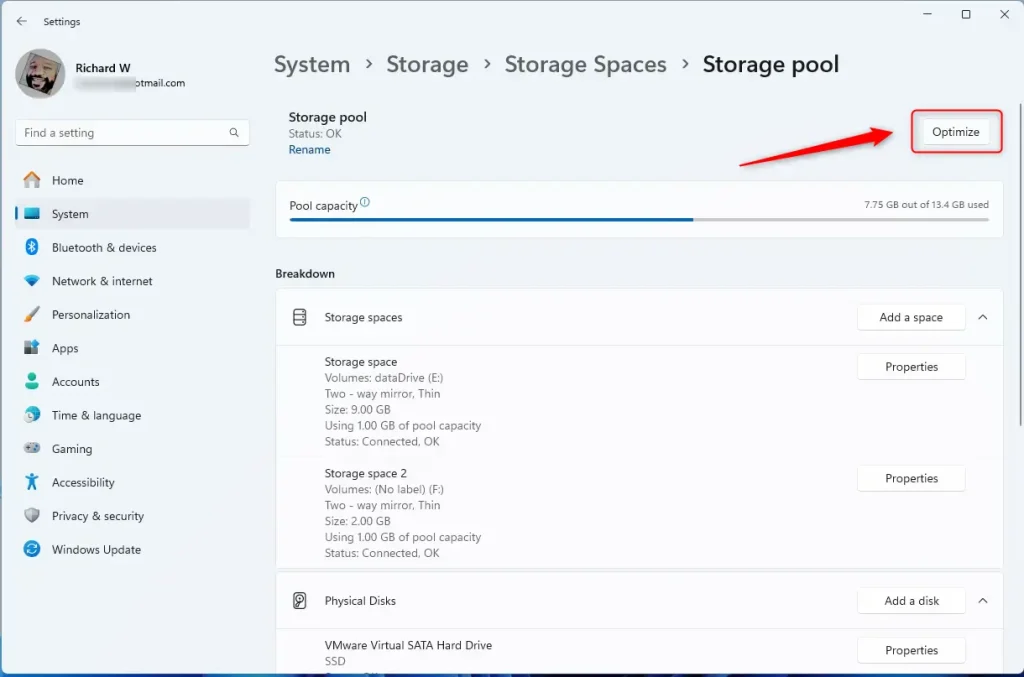
Windows 11 storage pool tile - Start the optimization. Click the Optimize button. On some builds the label reads Optimize drive usage. Windows begins spreading your data evenly across all drives in the pool.
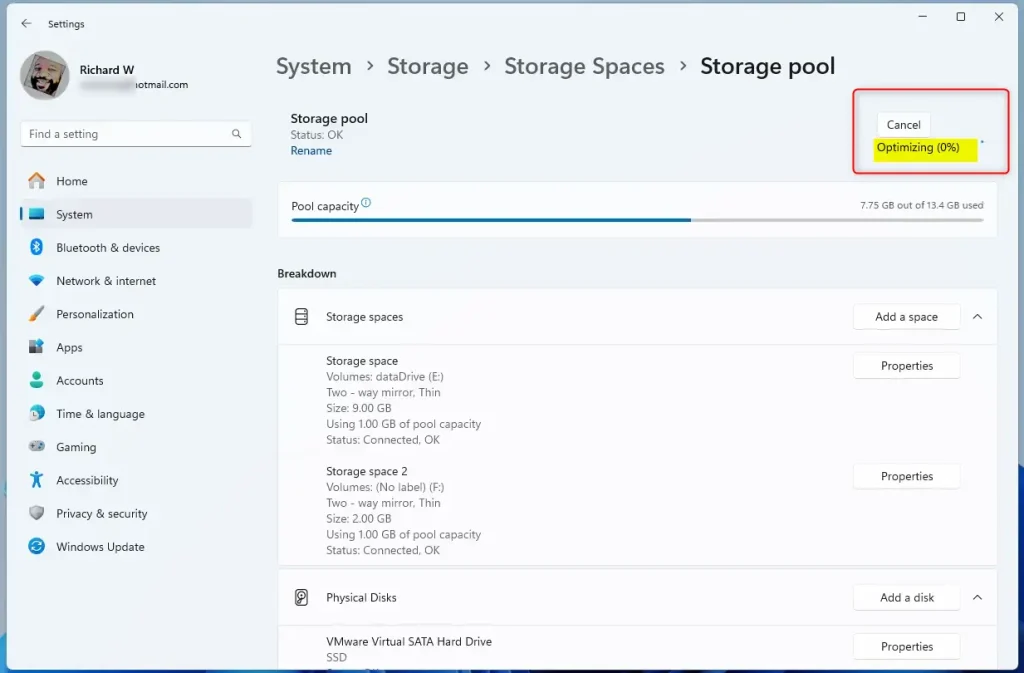
Storage pool optimize button - Wait for it to finish. You can see the progress on the screen. With a lot of data, this can take anywhere from several minutes to hours. You can keep using the PC, but it may feel slower while the drives are busy. Do not shut down or unplug any drives until it is done.
Storage pool optimize status - Close Settings. When the progress indicator is gone, close the Settings app. You do not need to restart Windows.
If the optimize option is missing or greyed out, check that the pool has more than one drive and that all its drives are connected and show as healthy. A pool with a missing or failed drive needs to be repaired first. An optimization that is already running can also make the button unavailable.
How to Optimize Storage Pools Using PowerShell
If you prefer the command line, you can optimize a pool with PowerShell. This is also handy when you manage the PC remotely or want to script the task. PowerShell must run as an administrator, or the commands will fail with an access error.
- Open PowerShell as Administrator. This step requires administrator privileges. Search for PowerShell in the Start menu, right-click it, and choose Run as administrator. Click Yes if User Account Control asks for permission. You can also use this guide to open PowerShell in Windows Terminal.
- See your storage pools. Type the command below and press Enter. A table lists each pool with its friendly name and health status.PowerShell
Get-StoragePool - Optimize your storage pool. Run this command, replacing Storage pool name with the name of your pool, as shown in the output of the previous command:Code
Optimize-StoragePool -FriendlyName "Storage pool name" - Use a real example. If your storage pool is named Storage pool, run:Code
Optimize-StoragePool -FriendlyName "Storage pool" - Let it run. PowerShell starts optimizing your pool. Keep the window open until the prompt returns, because closing it may stop the job. If the pool name contains spaces, keep it inside quotation marks as shown in the example.
If you get an error that the pool cannot be found, run the first command again and copy the name exactly as it appears. Optimization does not change your files or the pool's settings, so you can safely run it again later.
Summary
Optimizing your storage pool in Windows makes your computer run better and keeps your data safer by balancing files across all connected drives. This improves performance and reliability. You can easily optimize storage pools using the Windows Settings app or by using PowerShell commands for more direct control over your storage management.- Optimizing your Storage Pool helps your computer run better and keeps your data safer.
- You can optimize your pool using the easy Windows Settings or by using PowerShell commands.
- This process balances the data across all your drives, making the best use of your disk space.
- If you have questions, feel free to leave a comment below!
Have a question about this guide?
Answered by AI from this guide. Good questions may be added to this page — please don't include personal details.
Did this guide fix your problem?

About the Author
Richard
Tech Writer, IT Professional
Richard is a writer at Geek Rewind who turns complex IT tasks into clear, step-by-step guides. He draws on years of hands-on experience in system administration and enterprise IT operations, focusing on Windows, Linux and WordPress: the problems people actually run into, and the fixes that work. His server and WordPress guides come from systems he runs himself. Richard builds and maintains the platform behind Geek Rewind, from its Ubuntu servers and Nginx configuration to its custom WordPress plugins. Many new tutorials start with readers' questions, and he's always glad to answer them in the comments.
No comments yet — be the first to share your thoughts!