How to Easily Turn On the Windows 11 App Resume Feature

The Windows 11 App Resume feature (Microsoft calls it Resume) lets you pick up on your PC the work you started on your phone. It is easy to confuse with the setting that reopens your desktop apps after a restart, so it helps to know the difference before you go looking for it.
App Resume carries a document from your phone to your PC. A separate Windows sign-in option, Automatically save my restartable apps and restart them when I sign back in, reopens supported desktop apps after you restart. If that second behavior is what you want, use that setting instead. Both can be on at the same time.
You turn on App Resume from the main system settings in a few steps. It is still rolling out through Windows Insider builds, so the option may not appear on every PC yet.
Open Settings , click Apps, find the Resume tile, and toggle the switch to On. Then toggle the OneDrive option On beneath it to allow resuming files from your phone. The feature is only available on Windows 11 Build 22635.4515 or newer.
What is the Apps Resume Feature?
Windows 11 App Resume is a built-in feature that lets you continue working on files from your phone right on your computer. Here is how it works in practice:
- Open a supported file on your Android phone or iPhone.
- Unlock your PC within five minutes of opening the file.
- Look for the notification Windows shows in the corner of the screen. It offers to continue the document.
- Click the notification. The exact same document opens on your desktop, so you keep your place.
Open the file on your phone again to trigger a new prompt.
It works with files stored in OneDrive. That includes these file types:
- Word documents
- Excel sheets
- PowerPoint slides
- OneNote pages
- PDFs
A file saved only on your phone, or in another cloud service, will not be offered. The file has to be in OneDrive so both devices can reach it.
Also, your PC must be running Windows 11 Build 22635.4515 or newer (Beta Channel).
If you cannot find the Resume option, check your build number first. Open Settings, go to System, then About, and compare the OS build with the one above. A PC on the regular release channel, or on an older build, will not show it. Then confirm both devices use the same Microsoft account. If you decide you do not want the notifications, return to the same Resume setting and switch it off. No restart should be needed.
How to Turn On Apps Resume Using Windows Settings
Windows 11 App Resume can be turned on quickly through the main computer settings menu without needing any advanced tools. You just need to open the app settings, find the resume controls, and flip the main switch to active. This method is the safest and easiest way to get cross-device file syncing working on your personal computer.- Open the Settings app on your PC.
You can do this by clicking the Start menu and selecting Settings, or by pressing the keyboard shortcut Windows key + I. - In Settings, click Apps on the left side.
- Look for the Resume tile on the right and click it to open.
- Toggle the switch to On to enable the Apps Resume feature.
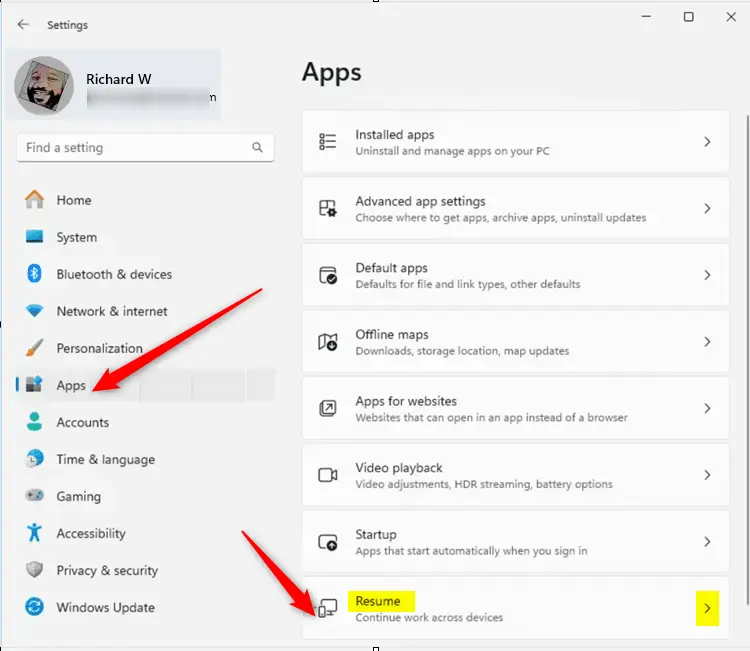
Apps Resume toggle in Windows 11 Settings - Under Resume, find the OneDrive option and toggle it On to allow resuming work on OneDrive files from your phone.
- When done, simply close the Settings app.
How to Turn Off or On Apps Resume Using the Windows Registry (Advanced)
Windows 11 App Resume can also be turned on or off by making a direct change inside the Registry Editor. This advanced method requires you to open the system registry database, find the correct configuration folder, and edit the specific key values by hand. It works best for system administrators or users who prefer managing system settings outside the standard menus.
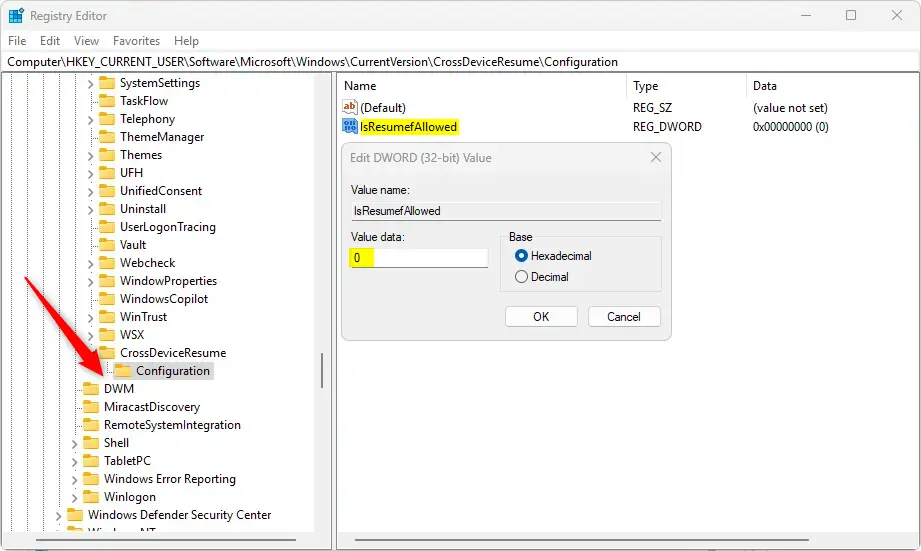
- Open the Windows Registry Editor by typing
regeditin the Start menu search and pressing Enter. - Navigate to this folder:
Computer\HKEY_CURRENT_USER\Software\Microsoft\Windows\CurrentVersion\CrossDeviceResume\Configuration - Right-click on Configuration, then choose New DWORD (32-bit) Value.
- Name the new DWORD
IsResumeAllowed. - Double-click the new value and set it to:
1to turn Apps Resume On0to turn it Off
- You can also control specific apps by creating DWORDs like this:
IsOneDriveResumeAllowed
Set to1to allow OneDrive to resume or0to block it. - Close the Registry Editor when finished.
What Happens After You Enable Apps Resume?
When you open a OneDrive file on your phone and then unlock your PC within 5 minutes, you will see a notification like this:
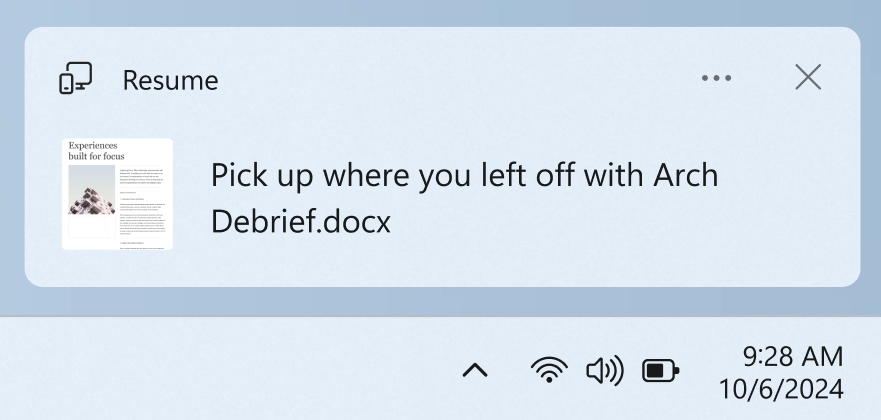
Click the notification, and the same file will open in your PC’s web browser, so you can continue working without searching for it.
Summary
- Apps Resume lets you continue working on OneDrive files from your phone right on your Windows 11 PC.
- You need Windows 11 Build 22635.4515 or newer (Beta Channel) and the same Microsoft account on both devices.
- Supported files include Word, Excel, PowerPoint, OneNote, and PDFs.
- You can turn Apps Resume on or off in Windows Settings or by editing the Registry.
Windows 11 App Resume connects your phone and computer to let you pick up right where you left off on documents stored in the cloud. You need a recent Windows beta build, matching Microsoft accounts on both devices, and compatible office files to make it work. You can control this cross-device feature easily through either your main computer settings or the system registry.
More info: Read the official Microsoft announcement here.
Have a question about this guide?
Answered by AI from this guide. Good questions may be added to this page — please don't include personal details.
Did this guide fix your problem?

About the Author
Richard
Tech Writer, IT Professional
Richard is a writer at Geek Rewind who turns complex IT tasks into clear, step-by-step guides. He draws on years of hands-on experience in system administration and enterprise IT operations, focusing on Windows, Linux and WordPress: the problems people actually run into, and the fixes that work. His server and WordPress guides come from systems he runs himself. Richard builds and maintains the platform behind Geek Rewind, from its Ubuntu servers and Nginx configuration to its custom WordPress plugins. Many new tutorials start with readers' questions, and he's always glad to answer them in the comments.
No comments yet — be the first to share your thoughts!