How to Enable or Disable Microsoft Account Notifications in Windows 11

Microsoft account notifications in Windows 11 are pop-up reminders about cloud storage, subscriptions, and security that appear in the Start menu . These alerts first arrived in build 22572 of the Windows 11 Insider Preview. Their purpose is to prompt you to back up files or set up apps.
If you would rather keep your screen clear of these alerts, you can switch them off. The simplest way is the Settings app . Turning them off only hides the reminders. You do not lose access to your Microsoft account, your files, or your subscriptions, and you can turn the notifications back on at any time.
Open Settings Personalization Start and toggle Show account-related notifications Off to disable Microsoft account notifications in Windows 11. The change takes effect immediately without restarting.
How to Turn Microsoft Account Notifications On or Off
There are two ways to control these notifications. The Settings app works for everyone and is the method I recommend. The Registry Editor does the same job and is mainly useful if the Settings option is missing or you prefer to edit values directly. Both methods work on Windows 11 Home and Pro. The steps below start with Settings:
Step 1Open the Settings App
- Click the Start menu (the Windows icon) and select Settings. The Settings window opens. If Settings is not pinned to your Start menu , click All apps and find it in the list, or type “Settings” in the search box.
- Or press
Windows key + Ion your keyboard to open Settings directly. This is quicker and works even when the Start menu is slow to respond.
Step 2Navigate to Personalization
- In Settings, click Personalization in the left-hand list. The personalization options (background, colors, themes, Start and so on) now appear on the right.
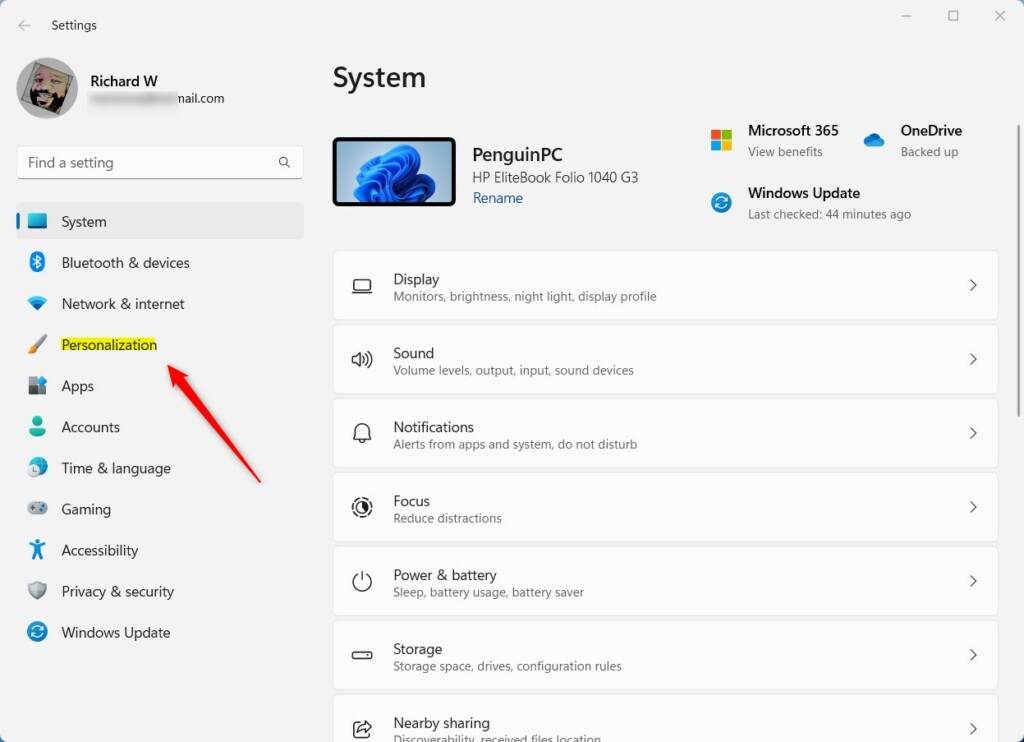
Click Personalization in Settings
Step 3Select Start
- Next, on the right, click Start. You may need to scroll down a little to find it. The page that opens holds the settings for the Start menu layout and what it shows.
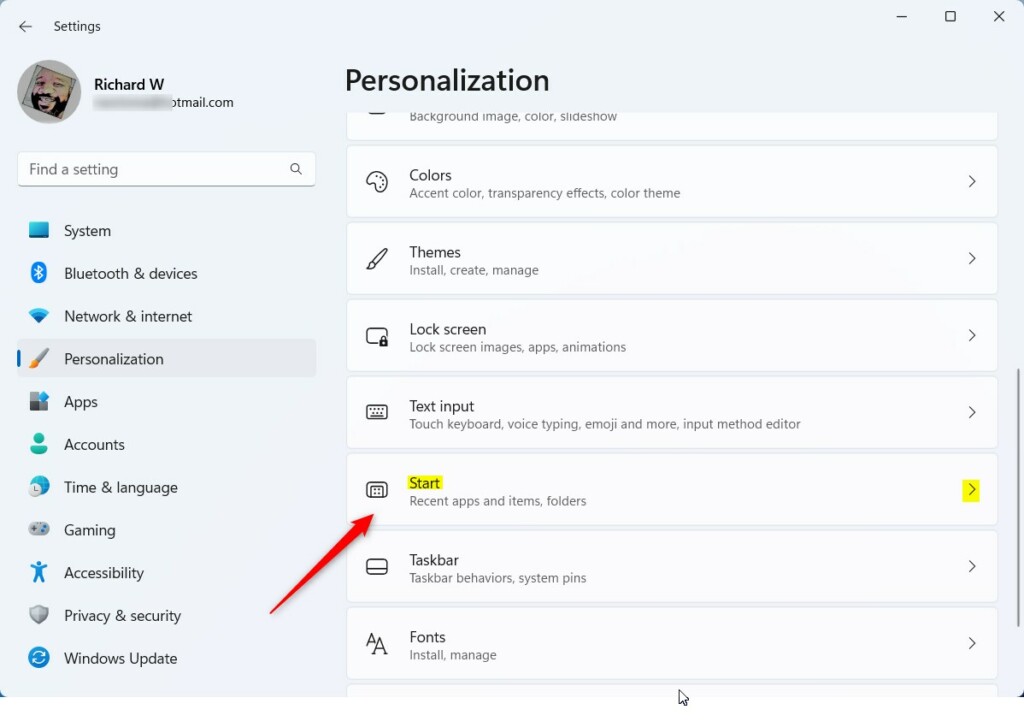
Click Start in Personalization
Step 4Toggle the Notification Setting
- Look for Show account-related notifications and toggle it On to enable or Off to disable. The switch label changes to match the new state straight away, and you do not need to click anything else to save it.
Microsoft has been rolling it out gradually, mostly to Insider Preview users first. In that case there is nothing to turn off. To undo the change later, come back to this page and flip the toggle the other way.

Turn Show account-related notifications On or Off
Close the Settings window once finished. If you want to be sure the change took effect, open the Start menu and check that the account reminders are gone (or back, if you turned them on).
Another Way: Use the Windows Registry (For Advanced Users)
Advanced users can manage this feature using the Registry Editor (a database of system settings). Use this method only if the Settings option is missing or you want to apply the change by hand.
Incorrect changes cause system instability. Follow these exact steps to avoid trouble. Before you start, it is a good idea to back up the registry: in Registry Editor, click File then Export and save a copy somewhere safe. You can double-click that file later to restore it.
Step 1Open the Registry Editor
- Press
Windows key + R, typeregedit, and press Enter. If User Account Control asks for permission, click Yes. The Registry Editor window opens, with a folder tree on the left and values on the right.
Step 2Navigate to the Correct Folder
- Navigate to this folder path:
HKEY_CURRENT_USER\Software\Microsoft\Windows\CurrentVersion\Explorer\Advanced. Expand each folder in the left pane in turn, or paste the path into the address bar at the top of the Registry Editor. - If you don’t see the Advanced folder, right-click on Explorer, choose New Key, and name the new key Advanced. The new key appears under Explorer. Click it to select it before moving on.
Step 3Create a New Value ⚙️ REQUIRES ADMIN PRIVILEGES
- Right-click anywhere on the right side pane inside Advanced, select New DWORD (32-bit) Value, and name it
Start_AccountNotifications. Type the name exactly, then press Enter. If the value already exists, skip this step and edit the existing one.
Step 4Set the Value
- Double-click the new
Start_AccountNotificationsvalue. A small Edit DWORD (32-bit) Value box opens. In the Value data field, enter:1to turn notifications on0to turn notifications off
- Click OK and close the Registry Editor. The value now shows your number in the Data column. To undo the change later, open the same value again and enter the other number.
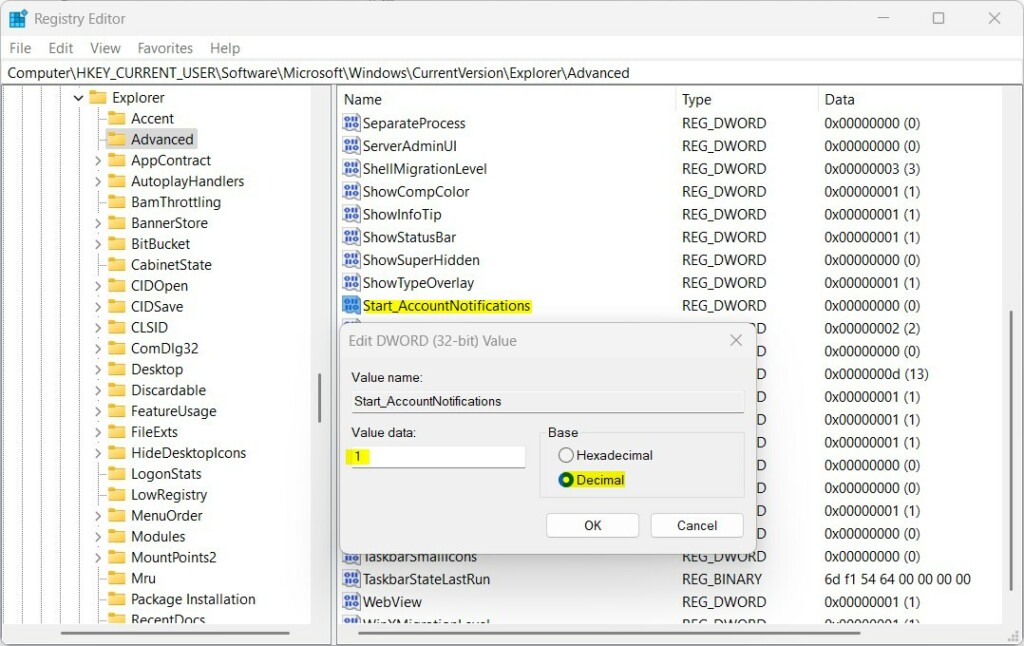
Set Start_AccountNotifications value to 1 or 0
Step 5Restart Your Computer
- Restart your computer for the changes to take effect. Save your work first. After you sign back in, the Start menu follows the value you set.
Summary
Windows 11 account notifications appear on your Start menu to show important updates about your Microsoft account and security status. These alerts help you spot security issues or billing problems quickly. Microsoft currently rolls them out slowly, so you might not see them on your computer yet.
- Microsoft added a new notification feature for your Microsoft account on the Windows 11 Start menu.
- This feature helps you stay updated about your account and security.
- Not all users see this feature yet. Mainly Insider Preview users have it now. If the Show account-related notifications option is missing on your PC, that is the likely reason.
- You can turn the notifications on or off easily through Settings or using the Registry Editor. Settings needs no restart. The registry method needs one.
- Choose the method you're comfortable with. For most people, that is Settings.
- For more details, see the official Microsoft announcement: Windows Insider Blog
Have a question about this guide?
Answered by AI from this guide. Good questions may be added to this page — please don't include personal details.
Did this guide fix your problem?

About the Author
Richard
Tech Writer, IT Professional
Richard is a writer at Geek Rewind who turns complex IT tasks into clear, step-by-step guides. He draws on years of hands-on experience in system administration and enterprise IT operations, focusing on Windows, Linux and WordPress: the problems people actually run into, and the fixes that work. His server and WordPress guides come from systems he runs himself. Richard builds and maintains the platform behind Geek Rewind, from its Ubuntu servers and Nginx configuration to its custom WordPress plugins. Many new tutorials start with readers' questions, and he's always glad to answer them in the comments.
No comments yet — be the first to share your thoughts!