How to Delete Recall Snapshots in Windows 11

Recall snapshots in Windows 11 are automatic screenshots that your PC takes every few seconds so you can search through your past activity. These images build up fast and can consume gigabytes of local drive space over time.
You can delete the saved snapshots from the regular Settings app whenever you need to free up storage. Windows lets you clear everything at once or pick a specific time frame to delete.
Access Storage settings within Privacy & Security to manage Recall data. Click “Delete snapshots” and choose a timeframe like the past hour, day, week, or month to remove them. Confirm the deletion to free up disk space.
What are Recall Snapshots?
Recall snapshots are background screen captures that Windows 11 takes automatically so you can search your past computer activity by keyword. They record the websites you visited, the documents you edited, and the apps you used, so you can find them later. You can delete them at any time to free up storage and protect your privacy.
Windows keeps these visual records so you can quickly find something you saw or worked on earlier. For more on how the feature works, see the Recall & Snapshots explained documentation. Windows purges the oldest snapshots on its own when storage runs low, but clearing them by hand gives you immediate control. The steps below remove snapshots from the last hour, day, week, or month.
Recall is only available on Copilot+ PCs, and it isn’t tied to Home or Pro. If you don’t see Recall in Settings, the PC probably doesn’t support it, or the feature isn’t installed or turned on. Windows may also ask you to verify your identity, for example with Windows Hello, before it opens the Recall settings.
Steps to Delete Recall Snapshots from a Specific Timeframe
You can delete snapshots from a specific time frame, such as the last hour, day, or week, directly in the Windows 11 Settings app . Only the time period you choose is removed, and the rest of your data stays untouched. You don’t need any extra software.
Work through the numbered steps below in order. You don't need to restart the PC afterward.
- Open the Settings app: You can do this by clicking the Start menu (Windows icon at the bottom left) and choosing Settings, or just press Windows key + I on your keyboard.
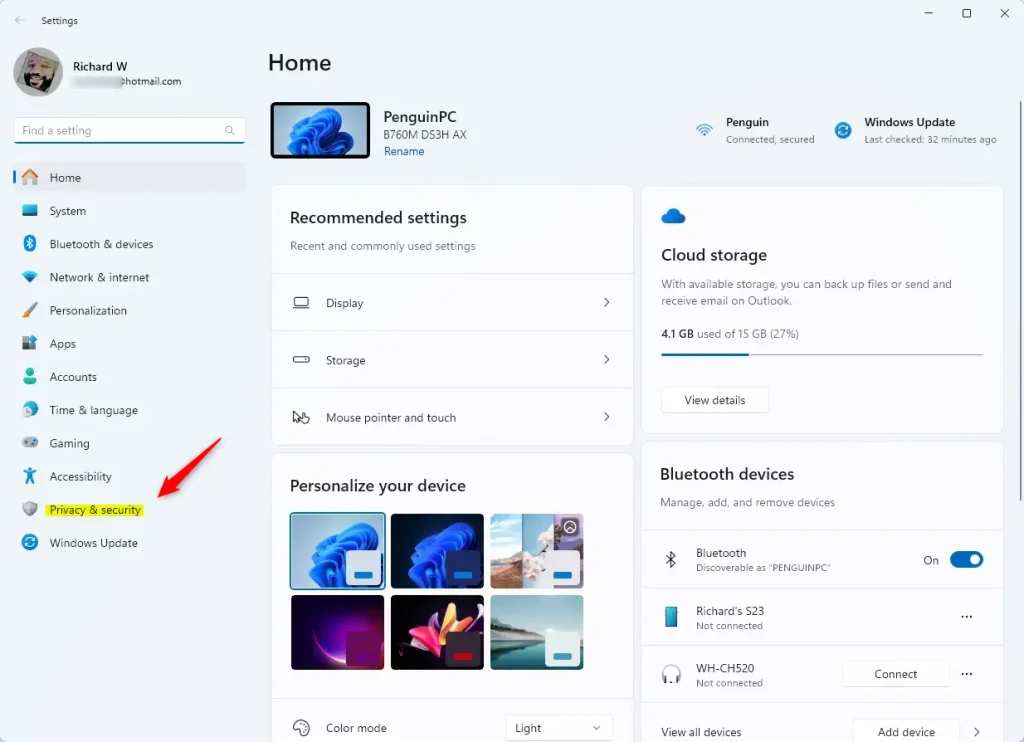
- Go to Privacy & Security: In the Settings window, look at the left side menu and click Privacy & security.
- Open Recall & Snapshots settings: On the right side, find and click Recall & snapshots.
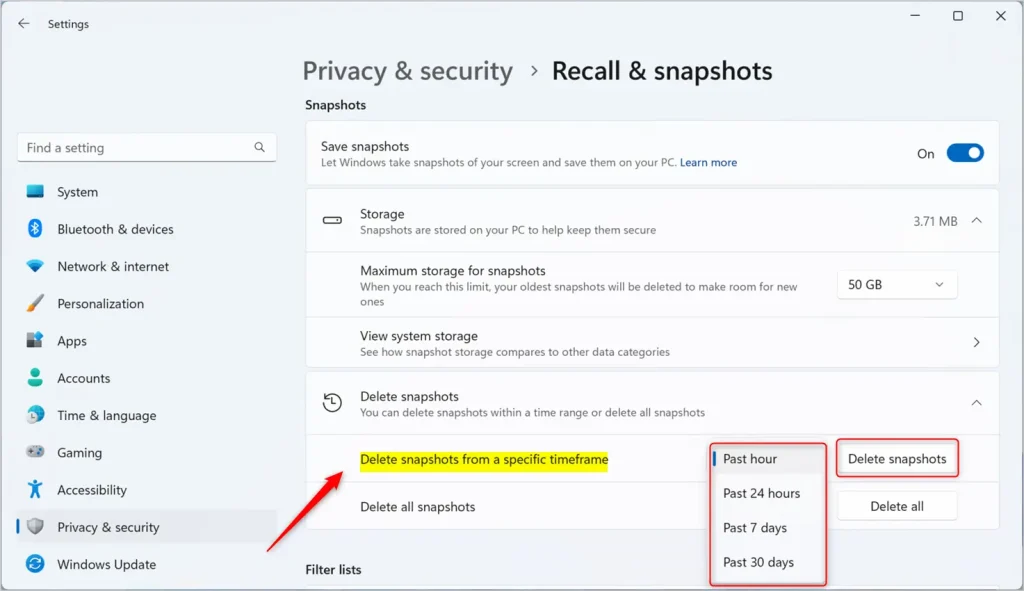
- Delete snapshots: Scroll down to the Storage section and click Delete snapshots to expand it.
- Choose a timeframe: Click on Delete snapshots from a specific timeframe. You can pick from these options:
- Past hour
- Past 24 hours
- Past 7 days
- Past 30 days
- Confirm deletion: Click the Delete snapshots button after choosing the timeframe. The snapshots from that period will be removed.
Deleted snapshots can't be brought back, so check the time range before you confirm. If you only want to stop new captures from piling up, turn off snapshot saving in the same Recall settings instead.
Here is what the Privacy & Security menu looks like in Windows 11:
And this is the screen where you delete snapshots from a specific time frame:
That completes the process for deleting Recall snapshots across the time frame you selected. Once it finishes, the drive space is released and the deleted period no longer shows up in Recall searches.
Need More Help?
Microsoft publishes official documentation on privacy controls at Microsoft Support - Recall and Your Data
Summary
- Recall Snapshots save pictures of your screen to help you find things later.
- You can delete snapshots from the last hour, day, week, or month to free up space.
- It's easy to manage this in the Windows 11 Settings under Privacy & Security.
- Following these steps helps keep your computer storage under control.
Knowing how to delete Recall snapshots helps you keep storage under control and protects your privacy. You can clear these picture records for a specific time frame, or turn the feature off entirely in your privacy settings, whenever you need to reclaim disk space from background screen captures.
Have a question about this guide?
Answered by AI from this guide. Good questions may be added to this page — please don't include personal details.
Did this guide fix your problem?

About the Author
Richard
Tech Writer, IT Professional
Richard is a writer at Geek Rewind who turns complex IT tasks into clear, step-by-step guides. He draws on years of hands-on experience in system administration and enterprise IT operations, focusing on Windows, Linux and WordPress: the problems people actually run into, and the fixes that work. His server and WordPress guides come from systems he runs himself. Richard builds and maintains the platform behind Geek Rewind, from its Ubuntu servers and Nginx configuration to its custom WordPress plugins. Many new tutorials start with readers' questions, and he's always glad to answer them in the comments.
No comments yet — be the first to share your thoughts!