How to Check Windows 11 Insider Build Expiration Date


This article explains how to check when your Windows 11 Insider Preview build will expire. There are two ways to do it: through the Settings app , or with a command in the Run window. Both take less than a minute.
To check your Windows 11 Insider Build expiration date, open Settings , go to System About, and find the “Evaluation expires on” line under Windows specifications. You can also press Win+R, type winver, and press Enter. If that line is missing, your PC is not running an Insider evaluation build.
What is 🪟 Windows 11 Insider Preview Build?
Windows 11 Insider Preview Build is an early version of Windows 11 that lets you try new features before they reach everyone else.
You get these builds by joining the Windows Insider Program. The program lets you preview upcoming features and send feedback to Microsoft. That early access shows you where Windows is heading, and your feedback can influence how features look when they are released.
Why Check Your Expiration Date?
If you do not move to a newer build before the expiration date, Windows will stop working correctly. Windows shows notifications when an update is due, so do not dismiss them. Checking the date yourself is a good habit if you run Insider builds on a test PC or a virtual machine that you do not open every day.
How to Check Your Expiration Date
Method 1Use the Settings App
- Open the Settings app. Click the Start menu and select Settings, or press Win+I together. The Settings window should open.
- Click System on the left side.
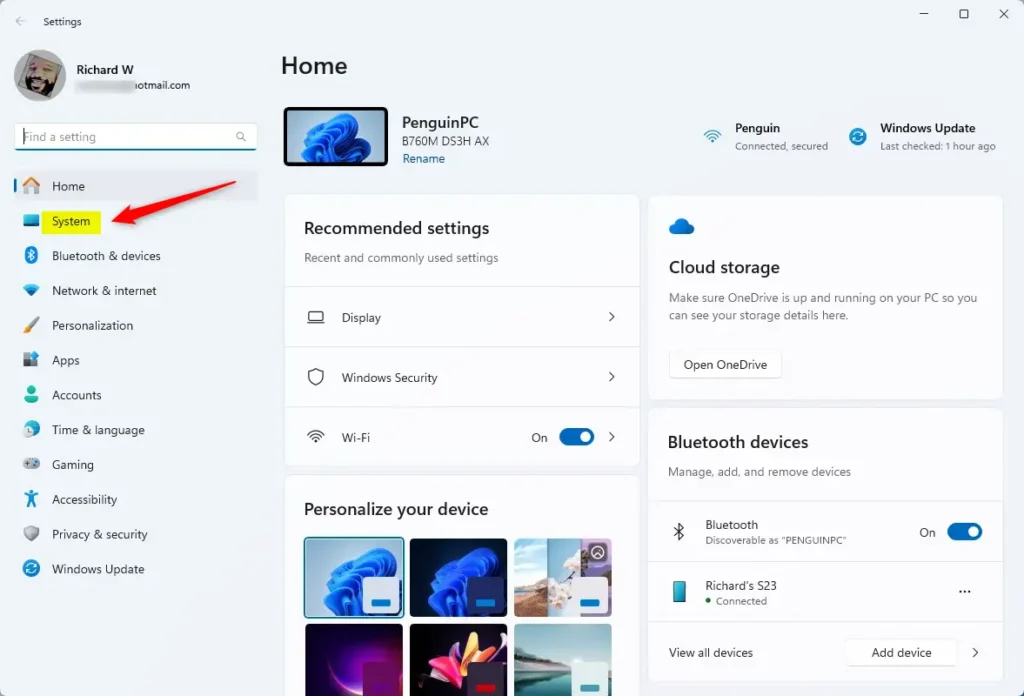
System in the Settings app - Scroll down the System page and select About. The device and Windows information should now appear.
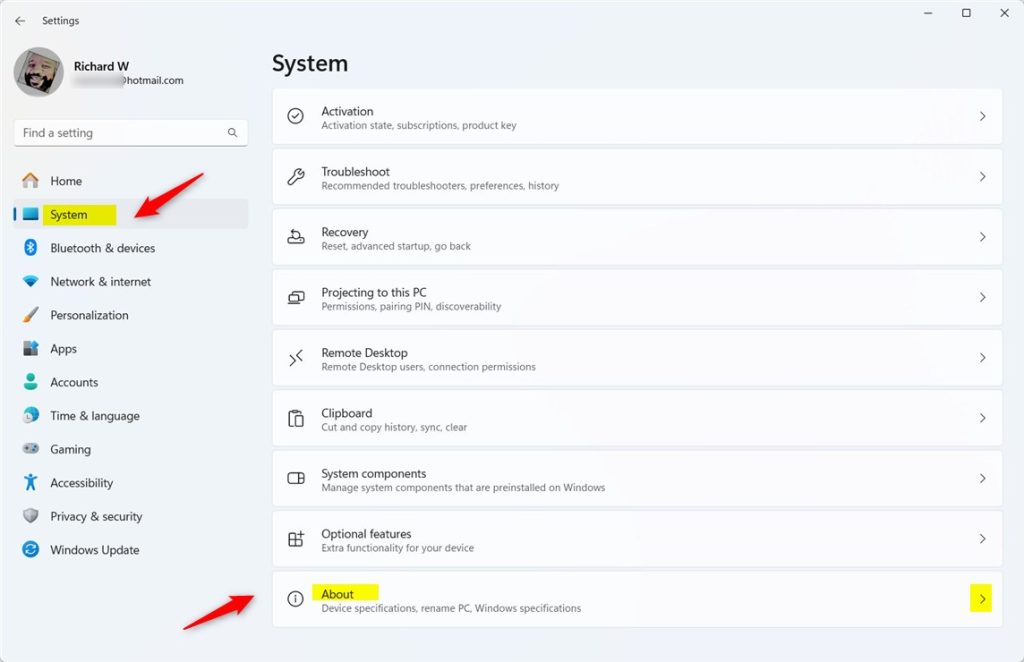
Windows 11 System About settings showing evaluation expiration date - Scroll to the Windows specifications section and look for Evaluation expires on. The line shows the date and time your build will expire.
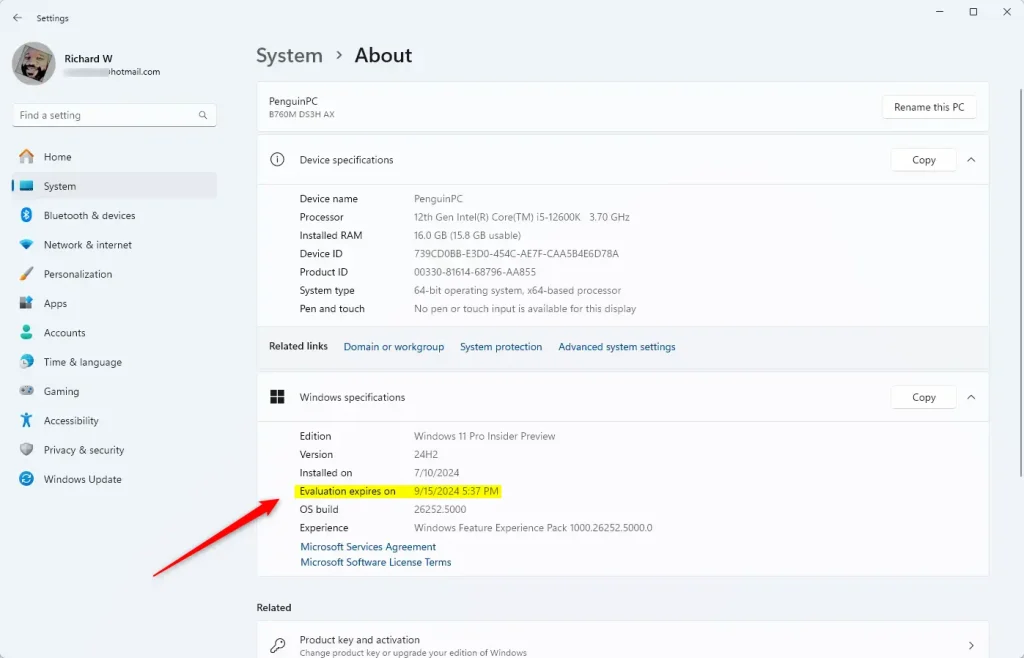
Windows 11 evaluation expiration date in About
If you do not see the “Evaluation expires on” line, your PC is probably not running an evaluation or expiring Insider build. A normal release build of Windows 11 does not show it.
Method 2Use the Winver Command
- Press Win+R to open the Run window.
- Type this command in the Open box:
winver
Press Enter or click OK. A window should open with details about your Windows build, including the expiration date. Close it when you are done. Nothing on your system changes.
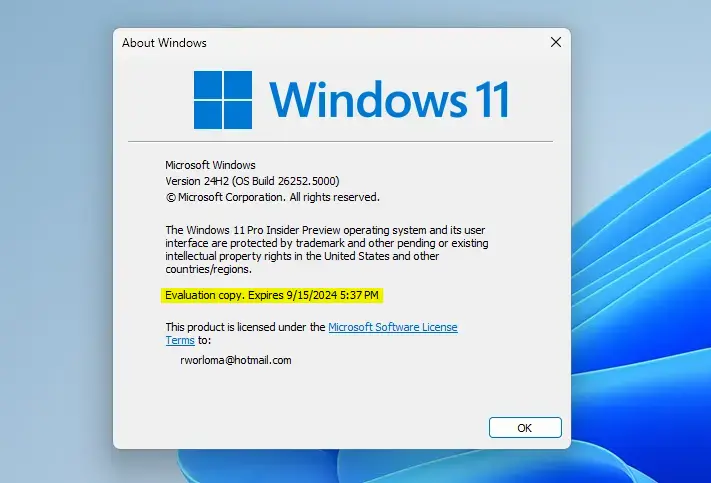
What Happens When Your Build Expires?
When your Insider build expires, Windows may stop updating and stop working properly. You will see notifications telling you to update. Install the update as soon as you can to keep Windows running smoothly.
Installing a new Insider build usually needs a restart, so save your work first. Do this well before the expiration date, not on the last day.
Summary
Your Windows 11 Insider Build expiration date is the day your test version of Windows 11 will stop working. Insider Preview builds are temporary, so it is worth knowing this date. You can check it in the Settings app or with a simple command.
You can check when yours expires in two ways. In the Settings app, go to System About and find "Evaluation expires on." Or use the winver command through the Run window.
Update your build before the expiration date so Windows keeps working well. Watch for update notifications and act on them quickly to avoid problems.
Reference
Was this guide helpful?

About the Author
Richard
Tech Writer, IT Professional
Richard is a writer at Geek Rewind who turns complex IT tasks into clear, step-by-step guides. He draws on years of hands-on experience in system administration and enterprise IT operations, focusing on Windows, Linux and WordPress: the problems people actually run into, and the fixes that work. His server and WordPress guides come from systems he runs himself. Richard builds and maintains the platform behind Geek Rewind, from its Ubuntu servers and Nginx configuration to its custom WordPress plugins. Many new tutorials start with readers' questions, and he's always glad to answer them in the comments.



No comments yet — be the first to share your thoughts!