Large toggle switch flipping off with dissolving particles
You find and manage your Advertising ID in Windows 11 by navigating to the Privacy & security settings.
Your Advertising ID is a unique identifier that apps use to personalize ads across your device, similar to a cookie for websites.
Windows 11 assigns a new Advertising ID to your device unless you reset or disable it. This allows for more targeted advertising experiences.
Understanding where to find these settings gives you control over personalized ads and helps protect your online privacy.
⚡ Quick Answer
Navigate to Settings > Privacy & security > General. Here, you can toggle the “Let apps show my personalized ads by using my advertising ID” option on or off to manage personalized advertising on your device.
What is an Advertising ID?
Before we change any settings, let’s understand what it is. Your Advertising ID is a unique number. Windows creates this number for each person using a device. App makers and advertising companies can use this ID to learn about what you do and what you like. Then, they use this information to show you ads they think you’ll be interested in. It’s like how websites use small files called cookies to track what you browse, but this is for apps on your Windows computer.
Here’s an example: If you’ve been looking for new running shoes, an app might use your Advertising ID. It could then show you ads for sports clothes. It’s all about making ads feel more related to what you like. But, you can choose to turn this feature on or off.
How to Find and Manage Your Advertising ID Settings
Are you ready to take control? Here’s how to find the settings for your Advertising ID in Windows 11. It’s pretty clear once you know where to look.
Step 1Open ⚙️ Windows Settings
Start by opening the ⚙️ Settings app. You can do this in a couple of quick ways: Click the ⊞ Start button (that’s the Windows logo) on 🖥️ your taskbar, then click the gear-shaped Settings icon in the Start menu. Or, a handy shortcut is to press Windows key + I on your keyboard.
Click the ⊞ Start button on 🖥️ your taskbar. It looks like the Windows logo.
In the ⊞ Start menu, click the Settings icon. It looks like a gear.
Or, press the Windows key + I on your keyboard at the same time. This is a fast shortcut many people use.
Step 2Go to Privacy & Security
Once ⚙️ the Settings window is open, look at the list on the left side. Find and click on Privacy & security. This is where Windows keeps all ⚙️ the settings for how your information is handled.
Windows 11 Privacy & security settings menu with options.Tip: If you don’t see “Privacy & security” right away, you might need to scroll down the list on the left. It’s usually near the bottom.
Step 3Access Recommendations & offers Settings
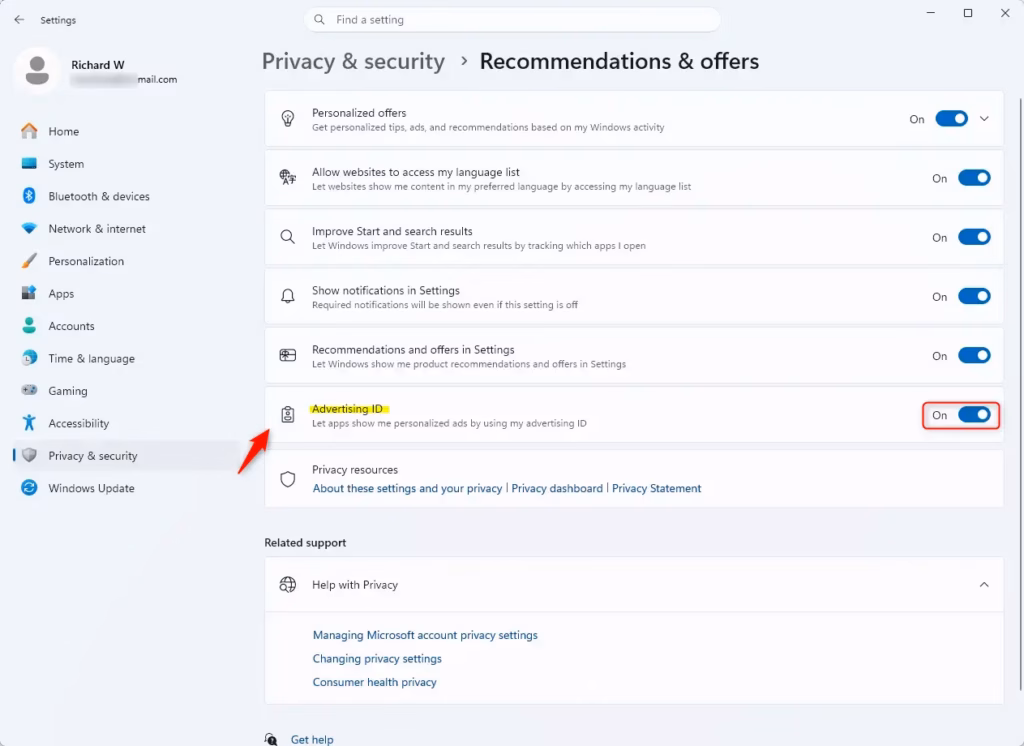
Inside the “Privacy & security” section, click on “Recommendations & offers“.
This “Recommendations & offers” page has several privacy settings that affect your whole Windows experience. You’ll find the control for your Advertising ID here.
Step 4Control Your Advertising ID
You’re in the right place. On the “Recommendations & offers” settings page, find the option that says: Let apps show my personalized ads by using my advertising ID.
There’s a switch next to it.
To turn it OFF: Click the switch. It will move to the left and turn gray. This means apps can no longer use your Advertising ID for personalized ads.
To turn it ON: Click the switch. It will move to the right and turn blue (or your computer’s accent color). This allows your Advertising ID to be used for personalized ads.
Advertising ID settings tile in Windows 11 privacy options.Important Warning: Turning off your Advertising ID won’t stop all ads. You will likely still see ads. However, the ads might be less relevant to you because the system won’t have that special number to make them fit your interests. If you turn it back on later, your Advertising ID will basically be reset, giving you a fresh start with personalized advertising.
Reference:
https://support.microsoft.com/en-us/windows/privacy-settings-for-recommendations-offers-in-windows-11-807608ee-3de2-4498-8e7c-eb10d655567f
Summary
Your Advertising ID in Windows 11 is a unique number apps and advertisers use for personalized ads. You manage this in Settings > Privacy & security > General. Toggling the “Let apps show my personalized ads by using my advertising ID” option on or off affects how targeted ads are. Turning it off means ads will be less relevant, though you’ll still see them.
Richard, a writer for Geek Rewind, is a tech enthusiast who loves breaking down complex IT topics into simple, easy-to-understand ideas. With years of hands-on experience in system administration and enterprise IT operations, he’s developed a knack for offering practical tips and solutions.
Richard aims to make technology more accessible and actionable. He's deeply committed to the Geek Rewind community, always ready to answer questions and engage in discussions.


No comments yet — be the first to share your thoughts!