How to Choose Where to Get Apps in Windows 11

The “Choose where to get apps” setting in Windows 11 controls whether you can install programs from any website or only from the Microsoft Store. It is a built-in safeguard that helps keep unsafe files and bad software off your system.
Microsoft checks every app in the Store before listing it, so Store-only mode is the strictest option. To change the setting, open the Settings app, click Apps, and then choose Advanced app settings. The steps below walk through this in detail.
Open Settings , click Apps, then Advanced app settings, and select your preferred option from the Choose where to get apps drop-down menu. Options range from allowing apps from anywhere to restricting installations to the Microsoft Store only. The change takes effect immediately without a restart.
Why This Matters
Controlling where apps come from helps keep your system secure and running smoothly. The right choice depends on how you use the PC. A family computer or a shared kiosk usually benefits from a strict setting. A developer or power user who installs tools from vendor websites will probably want something looser.
What Are Your Options?
Windows 11 gives you four choices for where you can install software from. You can allow apps from anywhere, get a suggestion when the Store has a comparable app, get a warning before installing anything from outside the Store, or block outside apps completely.
- Anywhere – Users can install both desktop and Store apps without getting any warning messages. This is the default.
- Anywhere, but let me know if there’s a comparable app in the Microsoft Store – Users can install both desktop and Store apps. The system will suggest Store alternatives when available.
- Anywhere, but warn me before installing an app that’s not from the Microsoft Store – Users can install both desktop and Store apps. When they try to install a desktop app, they get a message saying “The app you’re trying to install isn’t a Microsoft-verified app.” Users can then decide whether to visit the Store for more apps.
- The Microsoft Store only – Users can only install apps from the Store. If they try to install a desktop app, they get a message saying “The app you’re trying to install isn’t a Microsoft-verified app.” This setting helps keep your PC safe and reliable. Desktop apps that were already installed keep working, so this option does not remove anything.
Reference: Change your app recommendation settings in Windows – Microsoft Support
The setting lives under Settings Apps On current Windows 11 builds, look for Advanced app settings. On some versions it appears under Apps Installed apps (or Apps & features) instead. If you don’t see it in one place, check the other.
⚠️ Admin Required: You must be signed in as an administrator to change your app recommendation settings in Windows.
You have to switch out of S mode first. That switch is free but cannot be reversed.
Option One
Choose where to get apps in Settings
- Press Win+I on your keyboard to open Settings.
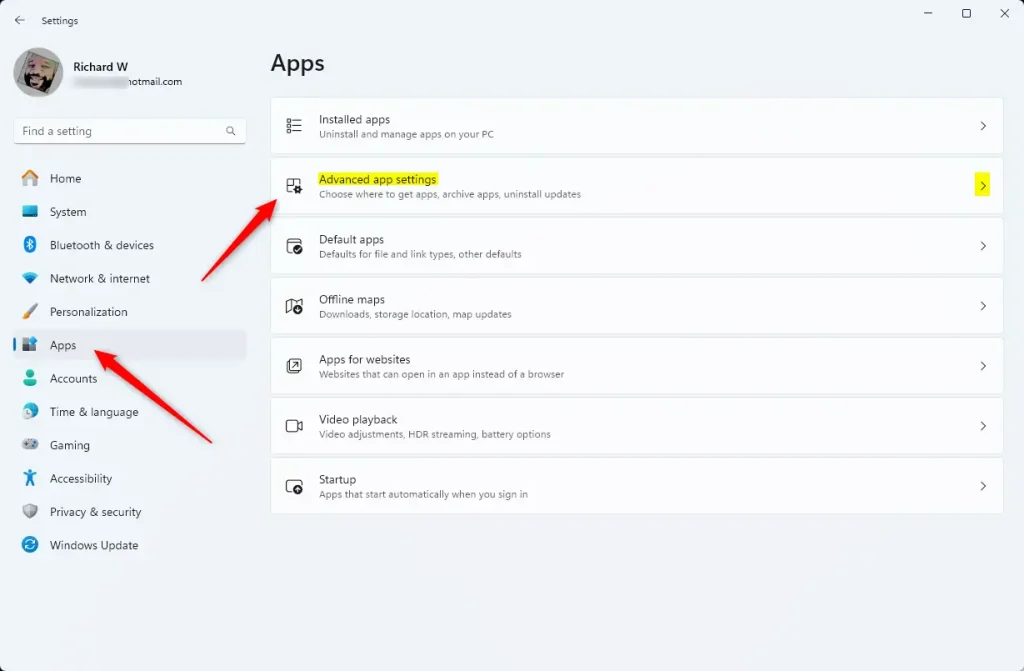
- Click Apps on the left side. Then click Advanced app settings on the right side. On some versions, the path is Apps & features More settings instead. You should now see the app-related options, including the "Choose where to get apps" drop-down.
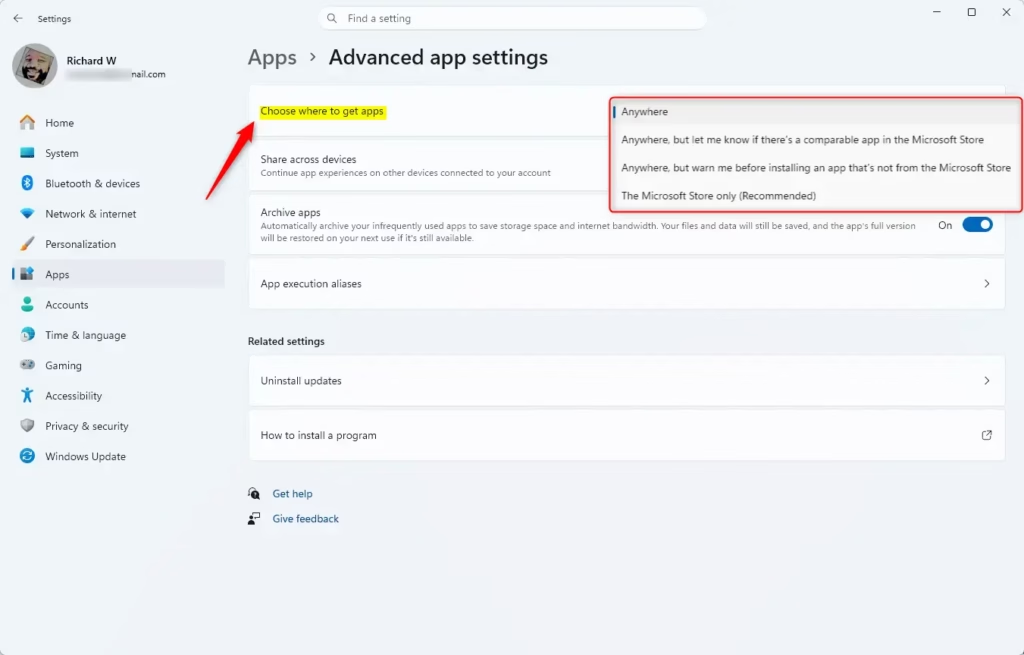
- Open the Choose where to get apps drop-down and select one of these options:
- Anywhere (default)
- Anywhere, but let me know if there's a comparable app in the Microsoft Store
- Anywhere, but warn me before installing an app that's not from the Microsoft Store
- The Microsoft Store only
- Close Settings. The change applies as soon as you pick the option, and you don't need to restart. To undo it, come back to the same drop-down and select Anywhere.
If the drop-down is greyed out or missing, check two things. First, make sure you are signed in with an administrator account. Second, check whether the PC is running in S mode, or whether a work or school organization manages it. Managed devices often have this setting locked by policy.
After you choose an option, the drop-down shows your selection. Try running an installer from outside the Store to confirm it behaves the way you expect. With the warning option, you should see the "isn't a Microsoft-verified app" message. With Store only, the installer is blocked.
The settings above are what most people need. The next section covers the registry for cases where you want to set this value directly, for example when the Settings page is unavailable. If you change your mind later, set the option back to the default using the same method you used to change it.
Option Two
Choose where to get apps using Registry
Editing the registry incorrectly can cause problems, so create a restore point or export a backup of the key before you change anything.
Install apps from "Anywhere"
This behavior represents the factory default configuration. Windows 11 allows apps from anywhere and shows no warnings or Store suggestions. If a change doesn't seem to take effect, sign out and back in, or restart the PC, and then check the Settings page again.
reg add "HKEY_LOCAL_MACHINE\SOFTWARE\Microsoft\Windows\CurrentVersion\Explorer" /v AicEnabled /t REG_SZ /d Anywhere /fInstall apps from "Anywhere, but let me know if there's a comparable app in the Microsoft Store"
reg add "HKEY_LOCAL_MACHINE\SOFTWARE\Microsoft\Windows\CurrentVersion\Explorer" /v AicEnabled /t REG_SZ /d Recommendations /fInstall apps from "Anywhere, but warn me before installing an app that's not from the Microsoft Store"
reg add "HKEY_LOCAL_MACHINE\SOFTWARE\Microsoft\Windows\CurrentVersion\Explorer" /v AicEnabled /t REG_SZ /d PreferStore /fInstall apps from "The Microsoft Store only"
reg add "HKEY_LOCAL_MACHINE\SOFTWARE\Microsoft\Windows\CurrentVersion\Explorer" /v AicEnabled /t REG_SZ /d StoreOnly /fSummary
In short, Windows 11 lets you choose how strictly it controls software installation. The range runs from allowing downloads from anywhere with no prompts, through warnings and Store suggestions, to the Microsoft Store only. Pick the level that fits how the PC is used, and you can change it at any time.
Have a question about this guide?
Answered by AI from this guide. Good questions may be added to this page — please don't include personal details.
Did this guide fix your problem?

About the Author
Richard
Tech Writer, IT Professional
Richard is a writer at Geek Rewind who turns complex IT tasks into clear, step-by-step guides. He draws on years of hands-on experience in system administration and enterprise IT operations, focusing on Windows, Linux and WordPress: the problems people actually run into, and the fixes that work. His server and WordPress guides come from systems he runs himself. Richard builds and maintains the platform behind Geek Rewind, from its Ubuntu servers and Nginx configuration to its custom WordPress plugins. Many new tutorials start with readers' questions, and he's always glad to answer them in the comments.
No comments yet — be the first to share your thoughts!