How to Change the Maximum Storage for Snapshots in Windows 11

Snapshot storage in Windows 11 controls how much drive space Recall uses to save your screen history. Recall takes pictures of your screen over time so you can search back through past activity.
Windows sets aside a fixed share of your disk for these images. When that limit fills up, the oldest snapshots are deleted automatically to make room for new ones. A bigger limit means a longer searchable history. A smaller limit leaves more room for your files and apps.
You can change the limit in Settings. Recall is only available on Copilot+ PCs. If you don’t see the Recall & snapshots page, your PC doesn’t support the feature, and there is nothing to change.
Open Settings , navigate to Privacy & security, then Recall & Snapshots. Adjust the “Maximum storage for snapshots” slider to your desired limit. Your changes are saved automatically.
Storage Options for Different PC Sizes
| Device Storage Size | Storage Options for Snapshots |
|---|---|
| 256 GB | 25 GB (default), 10 GB |
| 512 GB | 75 GB (default), 50 GB, 25 GB |
| 1 TB or more | 150 GB (default), 100 GB, 75 GB, 50 GB, 25 GB |
Steps to Change Maximum Storage for Snapshots in 🪟 Windows 11
- Open Settings . Press Win+I, or click Start and select Settings. The Settings window opens with a list of categories on the left.
- Go to Privacy & security. Click Privacy & security in the left menu. The privacy options appear on the right.
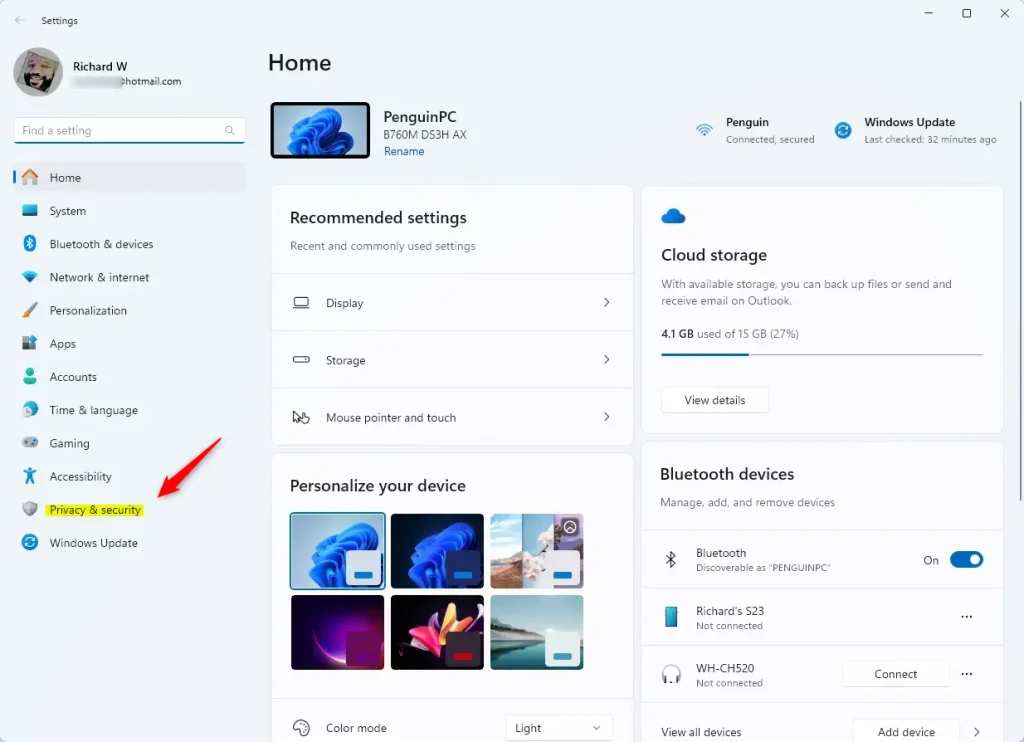
Windows 11 Privacy and Security settings menu for Recall exclusion - Open Recall & snapshots. Scroll down on the right and click Recall & snapshots. Windows may ask you to verify your identity with Windows Hello (face, fingerprint or PIN) before it shows the page.
- Check that snapshots are on. Make sure the Save snapshots toggle is set to On. If it is off, Recall isn’t saving anything and the storage setting has no effect.
- Expand the storage section. Click Storage to open it. You should now see the Maximum storage for snapshots setting.
- Pick a new limit. Use the Maximum storage for snapshots control to choose how much space Windows can use. The sizes on offer depend on your drive, so you may see fewer choices on a small disk.
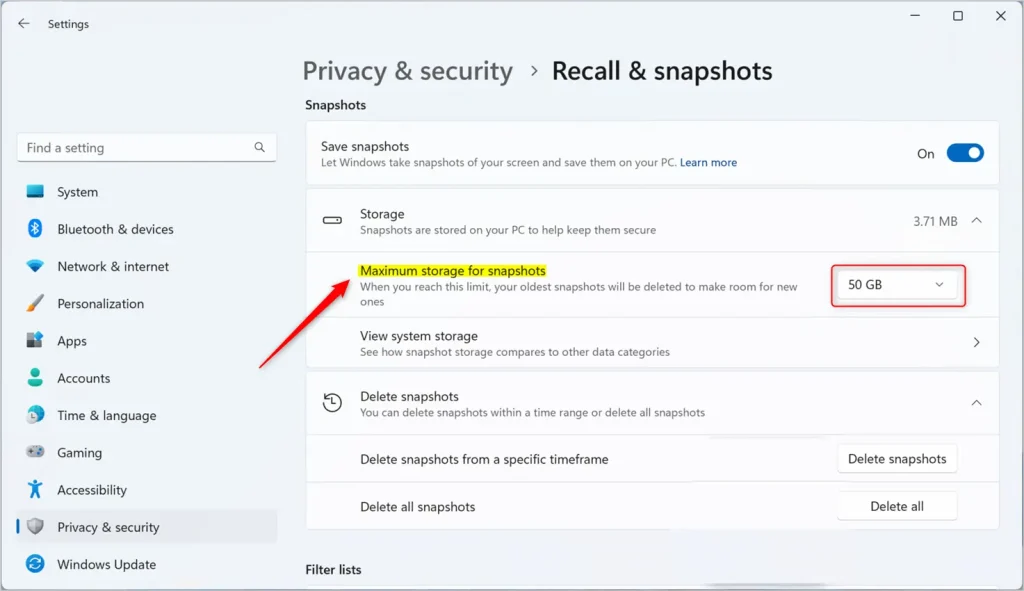
Change maximum storage for recall and snapshots - Close Settings. There is no Save or Apply button. The new limit is stored as soon as you pick it, and you don’t need to restart. To undo the change, come back to the same page and choose the old size.
Helpful Tips
- If you want a longer history, choose a bigger size. First make sure the drive has enough free space for it, or Windows and your other apps will feel the squeeze.
- If your PC is low on disk space, pick a smaller size. You can also delete snapshots you no longer need from the same Recall & snapshots page.
- If you don’t want Windows to save snapshots at all, turn off the Save snapshots toggle.
- Lowering the limit means older snapshots will be removed once the new, smaller limit is reached. You can’t get those back by raising the limit later.
The right size is a trade-off between free space and how far back you want to search. Choose a larger limit if you often need to find something you saw weeks ago. Choose a smaller one if your drive is nearly full.
Summary
Changing the maximum storage for snapshots gives you full control over how much disk space Windows uses for your system history. You can open Settings at any time to adjust these limits and keep your computer running smoothly without wasting valuable drive space.- Changing the max storage for snapshots is easy and helps you manage space on your PC.
- You can choose how much space Windows uses to keep snapshots safe.
- Access the settings anytime through the Privacy & security section in Windows Settings.
- Adjusting storage helps keep your important snapshots without filling up your hard drive.
Have a question about this guide?
Answered by AI from this guide. Good questions may be added to this page — please don't include personal details.
Did this guide fix your problem?

About the Author
Richard
Tech Writer, IT Professional
Richard is a writer at Geek Rewind who turns complex IT tasks into clear, step-by-step guides. He draws on years of hands-on experience in system administration and enterprise IT operations, focusing on Windows, Linux and WordPress: the problems people actually run into, and the fixes that work. His server and WordPress guides come from systems he runs himself. Richard builds and maintains the platform behind Geek Rewind, from its Ubuntu servers and Nginx configuration to its custom WordPress plugins. Many new tutorials start with readers' questions, and he's always glad to answer them in the comments.
No comments yet — be the first to share your thoughts!