How to Change Narrator Modifier Keys in Windows 11


Narrator modifier keys are the keys you hold down with other keys to run screen reader commands in Windows 11. By default, Windows assigns this role to both the Caps Lock key and the Insert key. Most Narrator shortcuts are written as “Narrator key + something”, so whichever key you pick here is the one you will use for nearly every command.
Changing this key helps you stop accidental screen reader shortcuts from firing while you type everyday text. You can set the modifier to Caps Lock only, Insert only, or keep both keys active at the same time. This tutorial covers two ways to do it: the Settings app, which suits most people, and Registry Editor, which suits advanced users.
Open Settings , go to Accessibility Narrator, scroll to Mouse and keyboard, click Narrator key, and select Caps Lock, Insert, or Caps Lock or Insert from the drop-down menu. The change takes effect immediately.
Why Change Your Narrator Modifier Key?
Why Change Your Narrator Modifier Key?
Choosing a preferred modifier key helps you avoid accidental shortcuts while typing and makes screen reader sessions more comfortable. A few common reasons:
- Insert sits next to Delete, Home and End on many keyboards, so it is easy to hit by mistake. Choosing Caps Lock avoids that.
- Many laptops have no dedicated Insert key, or make you press it with a function key. Caps Lock is easier to reach there.
- If you use another screen reader or an app that relies on Insert or Caps Lock, giving Narrator only one of the two keys avoids clashes.
- If you are not sure, keep Caps Lock or Insert. Both keys work, so nothing stops working while you decide.
How to Change Narrator Modifier Keys Using Settings
You can change Narrator modifier keys in Windows 11 using the Settings app when you want to make screen reader shortcuts easier to reach. Open Settings, go to the Accessibility section, and choose Narrator to pick a new key like Caps Lock, Insert, or both to use for your commands. This method works the same on Windows 11 Home and Pro, needs no administrator rights, and takes effect straight away.
Step 1: Open Settings . Click the Start menu and select Settings, or press Win+I on the keyboard. The Settings window should open on the System page.
Step 2: Click Accessibility in the list on the left side. The right side now shows the accessibility options, grouped under headings such as Vision, Hearing and Interaction.
Step 3: Find Narrator on the right side, under Vision, and click it to open its options. You should see the Narrator on/off switch at the top, followed by its settings.
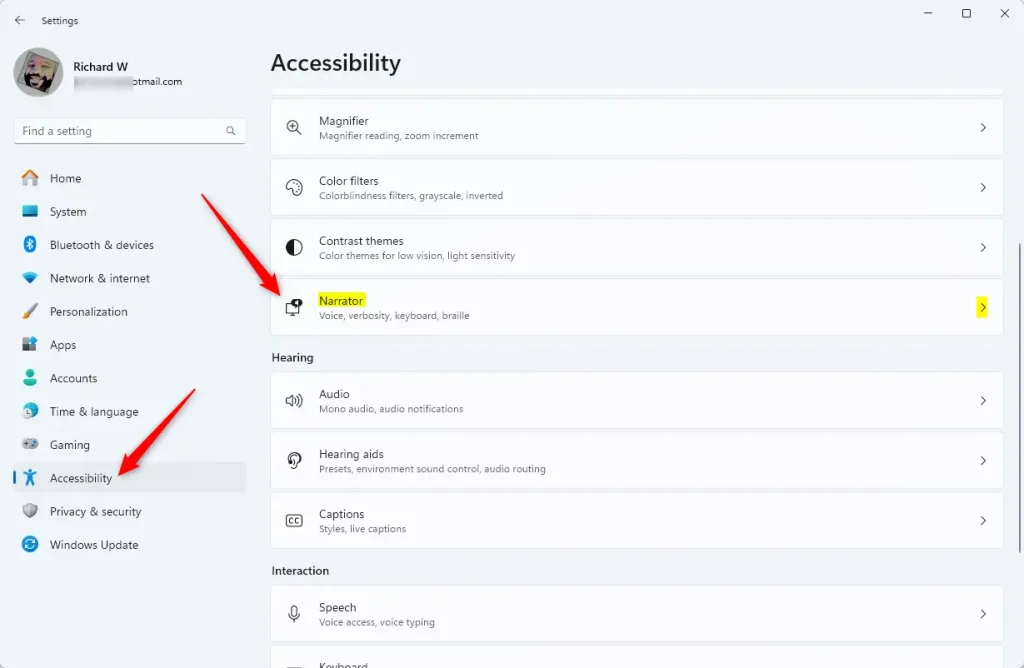
Step 4: Scroll down to the Mouse and keyboard section and click the Narrator key option. A drop-down menu opens with the available choices. You do not need to turn Narrator on to change this setting. If you cannot find it, look further down the page, because the Narrator page is long.
Step 5: From the drop-down menu, select your preferred key:
- Caps Lock: only Caps Lock acts as the Narrator key. Insert goes back to behaving normally.
- Insert: only Insert acts as the Narrator key. Caps Lock goes back to behaving normally.
- Caps Lock or Insert: either key works as the Narrator key. This is the default.
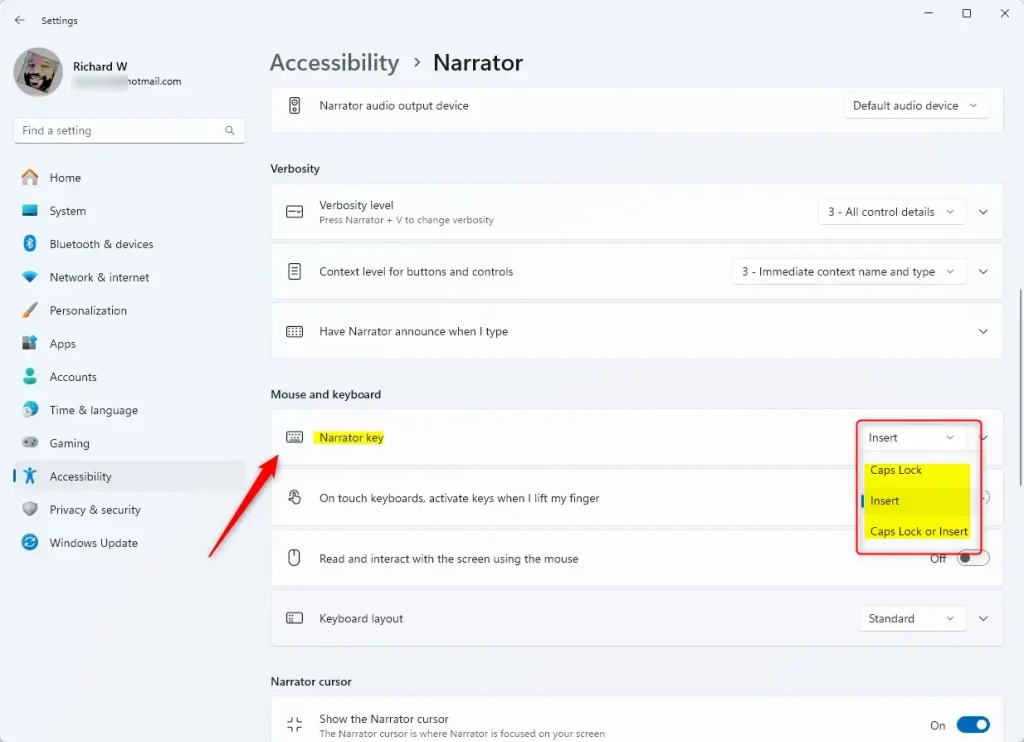
Step 6: Close the Settings app when finished. The change is saved as soon as you pick the option, so there is no Apply or Save button and no restart is needed. To undo it, come back to the same drop-down and choose Caps Lock or Insert.
How to Change Narrator Modifier Keys Using Registry Editor
This method lets you modify the settings directly through the system registry, but you should back up your files first because mistakes can cause issues on your computer. Registry Editor is available on both Home and Pro, and you will need to approve the administrator prompt when it opens. For a single setting like this one, the Settings method above is the safer choice.
If something goes wrong later, you can use that backup to put things back as they were.
Step 1: Open the Windows Registry. Approve the User Account Control prompt if one appears. The Registry Editor window should open with a tree of keys on the left.
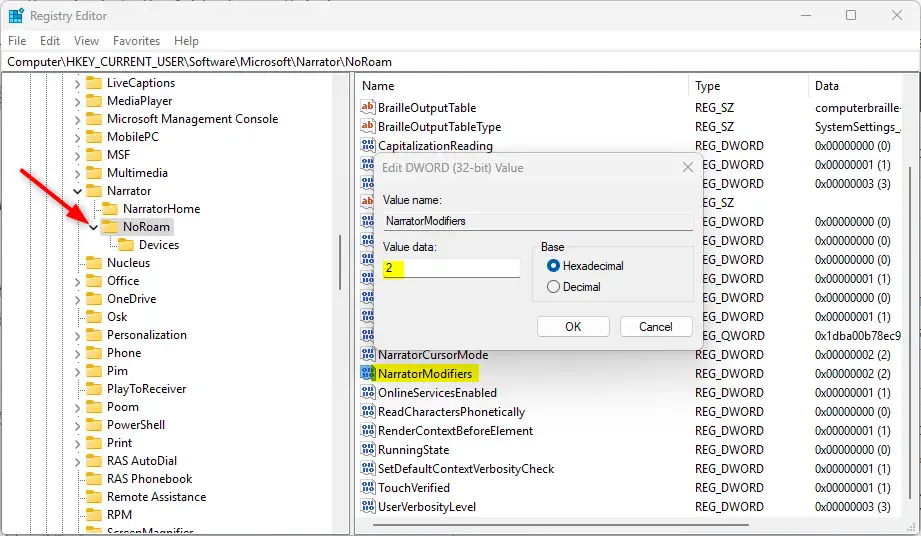
Step 2: Navigate to this folder path. You can type or paste it into the address bar at the top of Registry Editor, or expand the keys in the left pane one at a time:
Computer\HKEY_CURRENT_USER\Software\Microsoft\Narrator\NoRoamStep 3: Right-click an empty space in the right pane, select New, and choose DWORD (32-bit) Value. A new value appears in the list with its name highlighted for editing. If the value you need already exists, skip this step and double-click it in Step 5 instead of creating a second one.
Step 4: Name the new DWORD NarratorKey. Press Enter to confirm the name. Type it exactly as shown, because the name is what Windows looks for.
Step 5: Double-click NarratorKey and enter the appropriate number in the Value data box based on your choice, then click OK:
- Type
1for Caps Lock - Type
2for Insert - Type
3for Caps Lock or Insert
Step 6: Close Registry Editor. A computer restart may be required for the modifications to register, so restart if Narrator still responds to the old key. To undo the change, open the same value again and enter the number for your earlier choice. You can also change the setting back in Settings Accessibility Narrator
What Happens When You Change Your Modifier Key?
Narrator recognizes your new modifier key immediately when you use Settings. This adjustment streamlines screen reader command execution. To check it, start Narrator and press your chosen key together with F1, which opens the Narrator commands list. If nothing happens, make sure Narrator is running and that you are using the key you selected. If you used Registry Editor, restart the PC and try again.
Summary
Windows 11 provides two distinct paths for modifying Narrator shortcut keys. The Settings menu offers a graphical interface for selecting replacement keys from a drop-down menu, while the Registry Editor serves advanced workflows. For most people, Settings is the quicker and safer option, because it needs no backup and applies the change straight away.
Reference:
Was this guide helpful?

About the Author
Richard
Tech Writer, IT Professional
Richard is a writer at Geek Rewind who turns complex IT tasks into clear, step-by-step guides. He draws on years of hands-on experience in system administration and enterprise IT operations, focusing on Windows, Linux and WordPress: the problems people actually run into, and the fixes that work. His server and WordPress guides come from systems he runs himself. Richard builds and maintains the platform behind Geek Rewind, from its Ubuntu servers and Nginx configuration to its custom WordPress plugins. Many new tutorials start with readers' questions, and he's always glad to answer them in the comments.



[…] can open the speech recap window with Narrator key + Alt + X and find the last 500 strings Narrator had […]
[…] You open the Speech Recap window by pressing the Narrator key + Alt + X. The Narrator key is usually Caps Lock or Insert — you can check or change it here. […]