How to Enable Phonetic Reading in Windows 11 Narrator


Narrator is a screen reader built into Windows. It reads text on your screen aloud and describes events, which helps people with low vision or blindness.
Open Settings , go to Accessibility Narrator, expand Verbosity level, and toggle Read phonetically when reading by character to On. The change takes effect immediately without restarting.
Narrator can spell out words phonetically when it reads character by character. It has many other settings too. You can turn on or off its keyboard shortcuts, launch it automatically, adjust the voice, speed, and volume, manage natural voices, lower other apps volume when Narrator is speaking, change Narrator audio output device, change verbosity level, emphasize formatted text, and more.
This tutorial covers one of those settings: whether Narrator reads phonetically when you read by character.
With phonetic reading on, Narrator pairs each character with a word that starts with it, such as “A” followed by “Alpha”. That helps people who struggle to tell similar-sounding letters apart or to pronounce certain words. It also slows reading down, and fluent readers often find it unnecessary. Turning it on or off lets you match Narrator to how you actually read.
Enable or disable phonetic reading with Narrator
You can turn phonetic reading on or off in Narrator on Windows 11. The setting is the same in Home and Pro, it takes effect as soon as you change it, and you don’t need to restart.
Here’s how to do it.
- Open Settings by pressing Windows key + I, or click Start and select Settings. The Settings app opens.
- Go to Settings Accessibility Narrator. Click Accessibility in the left pane, then select the Narrator tile on the right. The Narrator settings page opens.
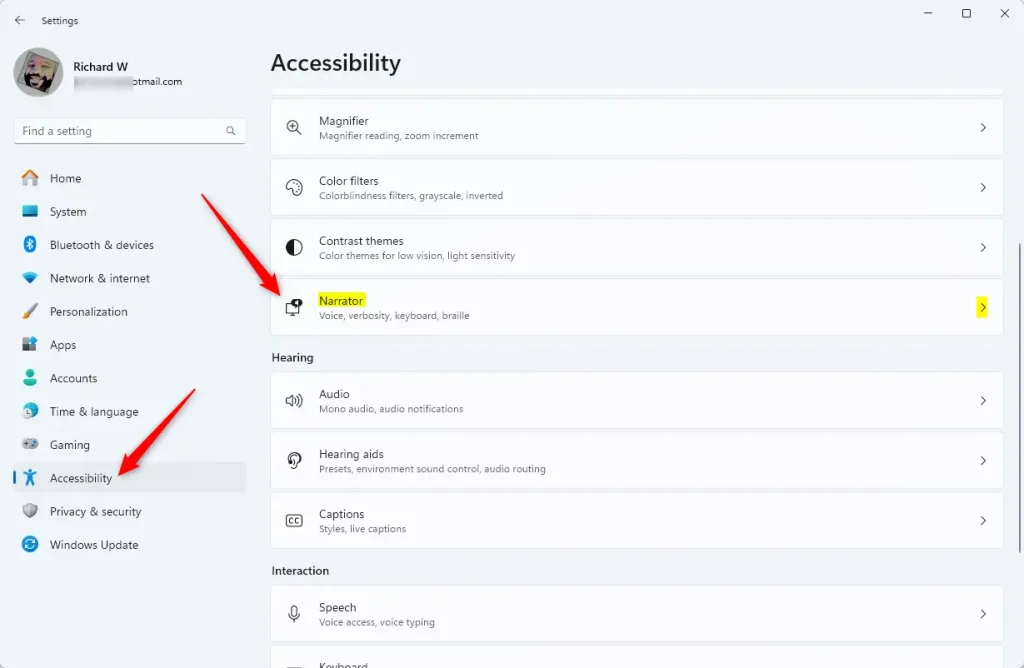
- On the Narrator page, find the Verbosity section and expand the Verbosity level tile. The options for that tile are now visible.
- Switch the Read phonetically when reading by character toggle to On to enable phonetic reading, or to Off to disable it.
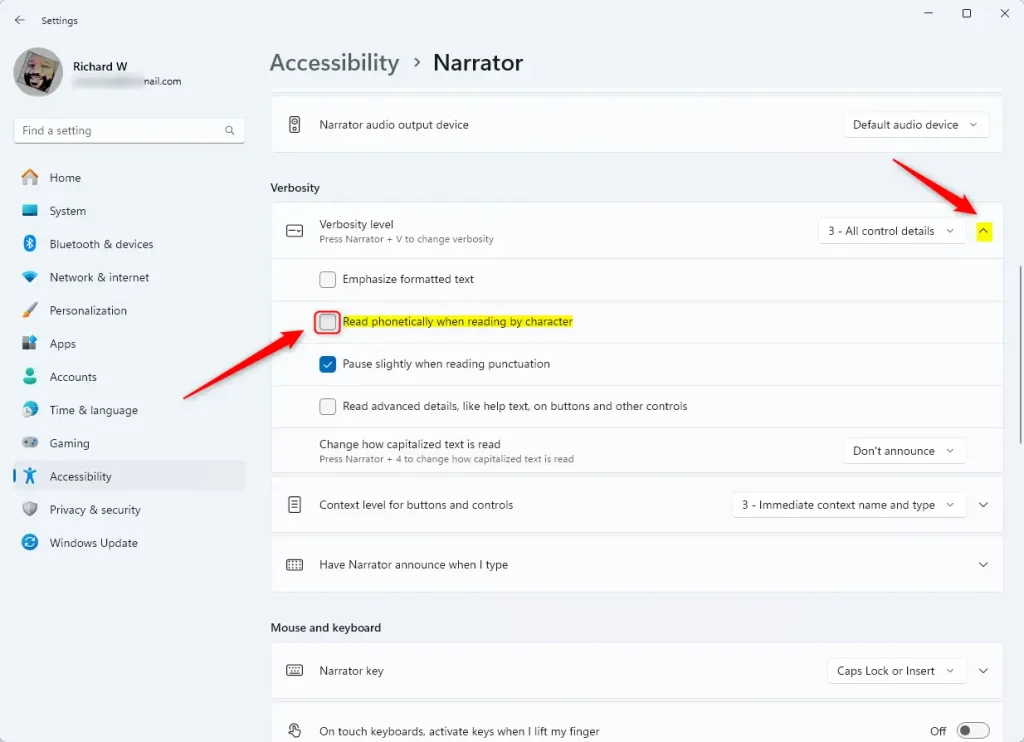
- Close the Settings app when you're done. Your choice is saved automatically.
That completes the process. To undo the change, repeat the steps and set the toggle back. If you don't see the option, make sure you're on Windows 11 and that you expanded the Verbosity level tile, since the toggle sits inside it.
Conclusion:
- Flexibility for Different Reading Needs: Enabling or disabling phonetic reading with Narrator in Windows 11 provides the flexibility to accommodate different reading needs.
- Enhanced Accessibility: Phonetic reading can benefit users who struggle with reading or pronouncing certain words, enhancing the accessibility of the Narrator feature.
- Personalized User Experience: The option to toggle phonetic reading on or off allows for a personalized user experience based on individual reading proficiency and preferences.
Was this guide helpful?

About the Author
Richard
Tech Writer, IT Professional
Richard is a writer at Geek Rewind who turns complex IT tasks into clear, step-by-step guides. He draws on years of hands-on experience in system administration and enterprise IT operations, focusing on Windows, Linux and WordPress: the problems people actually run into, and the fixes that work. His server and WordPress guides come from systems he runs himself. Richard builds and maintains the platform behind Geek Rewind, from its Ubuntu servers and Nginx configuration to its custom WordPress plugins. Many new tutorials start with readers' questions, and he's always glad to answer them in the comments.



[…] you use the Narrator app, you can enable or disable Narrators phonetic reading, pause for punctuation, adjust how the Narrator read advanced details, adjust the way […]
[…] you use the Narrator app, you can enable or disable Narrators phonetic reading, pause for punctuation, adjust how the Narrator read advanced details, adjust the […]
[…] you use the Narrator app, you can enable or disable Narrators phonetic reading, pause for punctuation, adjust how the Narrator read advanced details, adjust the […]
[…] you use the Narrator app, you can enable or disable Narrator phonetic reading, pause for punctuation, adjust how the Narrator read advanced details, adjust the way […]
[…] you use the Narrator app, you can enable or disable Narrator phonetic reading, pause for punctuation, adjust how the Narrator read advanced details, adjust the way […]
… liked this!