How to Add Natural Voices in Windows 11 Narrator
Windows 11 Narrator can use natural voices to sound more human, making it easier for you to understand what your PC is saying.
These new voices are a big step up from the older, robotic-sounding ones. They use modern speech technology to make screen content much clearer.
You can add these more natural voices through the Windows 11 Settings app. For example, a common natural voice available is Microsoft Zira.
Installing them improves how Narrator reads out your PC’s elements. This helps you navigate and understand your computer better.
Open Settings, navigate to Accessibility, then Narrator. Click “Add” under Narrator’s voices, choose a natural voice, and click Install. Wait for the download to complete.
Troubleshooting Natural Voices
If your natural voices aren’t showing up in Windows 11, ensure your internet connection is active, as it’s needed to download the language packs from the Microsoft Store.
Language Support and Integration
Natural voices offer many languages for your convenience. You can find the full list on the official Microsoft language support page. These natural voices integrate directly with Narrator and other accessibility tools, such as Immersive Reader in Microsoft Edge. Once downloaded, these text-to-speech engines work offline.
How to Remove Natural Voices (Admin Required)
To save storage space, you can remove Natural Voices in Windows 11. This process requires administrator rights. First, open PowerShell with administrator privileges and use a command to list your installed voices. Then, use another command to remove the specific voice package you want to delete.
- Open the PowerShell app as an administrator.
- Type the following command to see a list of your installed voices:
Get-AppxPackage -Name "*Voice*" | Select Name, PackageFullName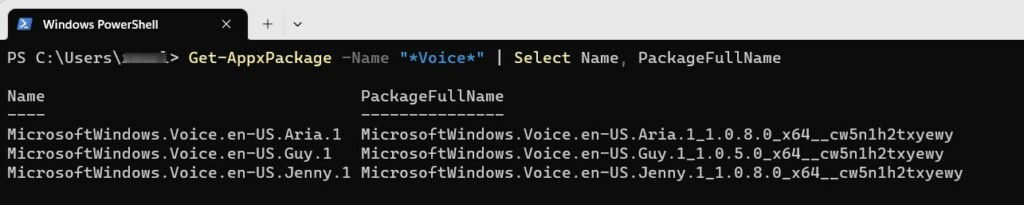
- Find the package name in the list, then run this command to remove it (replace the example text with the specific package name from your list):
Remove-AppxPackage -Package MicrosoftWindows.Voice.en-US.Aria.1_1.0.8.0_x64__cw5n1h2txyewySummary
Adding natural voices to Windows 11 Narrator makes using your computer much easier by providing a smoother, more human-like reading experience for all your content.
Why are natural voices not showing up in Narrator settings?
Natural voices might not be showing up in Narrator settings if your computer lost its internet connection during the download, so check your connection and Windows Update status.
Can I use natural voices offline after installation?
Yes, you can use natural voices offline in Windows 11 once they are fully downloaded and installed, as they are stored locally on your system.
Was this guide helpful?

About the Author
Richard
Tech Writer, IT Professional
Richard, a writer for Geek Rewind, is a tech enthusiast who loves breaking down complex IT topics into simple, easy-to-understand ideas. With years of hands-on experience in system administration and enterprise IT operations, he’s developed a knack for offering practical tips and solutions. Richard aims to make technology more accessible and actionable. He's deeply committed to the Geek Rewind community, always ready to answer questions and engage in discussions.


[…] keyboard shortcuts, launch it automatically, adjust the voice, speed, and volume, manage natural voices, lower other apps volume when Narrator is speaking, change Narrator audio output […]
[…] keyboard shortcuts, launch it automatically, adjust the voice, speed, and volume, manage natural voices, lower other apps volume when Narrator is speaking, change Narrator audio output […]
[…] on or off its keyboard shortcuts, launch it automatically, adjust the voice, speed, and volume, manage natural voices, lower other apps volume when the Narrator is speaking, change Narrator audio output […]
[…] keyboard shortcuts, launch it automatically, adjust the voice, speed, and volume, manage natural voices, lower other apps volume when Narrator is speaking, change Narrator audio output […]
[…] on or off its keyboard shortcuts, launch it automatically, adjust the voice, speed, and volume, manage natural voices, lower the volume of other apps when the Narrator is speaking, and […]
[…] keyboard shortcuts, launch it automatically, adjust the voice, speed, and volume, manage natural voices, and […]
[…] on or off its keyboard shortcuts, launch it automatically, adjust the voice, speed, and volume, manage natural voices, lower other apps volume when the Narrator is speaking, change Narrator audio output […]
[…] on or off its keyboard shortcuts, launch it automatically, adjust the voice, speed, and volume, manage natural voices, lower other apps volume when the Narrator is speaking, change Narrator audio output […]
[…] keyboard shortcuts, launch it automatically, adjust the voice, speed, and volume, manage natural voices, lower other apps volume when Narrator is speaking, change Narrator audio output […]
[…] you don’t like the voice it uses, you can add new natural voices that sound more clear and smooth on Windows […]