How to Change Narrator’s Pause for Punctuation in Windows 11

Open Settings Accessibility Narrator, scroll down to Verbosity level, find Pause slightly when reading punctuation, and toggle it On or Off. The change takes effect immediately without restarting.
What is Narrator?
Windows includes a built-in screen reader called Narrator. It reads on-screen text aloud for people with vision or reading challenges. One setting controls how Narrator handles punctuation, and changing it can make the voice sound much more natural. This guide shows where that setting is and how to switch it on or off.
Why Change Narrator’s Pause for Punctuation?
Clear pauses help listeners track where sentences end and keep the listening experience smooth. Some listeners like a slight pause after each comma or period. Others turn pauses off completely so Narrator reads faster.
With the pause turned on, Narrator will:
- Make it easier to tell where sentences or phrases end
- Make the reading sound more natural and clear
- Improve your overall listening experience
The best setting comes down to personal preference. Try both for a few days of normal work. A long email or document is a good test, because you will quickly notice whether the pauses help or slow you down.
How to Turn On or Off Pause for Punctuation
- Open Settings . Press
Windows key + Ion your keyboard. You can also click the Start menu (the Windows icon at the bottom-left) and then click Settings. The Settings window should open. - Go to Accessibility. In the list on the left side of the Settings window, click Accessibility. The accessibility options appear on the right.
- Open Narrator settings. On the right side, find and click Narrator. The Narrator page opens, with its on/off switch at the top.
- Find the Verbosity settings. Scroll down to the Verbosity section and click Verbosity level to expand it. The options under it should now be visible.
- Toggle the pause setting. Find the option called Pause slightly when reading punctuation. Switch it On if you want Narrator to pause a little at punctuation. Switch it Off if you want it to read straight through without pausing.
The steps are the same on Windows 11 Home and Pro. The change applies as soon as you flip the switch, so you do not need to restart. To test it, have Narrator read a paragraph with a few commas and full stops. To undo the change, go back to the same spot and flip the switch the other way.
Menu layouts can shift a little between Windows 11 updates, but the setting keeps the same name.
Visual Guide
The screenshots below show the same steps, so you can check that you are in the right place. In the Settings app, look for the following controls:
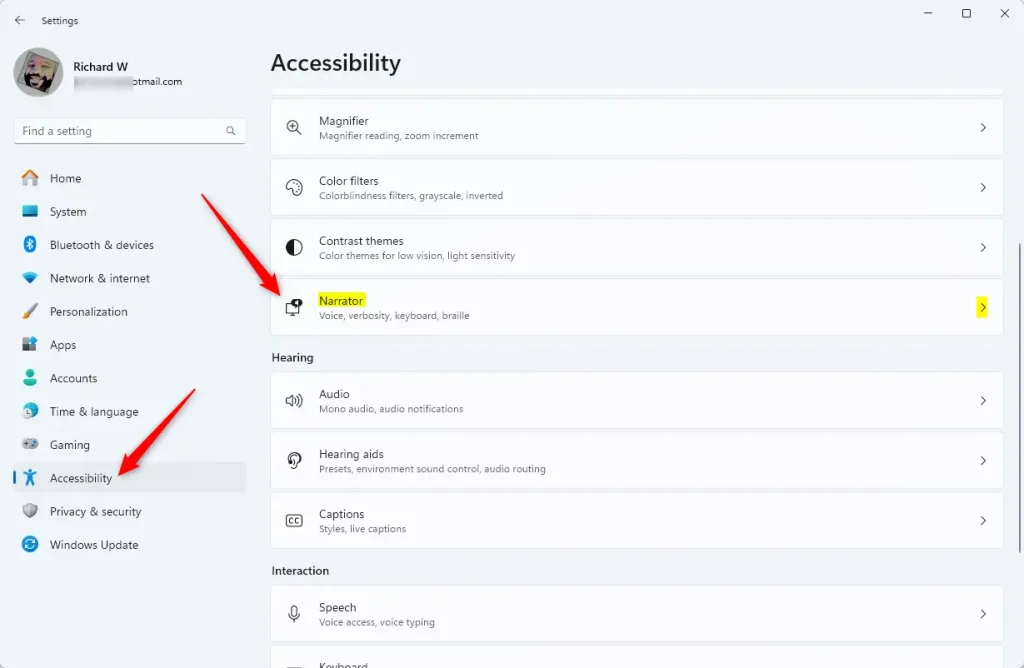
First, open the Narrator page from inside the Accessibility section, as shown above.
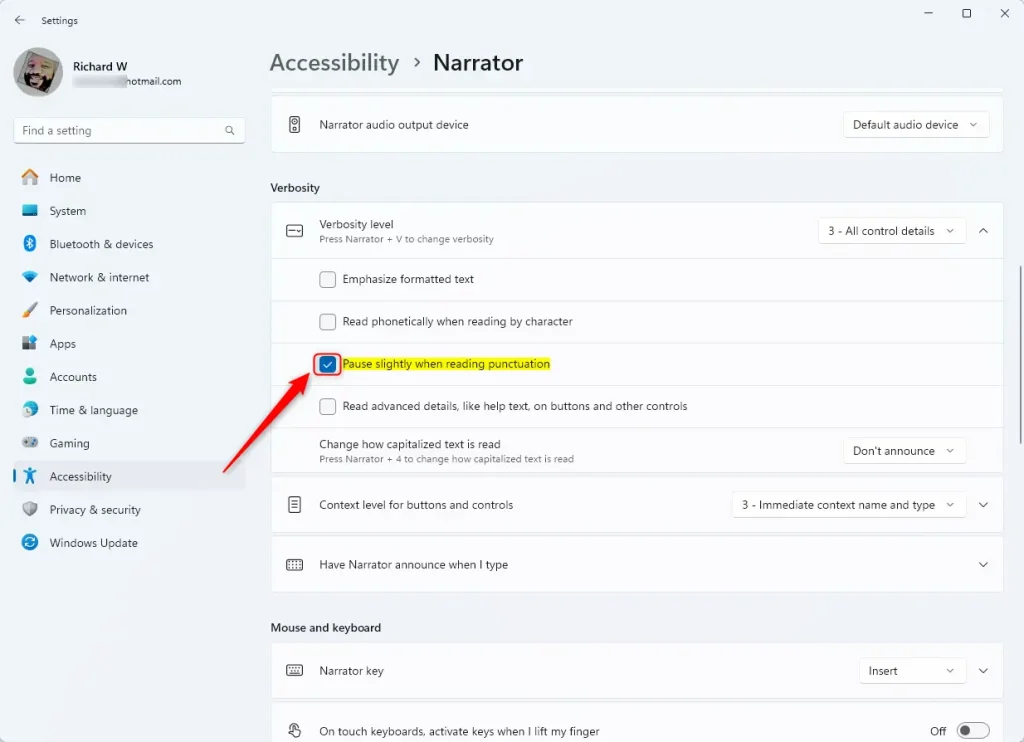
Next, find Pause slightly when reading punctuation and set it to On or Off.
Summary
This setting controls how long Narrator stays silent after punctuation marks such as commas or periods. Good pacing makes spoken text much easier to follow. If the pauses feel too slow, turn the option Off. If Narrator sounds rushed or runs sentences together, turn it back On.
Was this guide helpful?

About the Author
Richard
Tech Writer, IT Professional
Richard is a writer at Geek Rewind who turns complex IT tasks into clear, step-by-step guides. He draws on years of hands-on experience in system administration and enterprise IT operations, focusing on Windows, Linux and WordPress: the problems people actually run into, and the fixes that work. His server and WordPress guides come from systems he runs himself. Richard builds and maintains the platform behind Geek Rewind, from its Ubuntu servers and Nginx configuration to its custom WordPress plugins. Many new tutorials start with readers' questions, and he's always glad to answer them in the comments.




No comments yet — be the first to share your thoughts!