How to Show or Hide Voice Typing Mic on Windows 11 Touch Keyboard


- 14 steps
- Needs administrator rights
- Includes a restart or sign-out
The voice typing microphone on the Windows 11 touch keyboard lets you dictate text by speaking to your PC. You can show or hide this button depending on whether you use it. The touch keyboard is the on-screen keyboard that appears when you tap a text box on a touchscreen device, or when you open it by hand from the taskbar.
You can turn the button on or off in a few seconds from the Settings app. If you never dictate, hiding it frees a little room on the keyboard and avoids accidental taps. Nothing is uninstalled either way. Voice typing itself stays available, and you can still start it with the Win+H shortcut.
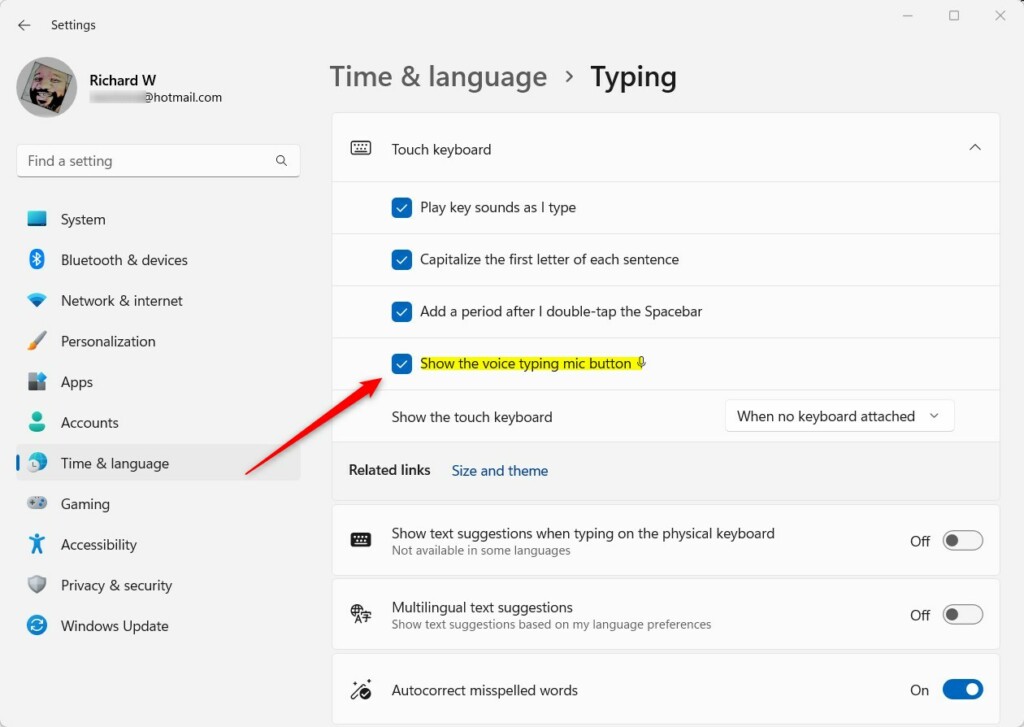
Open Settings, go to Time & language Typing, expand Touch keyboard, and check or uncheck “Show the voice typing mic button”. The microphone icon appears or disappears on the touch keyboard immediately without restart.
Why Use Voice Typing?
Voice typing is useful when typing on glass is slow or awkward, such as on a tablet or a 2-in-1 held in one hand. You speak, and Windows converts your speech into written words in whichever text box has focus.
- You need a working microphone. A built-in mic on a laptop or tablet is fine.
- Voice typing usually needs an internet connection, because the speech recognition is handled online.
- Show or hide the button only changes the keyboard layout. It does not turn the microphone itself on or off.
How to Turn On or Off the Voice Typing Mic Button Using Windows Settings
The simplest way to change this is through the built-in Settings app. This method controls whether the microphone icon appears on the touch keyboard, and you don’t need to touch any system files. You will open Settings, go to the Time & language section, and find the typing options.
The exact wording of the toggle can differ slightly between Windows 11 versions. If you don’t see the option, check that Windows is fully updated, because older builds may not list it. Follow the steps below and look for the setting that mentions the voice typing mic button.
- Open Windows Settings . Click the Start menu button and choose Settings. Or press
Windows key + Ion your keyboard. - In the Settings window, click on Time & language on the left side.
- On the right side, click the Typing section to open it.
- Find and expand the Touch keyboard section.
- Look for the option “Show the voice typing mic button” and check the box to turn it on. Uncheck it to turn it off.
The change takes effect right away, and you don’t need to restart. If the keyboard is already open, close it and bring it up again to see the updated layout. To undo the change, go back to the same page and flip the toggle the other way.
How to Turn On or Off the Voice Typing Mic Button Using the Registry (For Advanced Users)
You can also show or hide the voice typing mic button by changing a value in the Registry Editor, which is a database for low-level system settings. This route is useful if the Settings page is missing the option, won’t open, or if you prefer to manage settings through registry keys. It is also the method to use when you need to apply the same change to several PCs.
Before you change anything, create a restore point or export the key you are about to edit, so you can roll back if something goes wrong. You also need an administrator account to make changes.
Here's how:
- Open the Registry Editor by typing
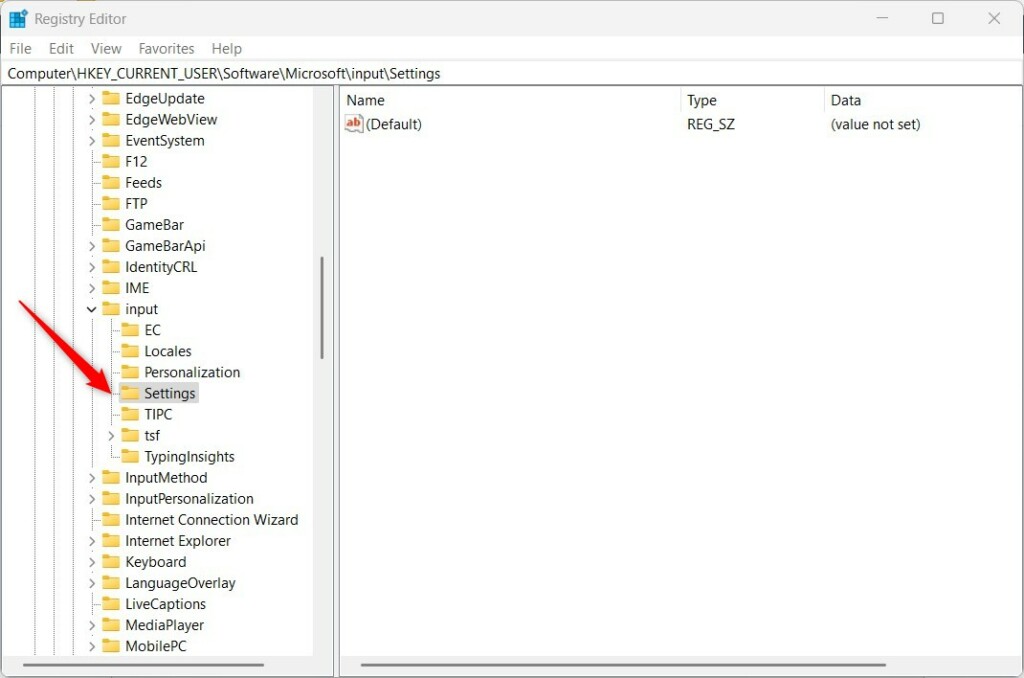
regeditin the Start menu search and pressing Enter. - Go to this folder (key):
HKEY_CURRENT_USER\Software\Microsoft\Input\Settings - If you don't see the Settings folder, right-click on Input. Select New Key and name it Settings.
- Right-click on the right side of the Settings folder. Choose New DWORD (32-bit) Value and name it IsVoiceTypingKeyEnabled.
- Double-click this new value. Set the Base to Decimal and enter:
1to turn the mic button ON0to turn the mic button OFF
- Click OK and close the Registry Editor.
- Restart your computer for the changes to take effect.
Once the value is saved, close the Registry Editor. If the button hasn't changed on the touch keyboard, sign out and back in, or restart the PC, and then check again. To undo the change, open the same value, set it back to what it was before, and save it. If you exported the key first, you can also double-click that exported file to restore it.
Summary
A hardware microphone picks up your speech so you can enter text faster on tablets and other touch-enabled devices. Dictation is a good alternative when typing with your fingers is slow.
Use the Settings method for a quick, low-risk change. Use the Registry Editor only when Settings doesn't offer the option or you need to manage it another way.
Have a question about this guide?
Answered by AI from this guide. Good questions may be added to this page — please don't include personal details.
Did this guide fix your problem?

About the Author
Richard
Tech Writer, IT Professional
Richard is a writer at Geek Rewind who turns complex IT tasks into clear, step-by-step guides. He draws on years of hands-on experience in system administration and enterprise IT operations, focusing on Windows, Linux and WordPress: the problems people actually run into, and the fixes that work. His server and WordPress guides come from systems he runs himself. Richard builds and maintains the platform behind Geek Rewind, from its Ubuntu servers and Nginx configuration to its custom WordPress plugins. Many new tutorials start with readers' questions, and he's always glad to answer them in the comments.
No comments yet — be the first to share your thoughts!