How to Change Narrator’s Reading of Capitalized Text in Windows 11


Narrator is the built-in screen reader in Windows 11. It gives you three ways to handle capital letters, so you can pick the one that is easiest to listen to. It can ignore capitals entirely, raise its pitch when it reads them, or say the word “cap” before each one.
Changing this setting stops Narrator from announcing every capital letter in a way you find distracting. That makes long web pages, documents and emails much easier to follow by ear. The setting works the same on Windows 11 Home and Pro, and it needs no restart.
Open Settings Accessibility Narrator, scroll to Verbosity, click Change how capitalized text is read, and select Don’t announce, Increase pitch, or Say cap. The new setting takes effect immediately.
Why This Matters
Microsoft changed how Narrator reads capitalized text to help users with visual impairments. Narrator used to read capitalized words at a higher pitch, and that confused some users. The newer options give you more control, and the plain reading style matches how people normally read text. If your copy of Windows 11 is missing the options described here, run Windows Update and install any pending updates. Older builds may not show all three choices.
Your Options
Narrator has three choices for reading capitalized text. Here is what each one does:
- Don’t announce – Narrator doesn’t mention that text is capitalized. This is the quietest option and works well for long reading, but you won’t hear any difference between “windows” and “Windows”.
- Increase pitch – Narrator raises its voice pitch when reading capitalized text. You hear the capitals without extra words, but the change can be subtle with some voices.
- Say cap – Narrator says the word “cap” before capitalized letters. This is the most explicit option. It helps when you proofread, spell names or type passwords, though it can be wordy in long text.
If you aren’t sure, try each one on a page you know well. You can change it again at any time.
How to Change Narrator’s Reading of Capitalized Text
These settings let you choose how Narrator announces capital letters: by saying “cap”, by changing its pitch, or by ignoring them. You change this in the Windows 11 Settings app , under Accessibility, in the Narrator settings. The steps below walk through it.
- Open the Settings app. Click the Start menu and select Settings. Or press Windows key + I on your keyboard. The Settings window opens with a list of categories on the left. Windows Settings Settings app
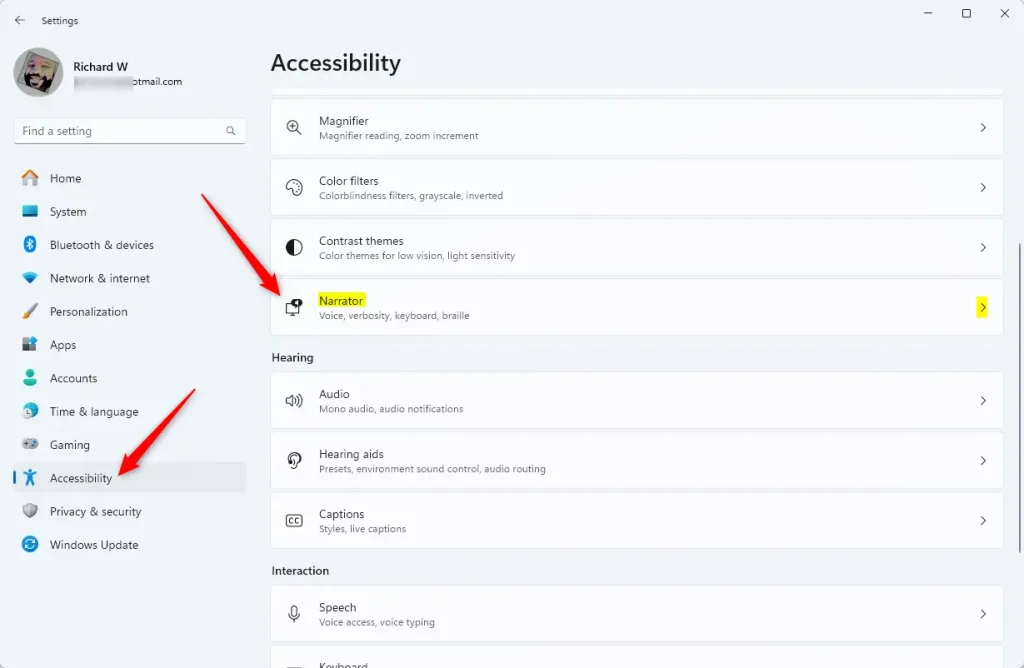
- In the Settings app, click Accessibility on the left side. The Accessibility page appears on the right, with sections for vision, hearing and interaction.
- On the right side, find the Narrator tile and click it to open the Narrator settings. You should see the Narrator on/off switch at the top, with more options below it. You can leave Narrator on or off here. The capitalization setting is saved either way, and it applies the next time Narrator runs.
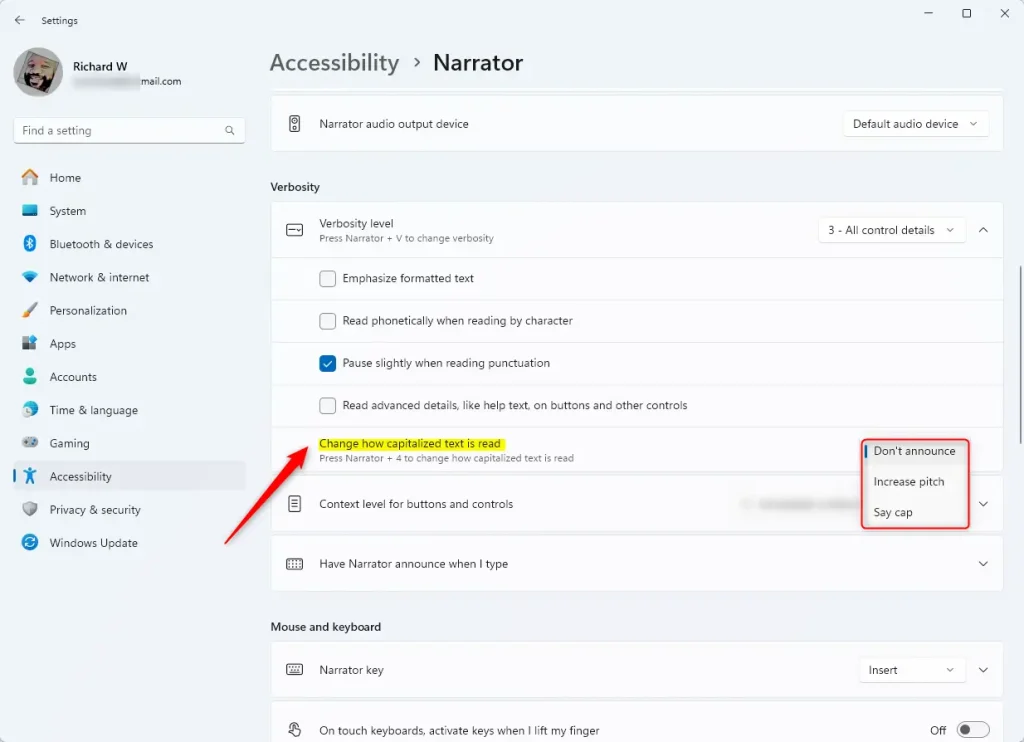
- Scroll down the Narrator page to the Verbosity section. Expand the Verbosity level tile by clicking it. More verbosity options appear below it.
- Find and select the Change how capitalized text is read tile. A drop-down list of options opens.
- Choose one of these options. The new setting takes effect straight away:
- Don't announce
- Increase pitch
- Say cap
The Narrator key is Caps Lock or Insert by default. To test your choice, open a document or web page with mixed-case text and let Narrator read it.
- Close the Settings app when you finish. Click the X in the top-right corner of the window. Your choice is saved automatically, so there is no Save button.
Narrator will now read capitalized text using your chosen setting. To undo the change, go back to Settings Accessibility Narrator, open the same tile and pick a different option.
Summary
You can adjust how Narrator reads capitalized text in Windows 11 with three choices: Don't announce, Increase pitch or Say cap. Try each one on text you know well, keep the one that is easiest to listen to, and switch any time from the Narrator settings.
Was this guide helpful?

About the Author
Richard
Tech Writer, IT Professional
Richard is a writer at Geek Rewind who turns complex IT tasks into clear, step-by-step guides. He draws on years of hands-on experience in system administration and enterprise IT operations, focusing on Windows, Linux and WordPress: the problems people actually run into, and the fixes that work. His server and WordPress guides come from systems he runs himself. Richard builds and maintains the platform behind Geek Rewind, from its Ubuntu servers and Nginx configuration to its custom WordPress plugins. Many new tutorials start with readers' questions, and he's always glad to answer them in the comments.



[…] Narrator phonetic reading, pause for punctuation, adjust how the Narrator read advanced details, adjust the way capitalized text is read, add a braille display with Narrator, change input and output language for braille with Narrator, […]
[…] Narrator phonetic reading, pause for punctuation, adjust how the Narrator read advanced details, adjust the way capitalized text is read, add a braille display with Narrator, change input and output language for braille with Narrator, […]