How to Change Braille Text Cursor in Windows 11
The Braille text cursor in Windows 11 lets you change how it looks when using Narrator. Narrator is a built-in Windows tool that reads screen text aloud, helping people with vision difficulties use their computers.
This feature allows you to customize the text cursor specifically for braille displays. For instance, you can adjust its size and color to better suit your needs and preferences.
Narrator is a screen reader that describes what’s on your computer screen and announces actions. It’s designed to make using a PC easier for those who are blind or have low vision, helping millions of people navigate their digital world.
Open Settings, navigate to Accessibility, then Narrator. Scroll to Braille settings, click Use a braille display with Narrator, and under Braille cursor, choose your preferred text cursor display option.
Other things you can do with Narrator
Windows 11’s Narrator tool lets you change many settings to make it work better for you. You can control keyboard shortcuts, decide if Narrator starts when you sign in, pick a different voice, and even connect a braille display.
- Turn keyboard shortcuts on or off
- Start Narrator automatically when you sign in
- Change the voice, speed, and volume
- Use a braille display device
And many more settings to customize your experience.
One special setting is how the braille text cursor looks on your braille display. You can change it to different styles. You can even hide it if you want.
Why change the braille text cursor?
Customizing your braille cursor makes your display easier to use. Different cursor styles help you see what you’re doing. Some people prefer to hide the cursor completely.
How to change the braille text cursor in 🪟 Windows 11
Changing the braille cursor in Windows 11 makes using your braille display much easier and more comfortable. You can adjust how the cursor looks and acts to better suit your needs. Follow these simple steps in Settings to find the braille options and make your preferred changes.
- Open Settings: Click on the Start menu and select Settings. Or press the Windows key + I on your keyboard.
- Go to Accessibility: In the Settings window, click Accessibility on the left side. Then click on Narrator on the right.
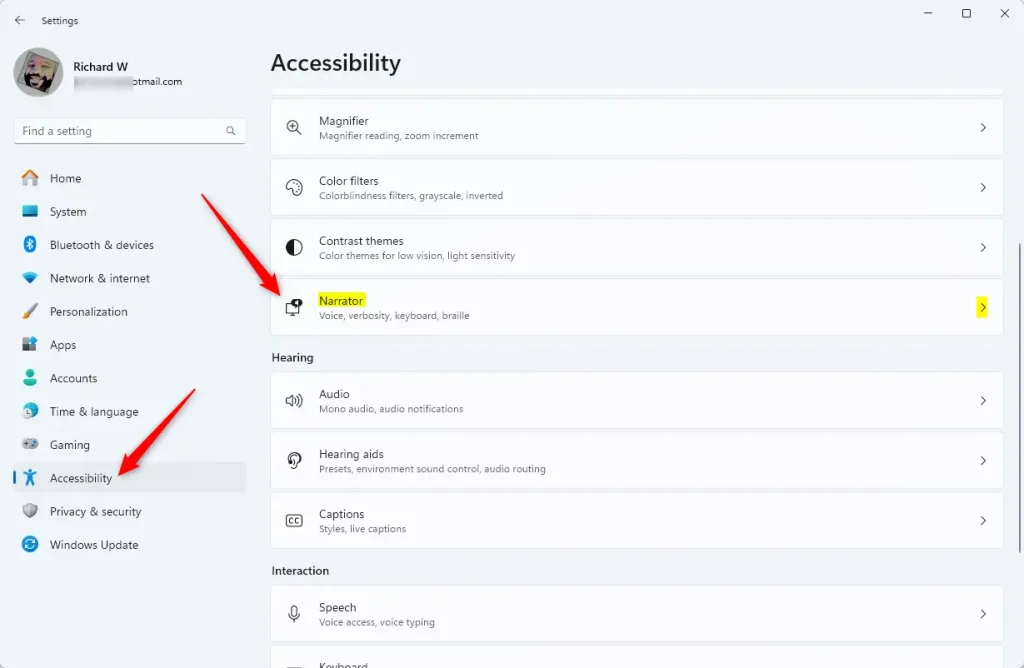
Narrator tile in Windows 11 Settings app for accessibility features. - Find Braille settings: Scroll down to the Braille section. Click to open the Use a braille display with Narrator settings.
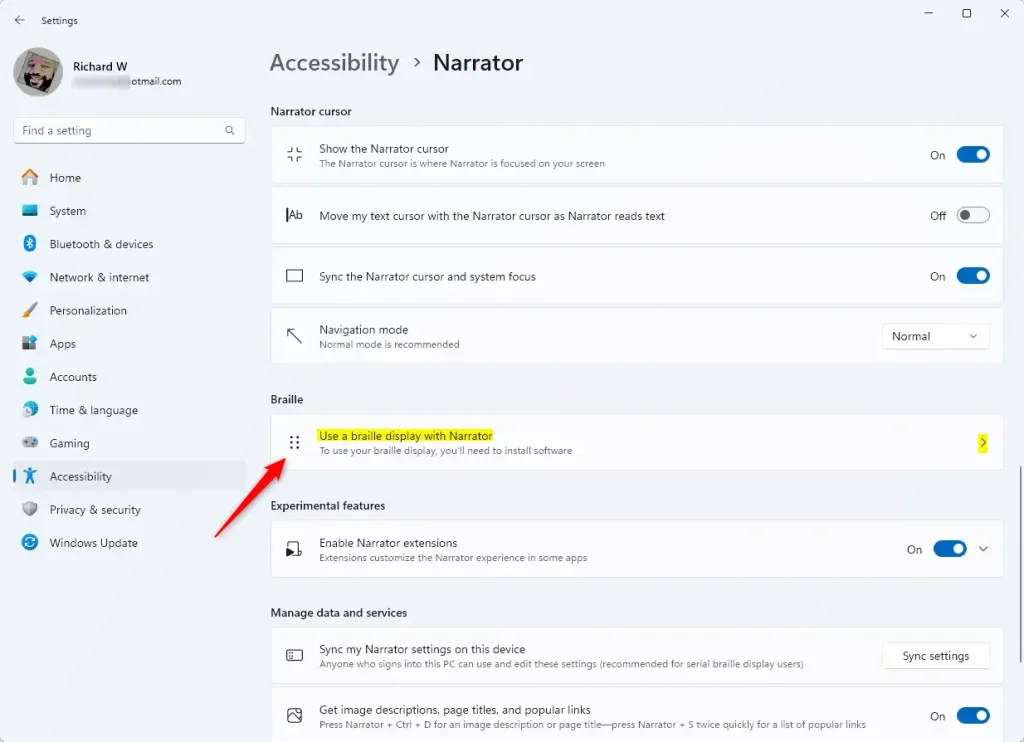
Braille settings in Narrator on Windows 11 - Install braille support (if needed): %📂%FLAG_ADMIN%% If you haven’t already, click the Download and install braille button. This adds braille support to your PC.
- Turn on Braille: After installing, you can turn braille support on or off.
- Add your braille display: Click Add a braille display. Then pick your device’s manufacturer and connection type.
- Change the text cursor display: Under Braille cursor, find Display the text cursor. Choose how you want the braille text cursor to look. You can pick from several options. You can also hide it completely.
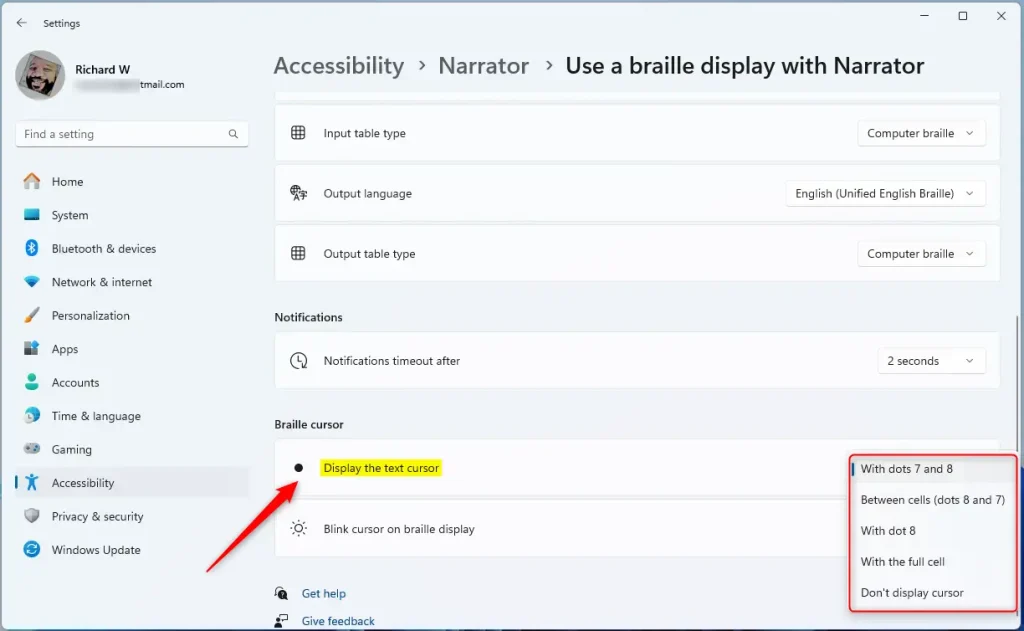
Options to change braille text cursor display in Windows 11
That’s all! You’ve now customized how the braille text cursor appears on your Windows 11 PC.
What happens when you customize the braille cursor?
Once you change these settings, your braille display will show the cursor exactly how you want it. You’ll see the changes right away on your display.
Summary
Customising the braille text cursor in Windows 11 greatly improves your experience with a braille display. You can choose how the cursor appears or hide it to make reading easier and more comfortable. The Settings app offers simple steps to adjust these options for your braille cursor.- Changing the braille text cursor helps make using a braille display easier and more comfortable.
- You can choose how the cursor looks. You can also hide it if you prefer.
- Just follow the simple steps in the Settings app to make these changes.
- If you want to learn more about using Narrator and braille displays, check out this helpful guide.
Was this guide helpful?

About the Author
Richard
Tech Writer, IT Professional
Richard, a writer for Geek Rewind, is a tech enthusiast who loves breaking down complex IT topics into simple, easy-to-understand ideas. With years of hands-on experience in system administration and enterprise IT operations, he’s developed a knack for offering practical tips and solutions. Richard aims to make technology more accessible and actionable. He's deeply committed to the Geek Rewind community, always ready to answer questions and engage in discussions.


No comments yet — be the first to share your thoughts!