How to Change Braille Text Cursor in Windows 11

The braille text cursor controls how your braille display shows the position of the text cursor. Narrator is the built-in screen reader in every edition of Windows 11, Home and Pro included. It sends the cursor position to a connected braille device, so you can find your place in the text by touch.
In Windows 11 the setting is called Display the text cursor. It lets you pick how the cursor appears on the braille display, or hide it. The steps below show where to find it. Nothing needs a restart.
Open Settings , navigate to Accessibility, then Narrator. Scroll to Braille settings, click Use a braille display with Narrator, and under Braille cursor, choose your preferred text cursor display option.
Other things you can do with Narrator
Narrator has many settings. You can change its keyboard shortcuts, decide whether it starts when you sign in, pick a different voice, and connect a braille display. To see them all, go to Settings Accessibility Narrator To turn Narrator on or off from the keyboard, press Win+Ctrl+Enter.
- Turn keyboard shortcuts on or off
- Start Narrator automatically when you sign in
- Change the voice, speed, and volume
- Use a braille display device
There are many more settings you can adjust to suit the way you work.
One of these settings is how the braille text cursor looks on your braille display. You can switch between different styles, or hide the cursor altogether.
Why change the braille text cursor?
Changing the cursor style can make a braille display easier to read. A distinct cursor helps you see where you are in a line of text. Some people find the cursor distracting and prefer to hide it. Both choices are fine, so use whichever suits you.
How to change the braille text cursor in 🪟 Windows 11
To change the braille text cursor, open the Narrator settings, find the braille section, and change Display the text cursor. You can change how the cursor appears on your braille display, or hide it completely. Hiding it can make long documents less cluttered to read. Follow the steps below.
- Open Settings. Click Start and select Settings. You can also press the Windows key + I. The Settings window opens.
- Go to Accessibility. Click Accessibility in the left pane, then click Narrator on the right. The Narrator page opens with its list of options.
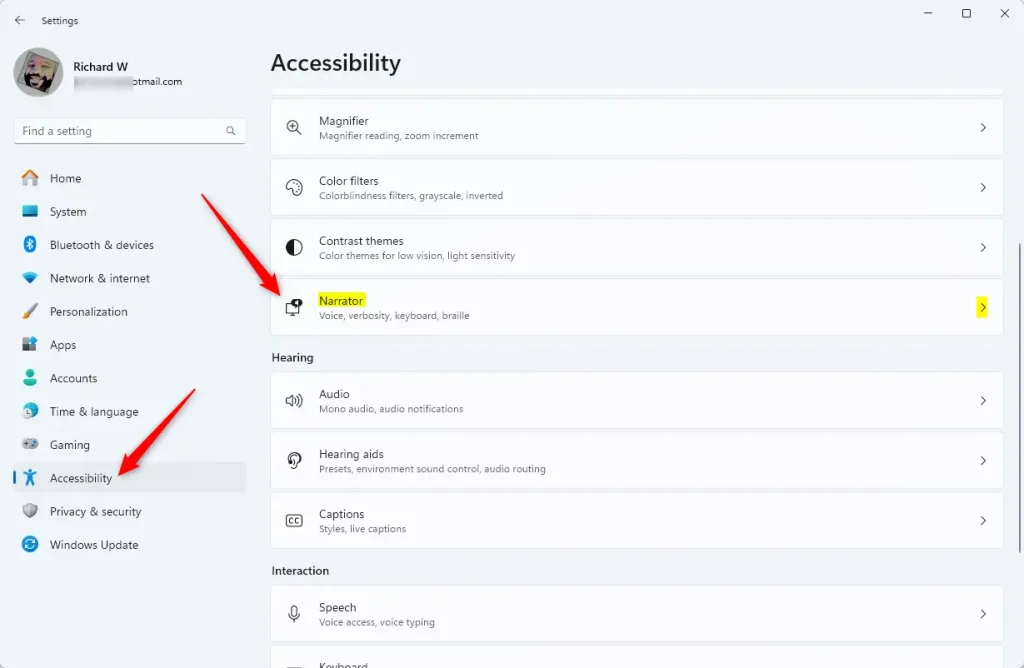
Narrator tile in Windows 11 Settings app for accessibility features. - Find the braille settings. Scroll down to the braille section and click Use a braille display with Narrator. The braille options expand or open on a new page, depending on your build of Windows 11.
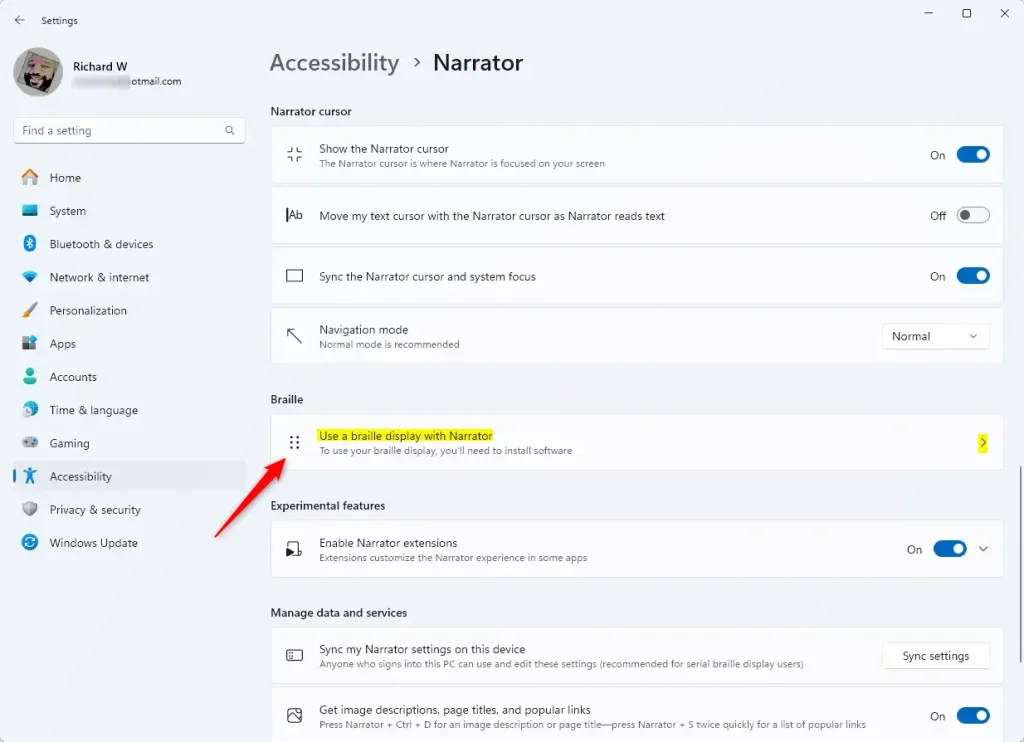
Braille settings in Narrator on Windows 11 - Install braille support, if needed. %%FLAG_ADMIN%% If you haven't done this before, click the Download and install braille button. This adds braille support to your PC. It needs an internet connection, and you may be asked for administrator approval. Wait for the download to finish before you go on.
- Turn braille on. Once braille support is installed, use the braille switch to turn it on. You can turn it off the same way later.
- Add your braille display. Click Add a braille display. Pick your device's manufacturer, then the connection type, such as USB or Bluetooth. Make sure the device is plugged in or paired first. Without a connected display you won't see the cursor change.
- Change the text cursor display. Under the braille cursor options, find Display the text cursor and open the list. Choose the cursor style you want, or choose the option that hides the cursor. The choices are listed on screen, and the exact wording can vary slightly between Windows 11 versions.
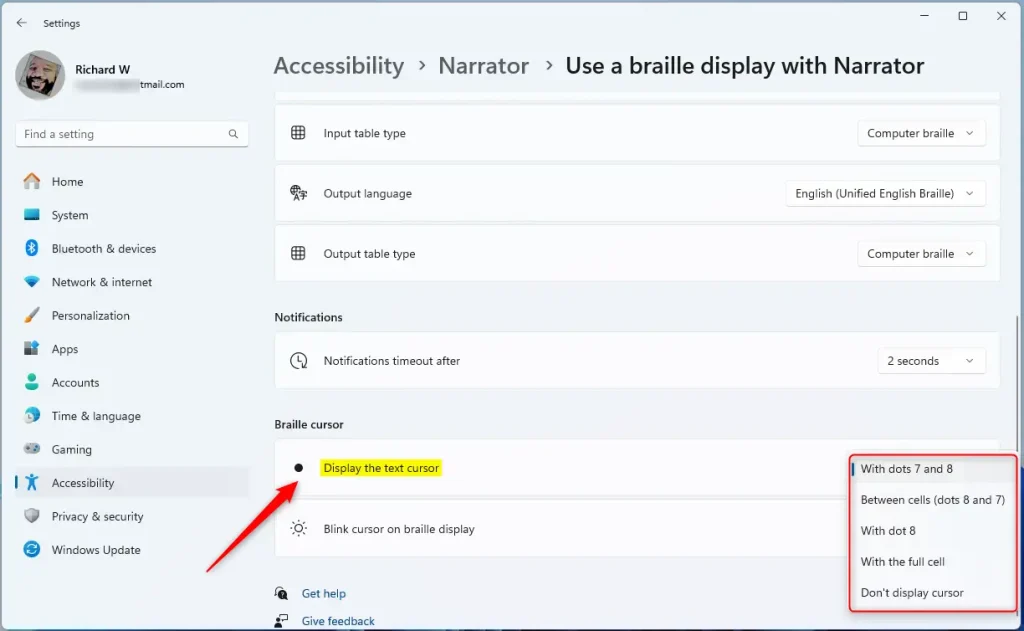
Options to change braille text cursor display in Windows 11
That's it. The braille text cursor now appears the way you chose. If you don't like the result, go back to Display the text cursor and pick a different option. You can switch as often as you like.
What happens when you customize the braille cursor?
The new setting should take effect straight away on your braille display, with no restart. If nothing changes, check that the display is connected and that braille is turned on in Narrator. Then move the text cursor in a document or text box to see the new style.
Summary
Customising your braille cursor Windows 11 settings greatly improves your daily experience with a braille display. You can choose how the cursor appears, adjust blink rates, or hide it completely to make reading much easier and more comfortable. The Settings app offers quick steps to adjust these options whenever you need them.- Changing the braille text cursor helps make using a braille display easier and more comfortable.
- You can choose how the cursor looks. You can also hide it if you prefer.
- Just follow the simple steps in the Settings app to make these changes.
- If you want to learn more about using Narrator and braille displays, check out this helpful guide.
Was this guide helpful?

About the Author
Richard
Tech Writer, IT Professional
Richard is a writer at Geek Rewind who turns complex IT tasks into clear, step-by-step guides. He draws on years of hands-on experience in system administration and enterprise IT operations, focusing on Windows, Linux and WordPress: the problems people actually run into, and the fixes that work. His server and WordPress guides come from systems he runs himself. Richard builds and maintains the platform behind Geek Rewind, from its Ubuntu servers and Nginx configuration to its custom WordPress plugins. Many new tutorials start with readers' questions, and he's always glad to answer them in the comments.




No comments yet — be the first to share your thoughts!