How to Change Braille Display Notification Timeout in Windows 11

The braille display notification timeout in Windows 11 controls how long alert messages stay visible on your connected braille device while you use Narrator. Narrator is the built-in screen reader that reads on-screen text out loud. You can set the timer anywhere from 3 seconds to 5 minutes, so you have enough time to read a warning before it disappears.
A short timeout can make a system alert vanish before you finish reading it on a refreshable braille display, because braille is read at your own pace. A longer timeout keeps those messages on the display until you have read them. The setting is the same on Windows 11 Home and Pro, and you don’t need to restart the PC after changing it.
Open Settings , navigate to Accessibility, then Narrator, and finally Braille. Under Notifications timeout after, select your desired duration. This adjusts how long braille notifications remain visible with Narrator.
Steps to Change Notification Timeout for Braille Display
- Open Settings. Click the Start menu (the Windows icon in the bottom-left corner) and choose Settings. Or press
Windows key + Ion your keyboard to open the Settings app quickly. The Settings window should open with a list of categories on the left. - Go to Accessibility. In the Settings window, click Accessibility in the left-hand menu. The right side now shows the accessibility options, grouped under headings such as Vision, Hearing and Interaction.
- Open Narrator Settings. On the right side, under the Vision group, click Narrator to see more options. You will see the Narrator on/off toggle at the top, followed by its other settings. You don’t have to turn Narrator on just to browse this page.
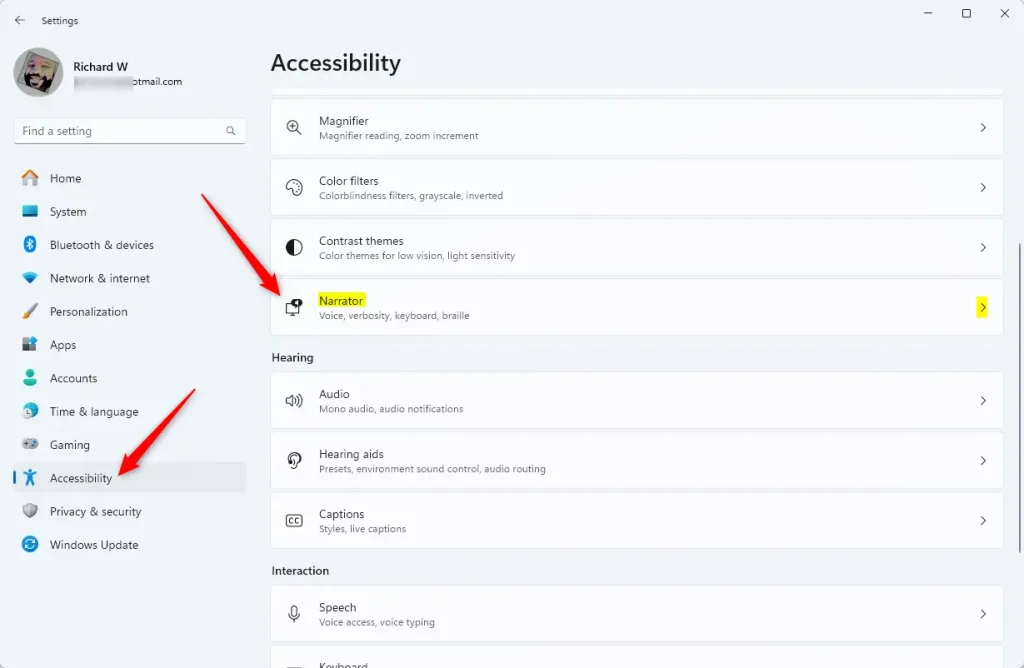
The braille settings sit inside Narrator, so the route is always the same: Settings, then Accessibility, then Narrator. Once you are on the Narrator page, you can reach the braille display options and set how long messages and alerts stay on your braille device before they disappear.
If you can’t find the Accessibility category, make sure you are in the main Settings app and not a search results page. The category list is always on the left.
- Find Braille Settings. Scroll down the Narrator page to the Braille section and click Use a braille display with Narrator to open it. The braille options expand or open on their own page, depending on your build of Windows 11.
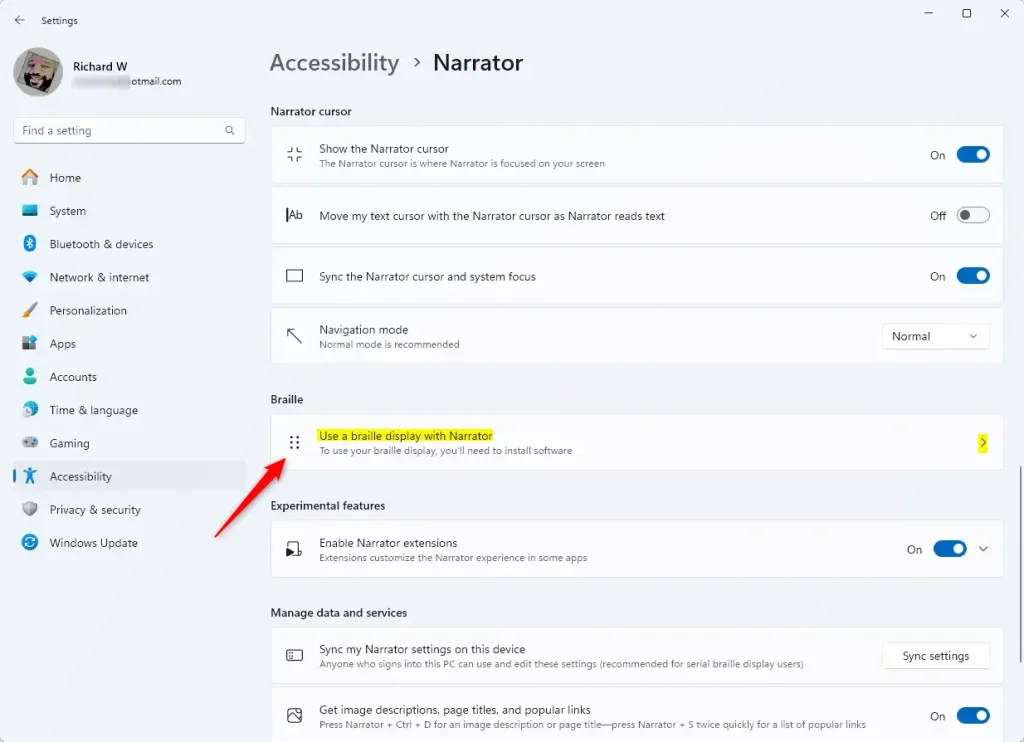
This is where the timeout lives. Windows needs braille support installed before it can talk to a display, so you may need to add that first. If the timeout option is missing or greyed out, the usual cause is that braille support or a display driver has not been set up yet. Work through the steps below in order.
If the braille options look different from what is described here, check Windows Update . Narrator changes between releases, and a label may differ slightly on an older build.
- Install braille support if needed. If you haven't installed braille support yet, click Download and install braille to add it to your computer. Wait for the download to finish before you continue. You need an internet connection for this step. (Learn more about installing braille support)
- Add your braille display. Under Braille displays and drivers, click Add a braille display and choose your device's brand and connection type, such as USB or Bluetooth. Connect or pair the device first so Windows can find it. Your display should then appear in the list.
- Find the Notifications section. Click Notifications timeout after. A list of time options opens.
- Pick your timeout length. Choose how long you want notifications to stay on your braille display before they disappear. You can select options like 5 seconds, 10 seconds, or more, up to 5 minutes. If you are unsure, start with a longer value and shorten it later once you know how much time you need.
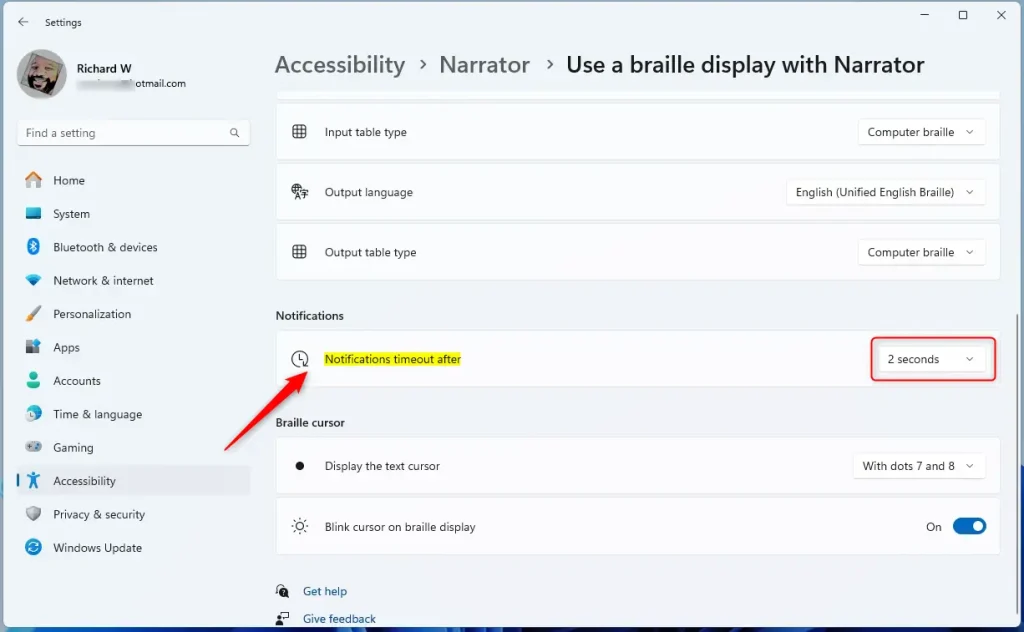
The change applies as soon as you pick a value, and Windows saves it automatically. There is no Apply or Save button to click.
To undo it, go back to Settings Accessibility Narrator, open the same braille setting, and choose a different timeout. You can change it as often as you like.
What happens when you're done? Your braille display notifications will now remain visible for the duration you selected. The next time Narrator sends an alert to your braille device, it should stay on the display for that long before clearing.
Summary
Adjusting the braille display notification timeout ensures important alerts stay on your braille device long enough to read without vanishing prematurely. Personalizing this setting helps you keep up with screen reader messages at a comfortable speed, making daily computer use much easier if you rely on a refreshable braille display.
- You learned how to open the Settings app and find the Narrator braille display options.
- You can change how long notifications stay on your braille display to make reading easier and avoid interruptions.
- If you want to learn more about using Narrator and braille displays, check out this helpful guide: How to Use a Braille Display with Narrator on Windows 11.
Was this guide helpful?

About the Author
Richard
Tech Writer, IT Professional
Richard is a writer at Geek Rewind who turns complex IT tasks into clear, step-by-step guides. He draws on years of hands-on experience in system administration and enterprise IT operations, focusing on Windows, Linux and WordPress: the problems people actually run into, and the fixes that work. His server and WordPress guides come from systems he runs himself. Richard builds and maintains the platform behind Geek Rewind, from its Ubuntu servers and Nginx configuration to its custom WordPress plugins. Many new tutorials start with readers' questions, and he's always glad to answer them in the comments.




No comments yet — be the first to share your thoughts!