How to Change Braille Display Input and Output Types in Windows 11

What is Narrator?
Narrator is a free screen reader built into Windows 11. It reads the text on your screen out loud, which helps people who are blind or have low vision. Narrator also works with braille displays, so you can read what is on screen in braille and type back to the computer from the display.
The braille settings live inside the Narrator settings page. You do not need a Microsoft account or a separate download from the Microsoft Store to get to them. You may need to install braille support first, and the steps below cover that.
Why Change Input and Output Table Types?
Changing your braille display settings helps you in several ways:
- Make braille easier to read and understand.
- Choose how special symbols and letters appear in braille.
- Use different languages or technical braille formats.
If braille looks wrong on your display, for example letters show up as odd symbols or contractions appear when you want full spelling, the table type is the first thing to check. It is a quick change and easy to reverse.
How to Change Braille Input and Output Table Types in 🪟 Windows 11
The input and output table types tell Windows how to translate text for your braille display and how to read what you type on it. Setting them correctly makes the display work properly with different languages and symbols. You can change them right inside Windows. No restart of the PC is needed, though Narrator may need to be running for the display to respond.
- Open Windows Settings . Click the Start menu and select Settings. Or press the Win+I on your keyboard. The Settings window opens.
- Go to Accessibility. In the Settings window, click Accessibility in the left pane. The accessibility options appear on the right.
- Open Narrator settings. Scroll down to the Vision section and click Narrator. The Narrator page opens with its options.
- Find Braille settings. Scroll to the “Braille” section and click Use a braille display with Narrator. The braille options expand below it.
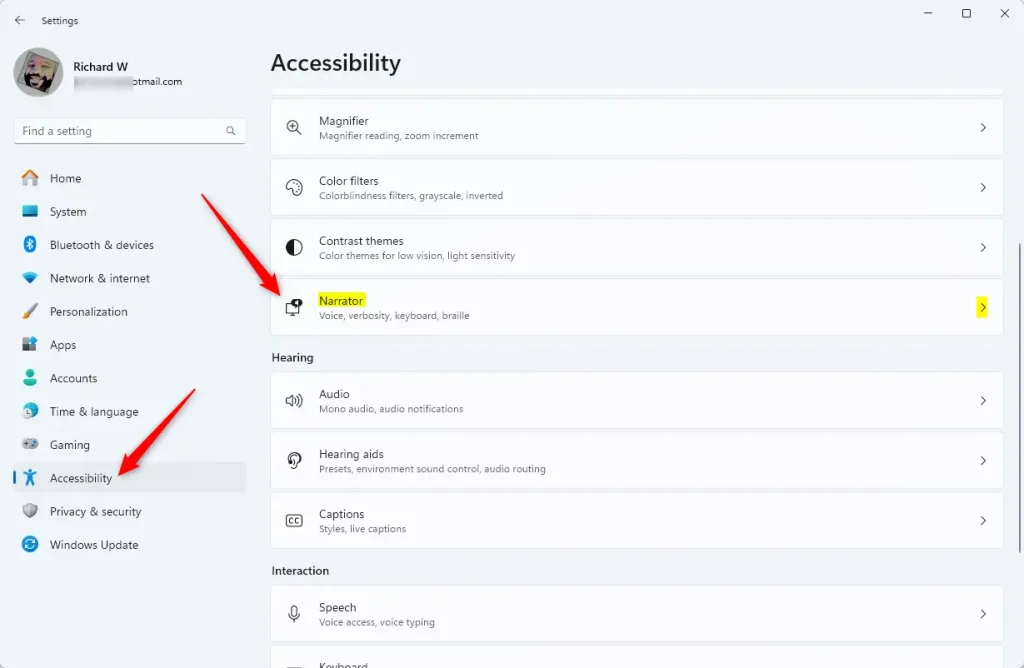
Narrator tile in Windows 11 Settings app for accessibility features. - Install braille support (if needed). If you have not set it up yet, click Download and install braille. This downloads braille support for Narrator, so your PC needs an internet connection. Wait for the download to finish before you continue. Learn more about setting up a braille display
- Add your braille display. Under “Braille displays and drivers,” click Add a braille display. Choose your device’s manufacturer and connection type, such as USB or Bluetooth . Connect or pair the display first if Windows does not find it.
- Change input and output table types. In the “Braille display input and output” section, pick the table type you want from these options. If the page shows separate lists for input and output, set each one. Available tables depend on your language and Windows version, so your list may differ slightly.
- Computer braille: Shows braille using computer standards.
- Uncontracted braille: Shows every braille character fully with no shortcuts.
- Contracted braille: Uses braille contractions for faster reading.
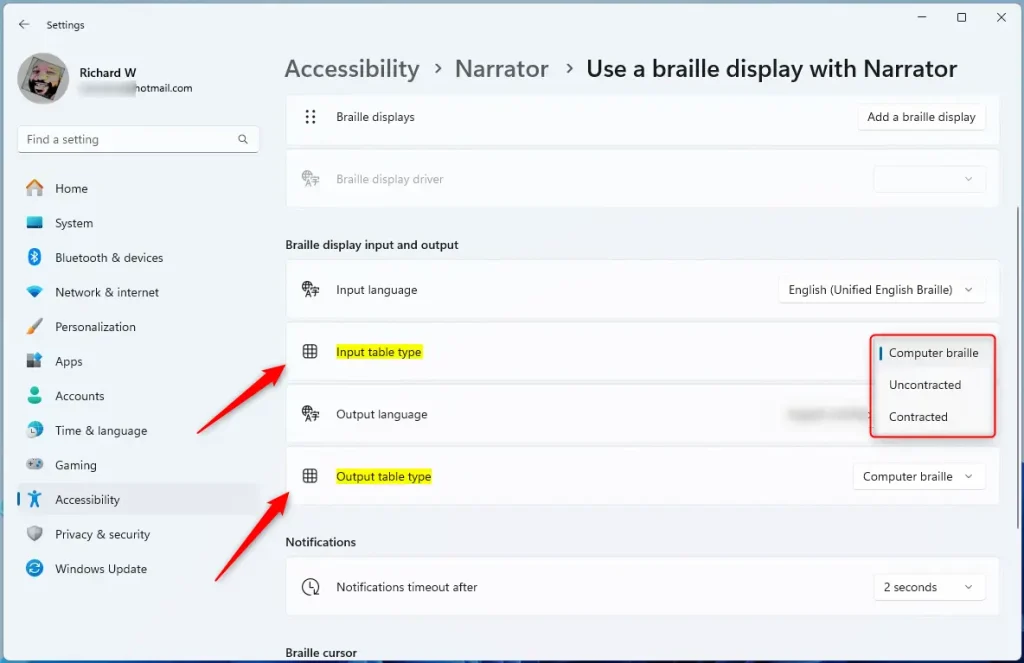
Braille display input table types options
Your selected braille display input and output types now control the braille device. Windows 11 uses these settings to translate text for your braille display, so you can read and enter information the way you chose.
If the result is not what you wanted, return to the same page and pick a different table. Nothing is permanent, so you can switch between tables as often as you need. If the display shows no braille at all, check that Narrator is running (press Windows key + Ctrl + Enter to start it) and that the display still appears under "Braille displays and drivers."
Summary
Changing your braille input and output types in Windows 11 helps you read and move around your computer more easily by letting you choose how braille characters are shown. Uncontracted braille suits learners and detailed editing, contracted braille speeds up reading for experienced users, and computer braille works best for code and technical text.
If you want to learn more about Narrator or braille displays, check out the full guide here.
Was this guide helpful?

About the Author
Richard
Tech Writer, IT Professional
Richard is a writer at Geek Rewind who turns complex IT tasks into clear, step-by-step guides. He draws on years of hands-on experience in system administration and enterprise IT operations, focusing on Windows, Linux and WordPress: the problems people actually run into, and the fixes that work. His server and WordPress guides come from systems he runs himself. Richard builds and maintains the platform behind Geek Rewind, from its Ubuntu servers and Nginx configuration to its custom WordPress plugins. Many new tutorials start with readers' questions, and he's always glad to answer them in the comments.




No comments yet — be the first to share your thoughts!