How to Change Narrator Audio Output in Windows 11


Narrator audio output settings in Windows 11 let you send the built-in screen reader’s voice to a specific set of headphones, a secondary speaker, or any other connected sound card. Narrator is the built-in Windows tool that reads text and describes items on your screen out loud. By default it speaks through the same device as everything else, so you hear it mixed in with music, video and notifications.
Splitting this audio stream keeps screen reader feedback separate from your main system sounds. That helps if you use more than one audio device at the same time. The setting is the same on Windows 11 Home and Pro, and you need no special permissions to change it.
Select a different playback device from Narrator’s settings. Open Settings , go to Accessibility, then Narrator, and choose your desired audio output device from the “Narrator audio output device” option. This directs Narrator’s voice to your selected speakers or headphones.
Why Change Your Narrator Audio Output?
Say you use a USB headset and desktop speakers together. Routing Narrator to the right one stops the screen reader from talking over a call or a video. It also keeps its speech out of the room if you only want to hear it privately. Before you start, plug in or pair the device you want to use and make sure Windows lists it as connected. A device that is switched off or unplugged will not show up in the list later.
Isolating the screen reader to its own hardware channel also helps when you troubleshoot missing speech. If Narrator is silent during system startup or after a device change, you can point it at a different output and see whether the problem is the device or Narrator itself.
How to Change Narrator Audio Output on 🪟 Windows 11
- Open the Settings app. Click the Start menu and select Settings. Or press
Windows key + Ion your keyboard. The Settings window opens with a list of categories on the left. - Click Accessibility on the left side. The accessibility options appear on the right, grouped under headings such as Vision, Hearing and Interaction.
- Select Narrator on the right to open it. This is the page with the Narrator on/off switch and all of its settings. You do not have to turn Narrator on to browse the options here.
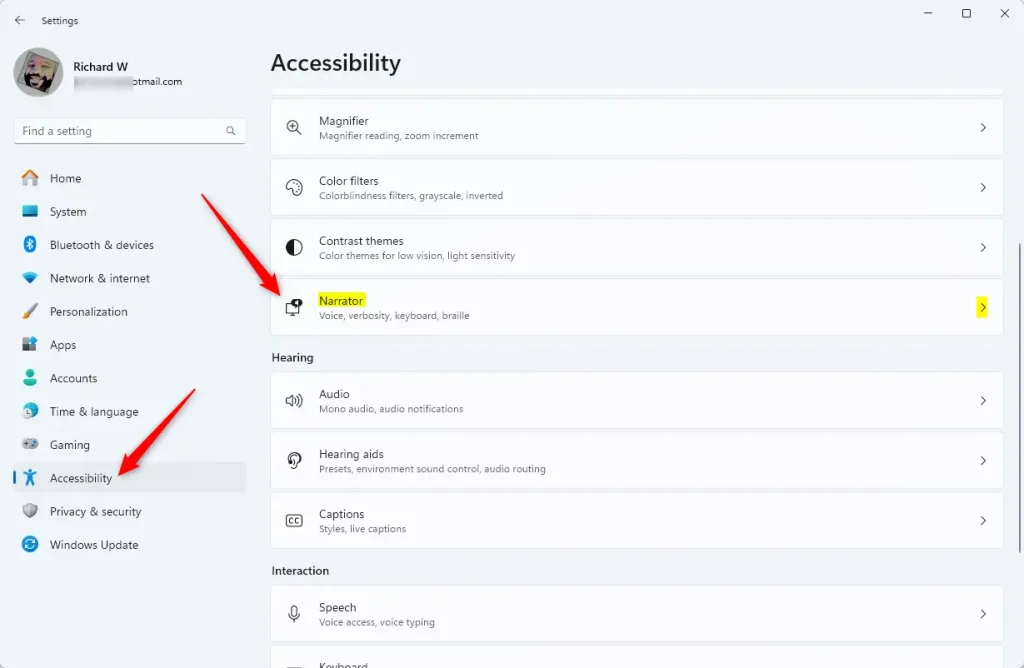
- Look for the “Narrator’s voice” section. You may need to scroll down the Narrator page to reach it. It holds the voice settings, including the audio output option.
- Click Narrator audio output device. A drop-down list opens showing the audio devices Windows currently detects. If the option is missing, install the latest Windows updates, because older builds of Windows 11 may not show it.
- Choose the audio device you want to use from the list. Narrator’s speech should switch to that device straight away, and a restart is not normally needed. If the device you want is not listed, check that it is connected and turned on, then reopen the Narrator page.
- If you choose Default audio device, Narrator uses your computer’s main audio output. Select this option again at any time to undo your change, for example if you remove the headset you routed Narrator to.
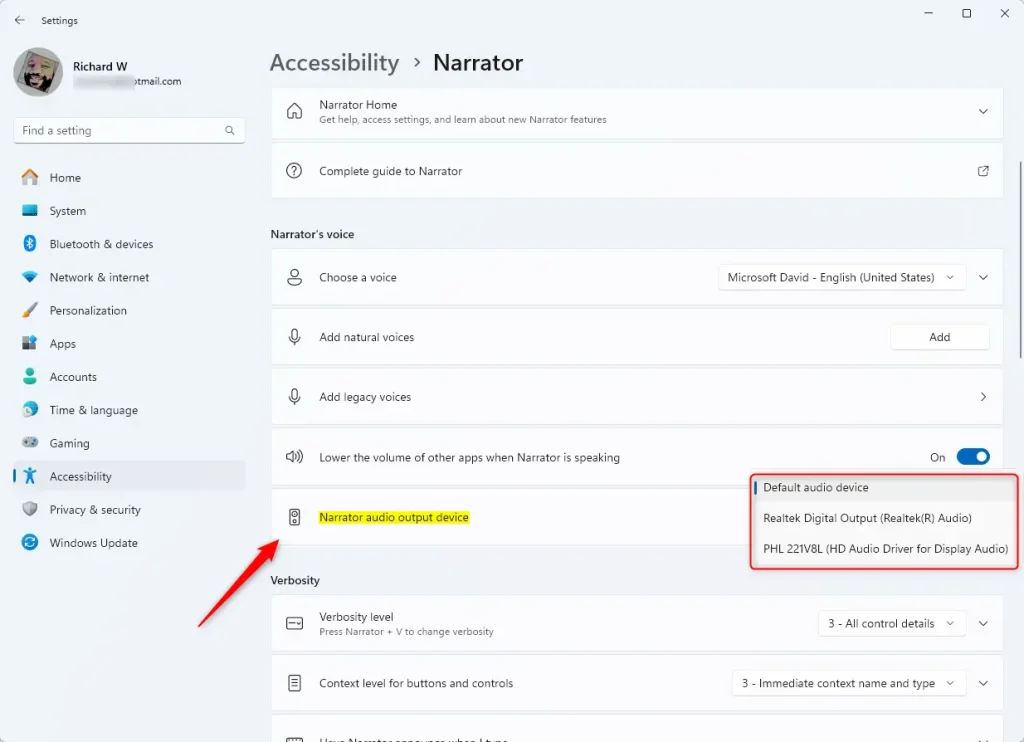
To change Narrator audio output in Windows 11, open the Settings app, go to the Accessibility section, open Narrator, and choose your preferred speakers or headphones from the audio device menu. This lets you send the screen reader voice to a separate headset so other people in the room cannot hear it.
What Happens When You Change the Audio Device?
This change sends screen reader speech only to your chosen device and leaves your default system sounds untouched. Music, video and calls keep playing through whatever device Windows uses as its main output.
Summary
Directing the screen reader to a dedicated device keeps its speech out of your primary media setup. If you ever lose Narrator's voice after unplugging a device, go back to the same setting and pick another device or Default audio device.
Was this guide helpful?

About the Author
Richard
Tech Writer, IT Professional
Richard is a writer at Geek Rewind who turns complex IT tasks into clear, step-by-step guides. He draws on years of hands-on experience in system administration and enterprise IT operations, focusing on Windows, Linux and WordPress: the problems people actually run into, and the fixes that work. His server and WordPress guides come from systems he runs himself. Richard builds and maintains the platform behind Geek Rewind, from its Ubuntu servers and Nginx configuration to its custom WordPress plugins. Many new tutorials start with readers' questions, and he's always glad to answer them in the comments.



[…] speed, and volume, manage natural voices, lower other apps volume when the Narrator is speaking, change Narrator audio output device, change verbosity level, emphasize formatted text, enable or disable Narrators phonetic […]
[…] Choose where the voice comes from (like speakers or headphones) […]