How to Change Narrator Verbosity on Windows 11


Narrator verbosity settings in Windows 11 control how much detail the built-in screen reader speaks when it reads text, buttons, and links. Lowering the level cuts extra speech and makes browsing faster. Raising it gives you more context about what is on screen.
You can choose from 5 verbosity levels. To change them, open the Narrator page in the Windows Settings app, or press Narrator + V to switch levels from the keyboard. The shortcut Ctrl+Win+F2 is also listed for this task. If Narrator is not running yet, press Ctrl+Win+Enter to start it. Press the same keys again to turn it off.
Open Settings Accessibility Narrator and find the verbosity dropdown to select your detail level, such as Text only or All control details. Alternatively, press Narrator + V to cycle through the five verbosity levels.
Why Change Narrator Verbosity?
Why change Narrator verbosity? This setting gives you precise control over how much information Narrator shares. A new user may want more detail to learn what each control is. An experienced user may want Narrator to say only the text.
Lower verbosity levels are faster and less cluttered. Use them when you only need the critical details, such as when you read long articles or move quickly through a familiar app. Higher levels suit new apps or complex forms, where hearing what kind of control you are on is useful.
How to Change Narrator Verbosity
Follow these steps to change how much Narrator speaks. The change applies to your user account only. It does not need a restart, and you can undo it at any time by choosing a different level.
Step 1Open the Settings App
- Press Win+I to open the Windows Settings app directly. Or click the Start menu and select Settings.
The Settings window should now be open, with a list of categories on the left.
Step 2Go to Accessibility Settings
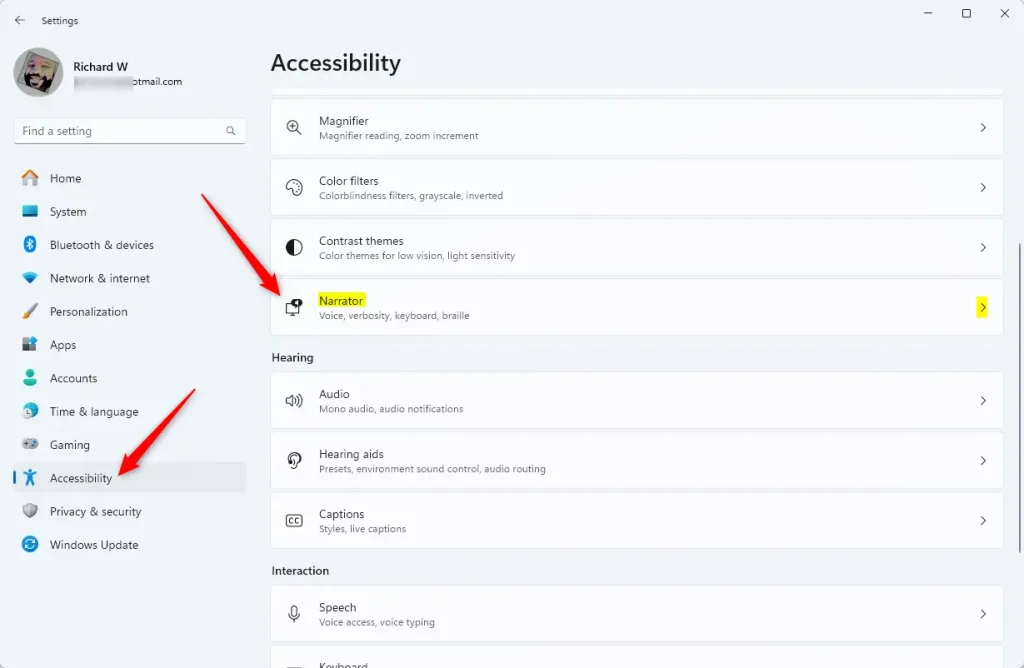
- Click Accessibility in the left panel.
- Select the Narrator tile on the right side to expand the available options.
You should now see the Narrator page. It has the on/off switch at the top, followed by the voice, verbosity, and keyboard options. If you cannot find Accessibility, scroll down the left panel, because it sits near the bottom of the list.
Step 3Change the Verbosity Level
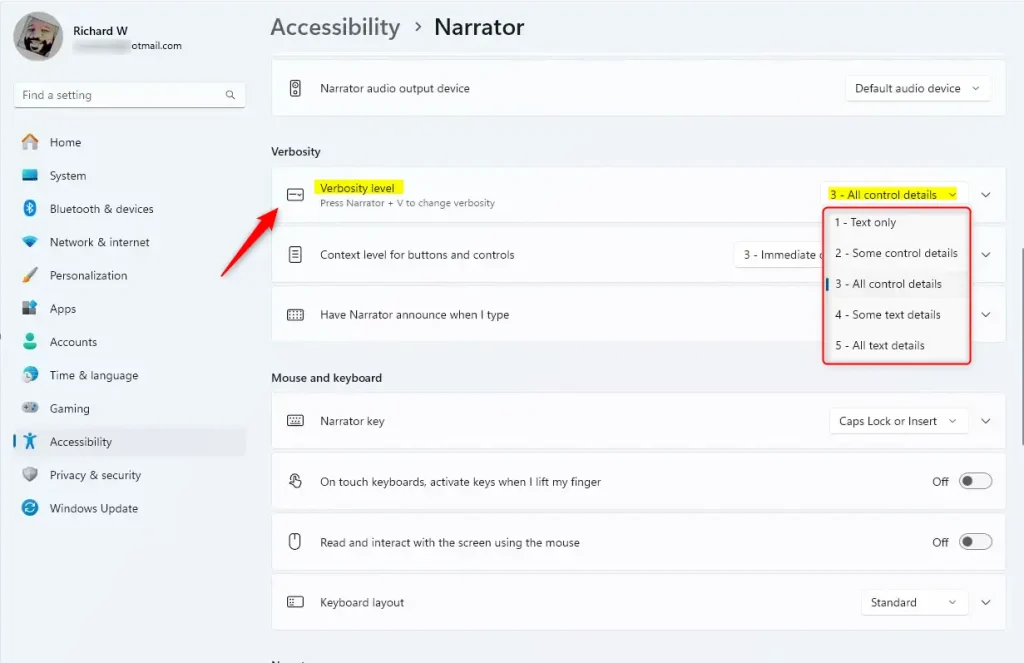
- On the Narrator page, find the verbosity setting and open its dropdown list.
- Pick the detail level you want from the list.
You can choose options like Text only or All control details to control how much information the screen reader speaks while you use your computer. Narrator should use the new level straight away, so you can test it by moving through a few items on the page. The five levels are listed below.
- Text only
- Some control details
- All control details
- Some text details
- All text details
Pressing Narrator + V changes the verbosity level instantly. Each press moves to the next level, and Narrator announces the level it switched to. The Narrator key is Caps Lock or Insert by default. You can change it in the Narrator settings.
There is nothing to save and no restart is needed. If the level sounds wrong, press Narrator + V again, or reopen the dropdown in Settings and choose another.
Summary
Adjusting Narrator verbosity in Windows 11 makes the screen reader give you the amount of detail you need. Try a couple of levels with the apps and sites you use most, then keep the one that fits. You can switch with Narrator + V whenever a task needs more or less detail.
Was this guide helpful?

About the Author
Richard
Tech Writer, IT Professional
Richard is a writer at Geek Rewind who turns complex IT tasks into clear, step-by-step guides. He draws on years of hands-on experience in system administration and enterprise IT operations, focusing on Windows, Linux and WordPress: the problems people actually run into, and the fixes that work. His server and WordPress guides come from systems he runs himself. Richard builds and maintains the platform behind Geek Rewind, from its Ubuntu servers and Nginx configuration to its custom WordPress plugins. Many new tutorials start with readers' questions, and he's always glad to answer them in the comments.



No comments yet — be the first to share your thoughts!