How to Change Advanced Camera Settings in Windows 11

Advanced camera settings in Windows 11 let you pick your default webcam, fix video brightness, and control app permissions in one place. You need Windows 11 version 22H2 or newer to use these built-in controls. To check your version, open Settings, go to System, then About, and look under Windows specifications.
Press the Win+I on your keyboard to open Settings , click Bluetooth & devices, and select Cameras. From that page, you can choose a connected camera to rotate the video feed, adjust lighting, or block apps from using your camera without permission. These steps are the same on Home and Pro editions. If your PC is managed by an organization, an administrator may have locked some of these options.
Open Settings , go to Bluetooth & devices, and select Cameras. Click your connected camera, then Advanced camera options and Edit to toggle Multi-app camera or Basic camera on or off. Click Apply to save changes.
What’s New in 🪟 Windows 11 Camera Settings?
Recent Windows 11 camera settings updates add useful tools like background blur, video filters, and global hardware controls to improve your video calls. These options let you manage your connected webcams directly from Windows, so you don’t need extra software from your camera maker. Some of them only appear if your camera and driver support them, so your list may be shorter than the one in a screenshot.
Microsoft added an Advanced camera options section to the Settings menu in Build 27758. If you don’t see it on your PC, run Windows Update and check again, because it depends on your Windows build.
This panel has two main features worth configuring:
- Multi-app camera: Lets several apps use your camera at the same time. This is helpful if you want to share video with a sign language interpreter and others at once. Normally one app grabs the camera and a second app gets a “camera in use” error. This setting is meant to avoid that.
- Basic camera: Turns on simple camera features to help fix issues if your camera isn’t working right. This tool was made with help from Microsoft support. Think of it as a stripped-down mode you try when the normal camera pipeline gives you a black screen or a frozen image.
How to Change Advanced Camera Settings in 🪟 Windows 11
To change advanced camera settings in Windows 11, open the main Settings app , go to Bluetooth & devices, and click Cameras to find your connected hardware. From there, you can adjust your video feeds, turn on fallback troubleshooting modes, and manage which apps are allowed to use your camera at the same time. The steps below walk through it one screen at a time.
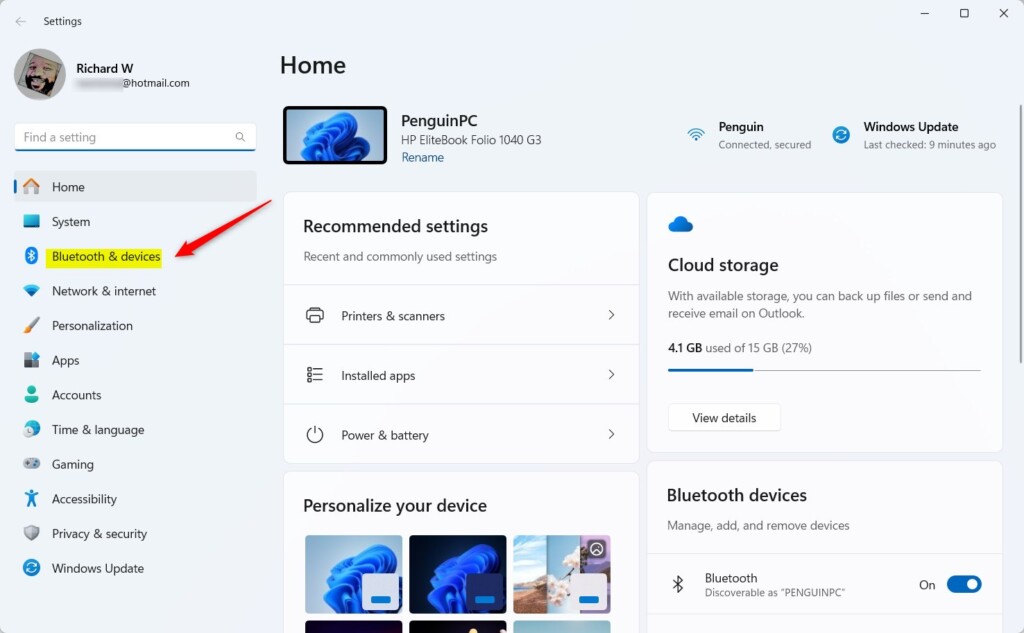
- Open Settings. Click the Start menu (the Windows icon) and then click Settings. Or press Windows key + I on your keyboard. The Settings window should open with a list of categories on the left.
- In Settings, click Bluetooth & devices on the left side. The right side should now show your Bluetooth toggle and a list of device pages such as Devices, Printers & scanners, and Cameras.
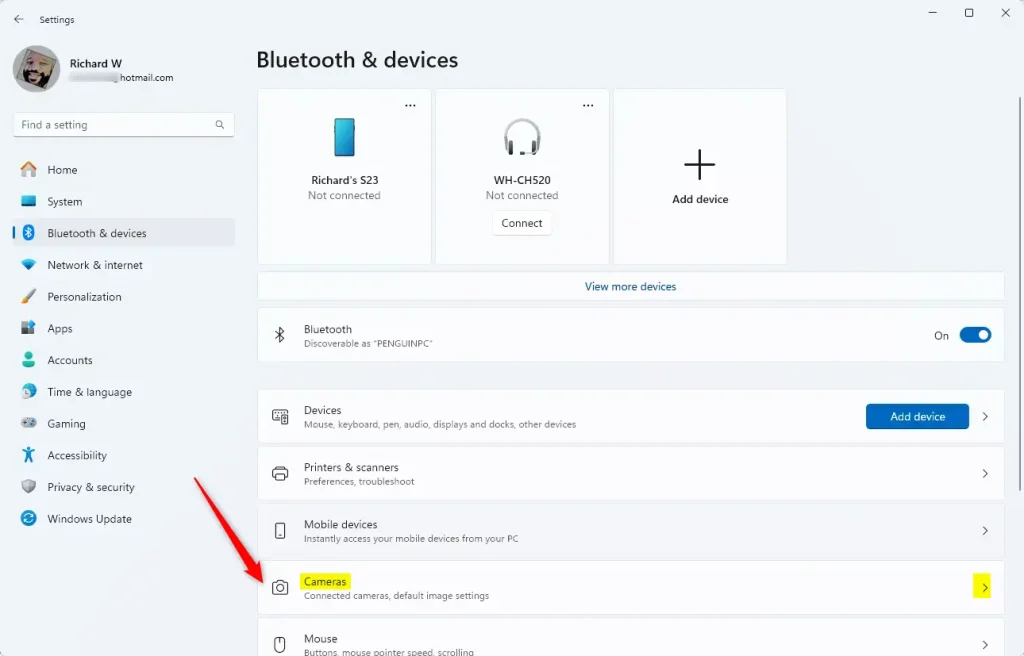
- On the right side, click Cameras. You should see a list of cameras under Connected cameras. If the list is empty, check that your webcam is plugged in firmly (for a USB camera) and that nothing else, such as a privacy shutter or a hardware switch, is blocking it.
- Under Connected cameras, click the camera you want to change. A page for that camera should open with a live preview and its own settings, such as brightness and contrast, if the camera supports them.
- Click Advanced camera options, then press the Edit button. The advanced switches should now become available. If Edit is missing, your Windows build may not include these options yet, so check Windows Update.
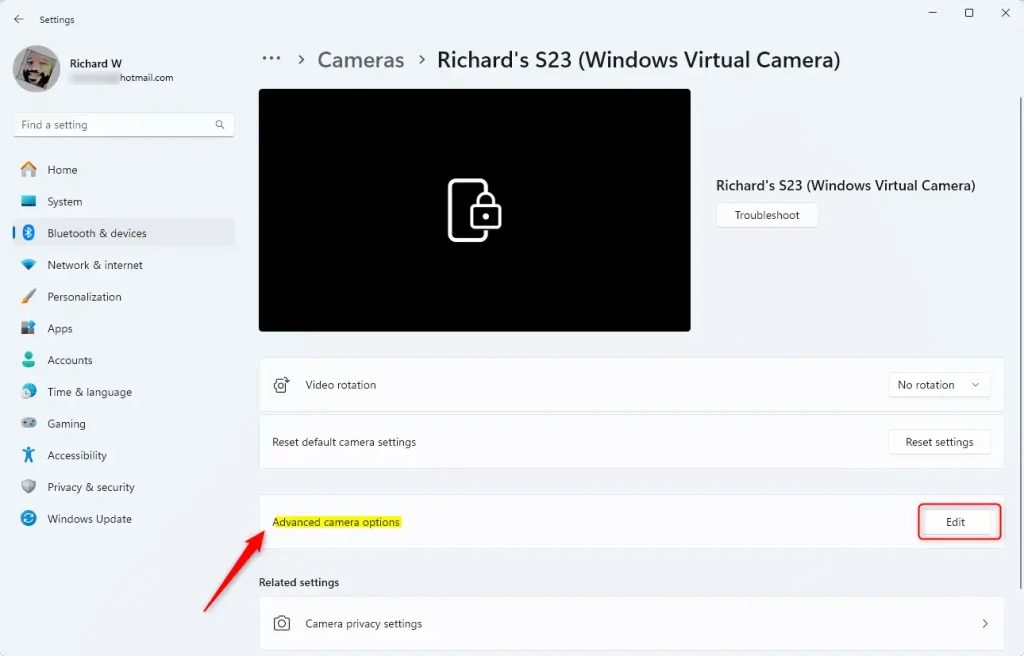
- Turn on or off the Multi-app camera and Basic camera switches depending on what you want. Turn on Multi-app camera if you need more than one app to use the camera at once. Turn on Basic camera only when the camera misbehaves. To undo either change later, come back to this page and switch it off again.
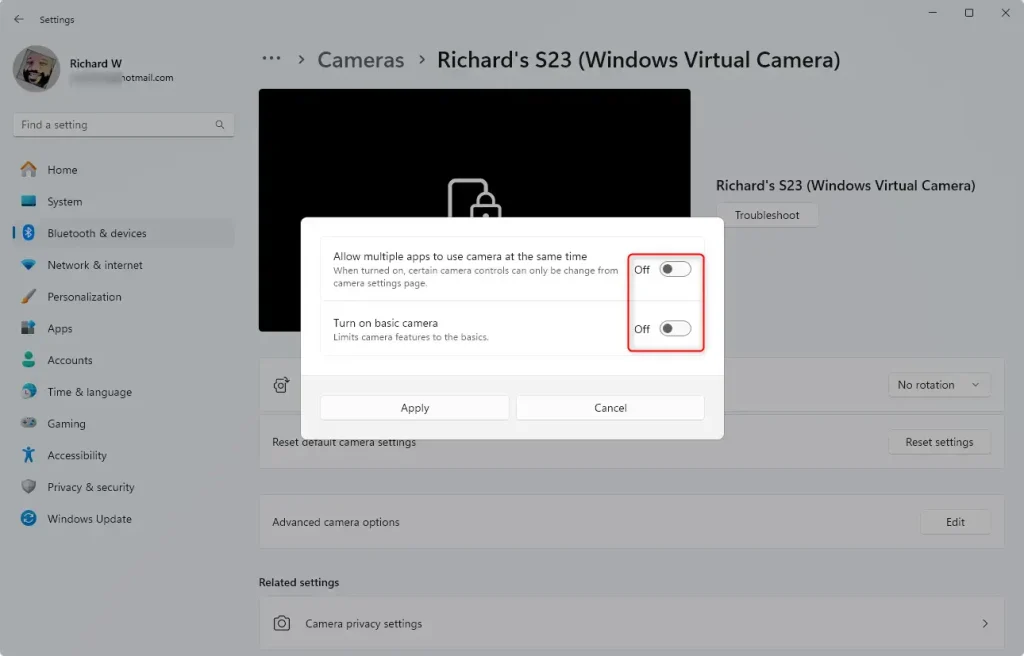
- Click Apply to save your changes. If an app was already using the camera, close it and open it again so it picks up the new setting.
Even so, clicking Apply first is the safer habit, since it confirms the change went through.
Summary
Windows 11 camera settings give you full control over your webcams with built-in troubleshooting modes, video filters, and multi-app access. These tools help you fix broken video streams quickly and let multiple programs share your camera feed at the same time during video calls.
The Multi-app camera option allows several programs to access your video feed at the same time, which proves useful when running a sign language interpreter alongside a call. If a second app still can't open the camera, close both apps and start them again.
The Basic camera mode acts as a fallback utility whenever hardware streams behave unexpectedly. Try it when you get a black screen or a frozen image, and switch it off again once the camera works normally.
Navigating to Bluetooth & devices followed by Cameras leads straight to Advanced camera options. Adjusting these settings lets you match the camera's behavior to how you actually work.
Setting these preferences up before an important meeting helps you avoid camera surprises mid-call.
Reviewing which apps can use your camera, from the same Cameras page, keeps your video calls secure as well as working.
Learn more: Visit the official Windows Blog for the latest updates.
Have a question about this guide?
Answered by AI from this guide. Good questions may be added to this page — please don't include personal details.
Did this guide fix your problem?

About the Author
Richard
Tech Writer, IT Professional
Richard is a writer at Geek Rewind who turns complex IT tasks into clear, step-by-step guides. He draws on years of hands-on experience in system administration and enterprise IT operations, focusing on Windows, Linux and WordPress: the problems people actually run into, and the fixes that work. His server and WordPress guides come from systems he runs himself. Richard builds and maintains the platform behind Geek Rewind, from its Ubuntu servers and Nginx configuration to its custom WordPress plugins. Many new tutorials start with readers' questions, and he's always glad to answer them in the comments.
No comments yet — be the first to share your thoughts!