Windows 11 Camera Not Working? 8 Ways to Fix Webcam Issues

- 48 steps
- Needs administrator rights
- Includes a restart or sign-out
A Windows 11 camera that won’t turn on usually shows up during a video call in Zoom or Teams. The cause is almost always one of four things: a privacy setting blocking the app, a broken driver, a bad update, or a physical switch or cable. Fixing it rarely takes more than 5 to 10 minutes.
The eight methods below start with the quickest checks and move toward deeper fixes. They apply to built-in laptop cameras and external USB webcams. Test the camera after each one so you know which fix worked.
Windows 11 camera not working is usually caused by a privacy block, a disabled driver, a bad update, or a physical switch or cable. Check the physical shutter or the Fn key camera icon first, then open Settings Privacy & security Camera and turn on Camera access, Let apps access your camera, and Let desktop apps access your camera.
1Check Your Physical Connections and Hardware Switches
Rule out physical problems before you change any software settings. A loose cable or a closed shutter takes seconds to fix, and it is easy to overlook.
Ensure the Camera Is Connected
If you use an external USB webcam, check the cable and the port first.
- Unplug the USB cable from the computer, wait a few seconds, and plug it back in. Windows usually plays a connection sound when it detects the device.
- Try a different USB port. If the camera works in another port, the first port may be faulty or underpowered.
- Plug the camera straight into the computer instead of a USB hub. Hubs, especially unpowered ones, often can’t supply enough power for a webcam.
- If you have another computer, plug the camera into it. If it fails there too, the camera or its cable is the problem, not Windows.
Check for a Physical Camera Switch or Button
Many laptops have a physical privacy shutter, a sliding lens cover, or a keyboard key that switches the webcam off completely. When the camera is off this way, Windows may not see the device at all.
- Look closely at the lens above your screen. If there is a small sliding cover, move it to the open position.
- Check the top row of your keyboard for a key with a small camera icon. On some laptops you must hold the Fn key while pressing it.
- Press the key once and test the camera again. The camera light, if your laptop has one, should come on when an app starts using it.
2Run the Built-In Windows Camera Troubleshooter
Windows 11 includes a camera troubleshooter that finds and fixes common problems automatically. It can reset a stuck camera service or turn a disabled device back on, and it takes about a minute to run.
The path is Settings System Troubleshoot Other troubleshooters. Click Run next to the camera entry. If you don’t see Camera in the list, your Windows build may have moved the troubleshooter into the Get Help app. In that case, skip this method and continue with the next ones.
- Click the Start button and open the Settings app.
- Go to System Troubleshoot The Troubleshoot page opens with a list of options.
- Click Other troubleshooters. A list of troubleshooters appears.
- Find Camera in the list and click the Run button next to it. A troubleshooter window opens and starts scanning.
- Follow any instructions on your screen. If it reports that it fixed something, restart your computer when the process finishes, then test the camera.
3Allow Your Apps to Access the Camera
Windows 11 has strict privacy controls. If camera access is off, apps like Zoom or Microsoft Teams can’t see your webcam, and they often show a black screen or a “no camera found” message. This is one of the most common causes, so check it early.
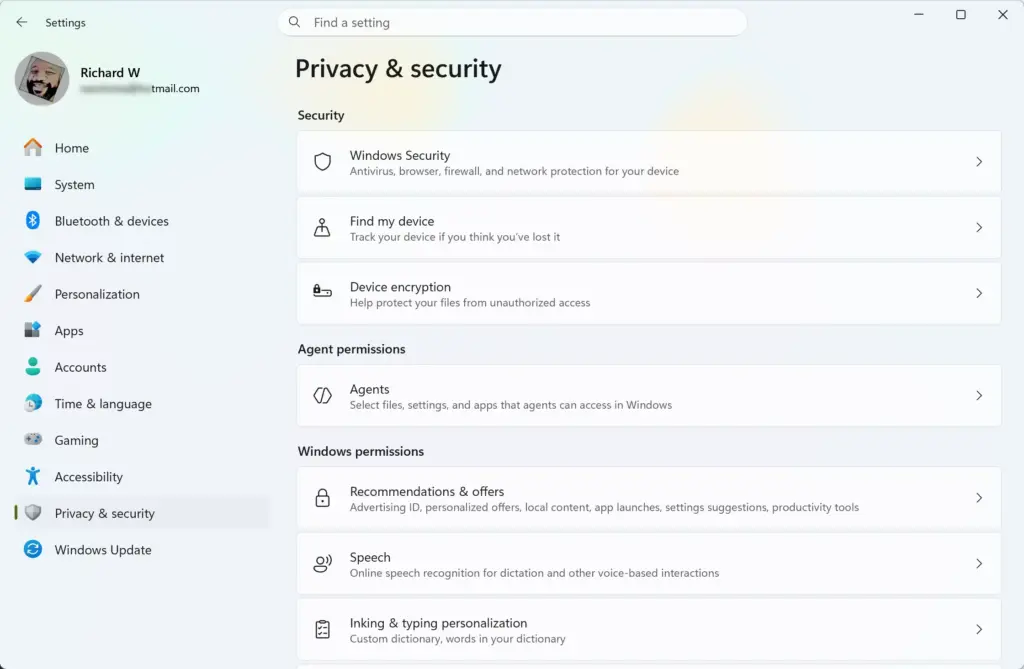
The path is Settings Privacy & security Camera There are three levels of switches, and all three must allow access. These settings apply to Home and Pro alike.
- Open the Settings app from your Start menu .

Settings - Click Privacy & security on the left side.
- Scroll down to the App permissions section and click Camera.
- Make sure the switch for Camera access is turned On. If it is Off, your whole device is blocked from the camera.
- Scroll down and make sure the switch for Let apps access your camera is also turned On.
- Find your specific video app in the list below and make sure its individual switch is turned On.
- Scroll to the bottom of the page and check Let desktop apps access your camera. Many classic desktop programs, including the Zoom desktop client, are controlled by this switch and don’t appear in the app list above it.
Your camera should now work in the app. If you only turned a switch on, you don’t need to restart, but close and reopen the app first. If you want to undo any change, return to this page and turn the switch Off again.
4Check and Update Your Camera Drivers
Outdated or corrupted drivers often stop a webcam from working because Windows can no longer talk to the hardware. Updating the driver is a quick fix for that.
If you are on a work or school computer and can’t open the driver options, ask your administrator.
- Right-click the Start button and select Device Manager from the menu.
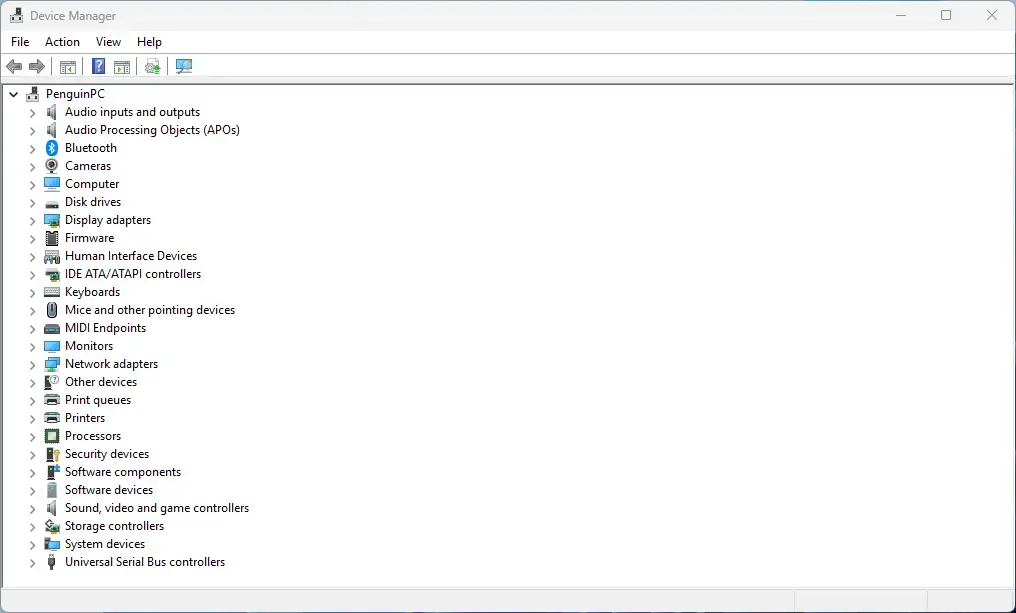
Device Manager - Look for a category named Cameras, Imaging devices, or Sound, video and game controllers, and click the arrow next to it to open the list. The category name depends on the camera model and its driver.
- Right-click your camera device and select Update driver. If the device has a small down-arrow icon on it, it is disabled, so choose Enable device first.
- Choose Search automatically for drivers. Windows will search your computer and the internet for the best available driver and install it . If it says the best driver is already installed, the driver is probably not the problem, or the manufacturer’s own support page has a newer one.
- Restart your computer after the update finishes, then test the camera.
5Roll Back or Reinstall a Faulty Driver Update
A bad driver update can break a webcam that worked the day before. If the problem started right after a Windows or driver update, roll the driver back. If rolling back isn’t possible, remove the device and let Windows reinstall it.
Note: This step requires administrator privileges.
- Open Device Manager by right-clicking the Start button.
- Open the camera section, right-click your camera, and select Properties. The properties window opens.
- Go to the Driver tab at the top of the window.
- If the Roll Back Driver button is clickable, click it and follow the steps to return to the previous version. If it is greyed out, Windows has no older driver saved, so move on to the next step.
- If rolling back is not available, click Uninstall device. Check the box that tries to remove the driver software for this device, and click Uninstall. Only tick that box if a plain uninstall didn’t help, because it deletes the driver files that Windows would otherwise reuse.
- Restart your computer. Windows will automatically reinstall a fresh copy of the camera driver when it turns back on. If the camera still doesn’t appear in Device Manager, open the Action menu and choose Scan for hardware changes.
6Check Your Antivirus and Security Software
Some third-party antivirus and internet security suites include webcam protection that blocks camera access to stop spying. It can also block legitimate video calls, and it works separately from the Windows privacy switches above.
- Open your antivirus software dashboard.
- Look for settings named webcam protection, privacy control, or app permissions. They are often under a Privacy or Protection section.
- Add your video app to the allowed list, or turn off the webcam block for a moment to test your camera.
- If you can’t find the setting, read your antivirus help guide or the vendor’s support page.
If the camera works with the block off, turn protection back on and allow only the apps you trust. Don’t leave it off permanently.
7Check for Pending Windows Updates
Microsoft often ships bug fixes through Windows Update, including fixes for camera and driver problems. A missing update can leave a known bug in place. Updating also pulls in newer driver versions for many built-in cameras.
- Open the Settings app.
- Click Windows Update on the left menu.

Settings › Windows Update - Click the Check for updates button. Windows lists any updates that are waiting.
- If any updates appear, let them download and install completely. Also look for optional driver updates, if offered, as they sometimes include camera drivers.
- Restart your computer when asked, then test the camera.
8Test Your Camera in the Dedicated Camera App
Test the webcam in the built-in Windows Camera app. It tells you whether the hardware works. If the camera works there but not in Zoom or Teams, the problem is in that app's settings and not in Windows.
- Type Camera into the Windows search bar and open the built-in Camera app.
- Check if you can see yourself clearly. If you get a black screen or an error, the problem is with Windows or the hardware, so go back to the earlier methods.
- If the camera works here, open the settings menu inside your video meeting app (such as Zoom or Microsoft Teams) and make sure the correct camera is selected under the video device options. This matters most if you have both a built-in camera and an external webcam.
- Close any other program that might be using the camera, and then try again. Only one app can use the camera at a time.
Bonus Expert Tip: Check Registry Permissions for Camera Access
Permission errors can occasionally block camera features and show an error code like 0xA00F4243 on your screen. That code often means another app is already using the camera, so close any other video or recording apps first and try again.
Adjusting normal settings menus is always much safer than editing the Windows registry directly, and a wrong registry change can cause bigger problems.
If your computer is managed by an organization or school, speak with your system administrator. Global group policies can block the webcam, and you can't change them from a standard account.
Bonus Expert Tip: Clear Camera App Cache and Reset
The Windows Camera app stores temporary data that can get corrupted over time and make the webcam freeze or fail. Repairing or resetting the app clears that data and doesn't touch your personal files.
- Open the Settings app on your computer.
- Click Apps and then select Installed apps.
- Scroll down the list until you find the Camera app.
- Click the three dots next to the Camera app and select Advanced options.
- Scroll down. Click Repair first, which keeps the app's settings, and test the camera. If that doesn't help, click the Reset button. Confirm your choice when asked.
Reset returns the Camera app to its default settings, but your photos and videos are not deleted. There is no undo, but the app simply starts fresh the next time you open it.
Summary
Fixing a broken Windows 11 camera rarely takes advanced skills. Work through the steps in order: check the cable and physical switches, run the troubleshooter, review the privacy permissions, update or roll back the driver, and reset the Camera app. One of them will solve the problem in most cases.
If the camera still doesn't work in the Camera app, doesn't appear in Device Manager, and fails on another computer too, the hardware itself is probably faulty and needs repair or replacement.
Frequently asked questions
How to fix camera not working?
Start with the Camera settings. Open Settings, go to Privacy & security, then Camera, and turn on Camera access and Let apps access your camera. Next, check for a physical shutter or camera key on your laptop. If the camera still does not work, restart the computer and test it again in your video app.
Why does nothing happen when I plug my camera into the USB port of my 🪟 Windows 11 laptop. it works on other laptops.?
Your laptop may not be detecting the camera's USB connection. Unplug the camera, wait a few seconds, and try a different USB port. Then open Device Manager and look for the camera under Cameras or Imaging devices. A yellow warning icon points to a driver problem, which you can fix by right-clicking the device and choosing Update driver.
Where is physical switch for camera 🪟 Windows 11?
Most laptops have a privacy shutter, a slider on the top edge of the screen next to the webcam lens. Some models use a function key instead, usually a key with a camera icon that you press with the Fn key. External webcams may have a small lens cover or a physical on/off switch on the cable or body.
How to restore camera on laptop 🪟 Windows 11?
Turn the camera back on in Settings. Go to Privacy & security, then Camera, and switch on Camera access. If that does not work, open Device Manager, expand Cameras, right-click your camera, and choose Enable device. Restart the computer afterward so Windows can reload the driver.
What to do when ur having trouble with camera Windows?
Check the basics first. Close other apps that may be using the camera, such as Zoom or Teams, then restart the computer. Make sure Camera access is turned on in Settings under Privacy & security. For an external webcam, try a different USB port. If none of these fixes work, check Device Manager for a warning icon.
How do I fix my hp compaq it want come on because I tried to put a camera on it?
Unplug the camera and any other USB devices, then turn the computer off completely. Hold the power button for about 15 seconds to drain residual power, then press it again to start. If the computer starts, plug the camera into a different USB port. If it still will not turn on, the problem is probably the computer's power or hardware, not the camera.
Still have a question?
Answered by AI from this guide. Good questions may be added to this page — please don't include personal details.
Did this guide fix your problem?

About the Author
Richard
Tech Writer, IT Professional
Richard is a writer at Geek Rewind who turns complex IT tasks into clear, step-by-step guides. He draws on years of hands-on experience in system administration and enterprise IT operations, focusing on Windows, Linux and WordPress: the problems people actually run into, and the fixes that work. His server and WordPress guides come from systems he runs himself. Richard builds and maintains the platform behind Geek Rewind, from its Ubuntu servers and Nginx configuration to its custom WordPress plugins. Many new tutorials start with readers' questions, and he's always glad to answer them in the comments.
No comments yet — be the first to share your thoughts!