How to Configure Text and Image Generation Privacy Permissions in Windows 11


Text and image generation privacy permissions in Windows 11 control whether apps can send data from your screen and workflow to cloud-based artificial intelligence features. These built-in generative tools create text and pictures based on what you do on your PC, but they also share your activity with online servers unless you turn them off.
You can block access for individual apps or shut the features off across Windows 11. Changing these permissions stops background software from gathering data from your computer and keeps your personal files private. This guide covers two methods: the Settings app, which suits most people, and Registry Editor, which suits administrators who want a firmer lock.
Open Settings Privacy & security, scroll to app permissions, find text or image generation, and toggle the master switch to Off. This blocks all apps from using generative AI features. To control individual apps instead, keep the master switch on and toggle specific applications off one by one.
Accessing Privacy & Security Settings
The Privacy & security page is the main control area for what apps can do on your device. You can reach it from the Start menu or with a keyboard shortcut. The layout is the same on Home and Pro.
- Open the Start menu and click Settings (the gear icon), or press the Win+I keyboard shortcut. The Settings window opens.

Windows 11 Start menu with Settings gear icon highlighted. - Select Privacy & security from the left-hand navigation pane. The right side now lists your device security and permission categories.

- Scroll down through the list to the app permissions area, where the app-specific capabilities and generative feature controls are.
Run Windows Update , then check again. Microsoft adds and renames privacy pages between feature updates.
Configuring Application Permissions via the Settings App
The Settings app is the easiest way to stop programs from using text and image generation tools without your permission. A single switch turns the feature off for every app, and you can also set permissions app by app. Changes take effect straight away, and no restart is needed.
- Open Settings and go to Privacy & security.
- Scroll to the app permissions section and look for the entry for text generation or image generation. Click it to open its page.
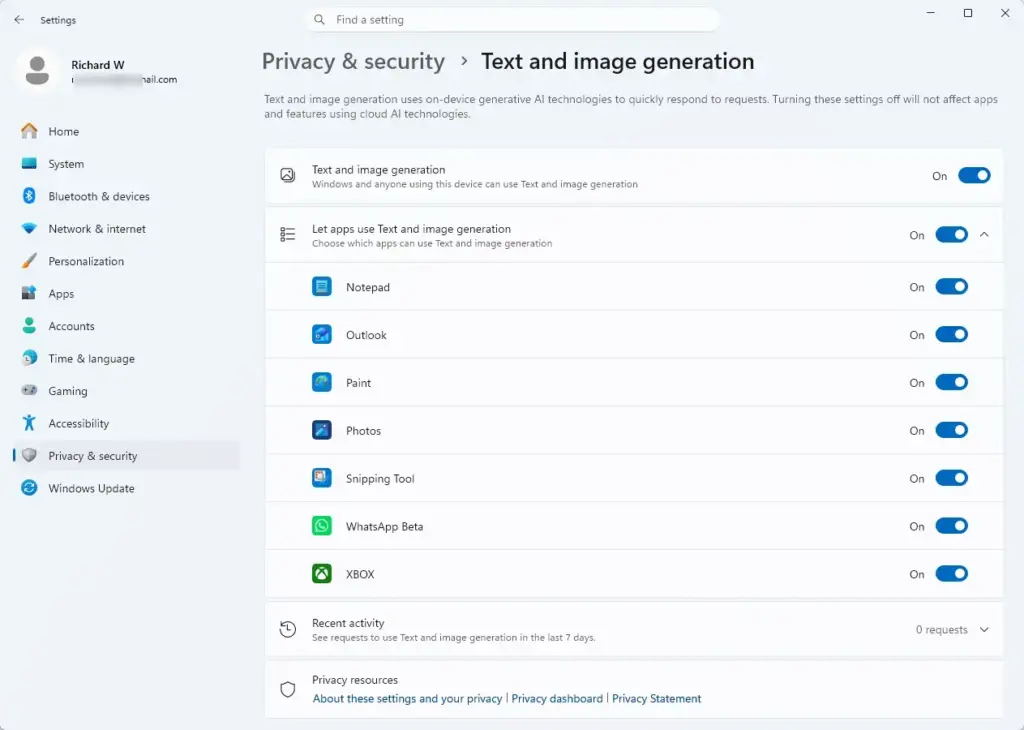
Settings › Privacy & security › Text and image generation - Set the master switch, Let apps generate text or Let apps generate images, to Off. This blocks all applications at once. The switch label should now read Off.
- If you would rather leave the feature on for some programs, keep the master switch on. Then go through the list of installed software beneath it and turn individual applications off one by one.
The exact wording of these toggles can differ between Windows 11 builds. If a switch is greyed out, or a message says some settings are managed by your organization, a policy is controlling it. That is common on work PCs. Ask your administrator, or check the registry method below, which may be the source of the policy.
To undo any of this, return to the same page and turn the switch back On.
Managing Text and Image Generation Using Registry Editor
Registry Editor lets you change advanced system keys that control generative AI features across the computer. Use it if you want to lock these settings down or apply rules to more than one user account. It works on both Home and Pro editions.
Modifying the registry incorrectly can cause system instability, so follow these steps carefully. Before you start, consider backing up the registry. In Registry Editor, click File, then Export, choose All as the export range, and save the file somewhere safe.
- Press Windows Key + R to open the Run dialog box.
- Type
regeditand press Enter to open Registry Editor. When the User Account Control prompt appears, click Yes to allow the app to make changes to your device. Registry Editor opens with the key tree on the left. - Go to this registry key in the left sidebar:
HKEY_CURRENT_USER\Software\Policies\Microsoft\Windows - Right-click the Windows key, select New, and click Key. Name this new key
WindowsAI. It appears under the Windows key. - Right-click the newly created AI key, select New, and click DWORD (32-bit) Value. Name this value
DisableGenerativeAI. - Double-click
DisableGenerativeAIand change its value data from0to1to disable text generation, or leave it as0to keep it enabled. Click OK. - To manage image generation, right-click the AI key again, select New, and click DWORD (32-bit) Value. Name this value
DisableGenerativeAI. - Double-click
DisableGenerativeAI, set its value data to1to restrict image generation capabilities, and click OK. - Close Registry Editor and restart your computer to apply the changes.
If a step fails with an access error, you are probably not signed in as an administrator. To undo the change, go back to the same key, set the value data back to its original number or delete the value, and restart. If you want to remove everything, delete the key you created in step 4. Or import the backup file you exported earlier.
Verifying Your Privacy Configurations
Verifying your configuration confirms that your new permission rules are working and that the generative features are really blocked. It only takes a few minutes.
- Sign in again after the restart, open Settings, and go to Privacy & security. Check that the text and image generation switches are still set to Off, or that the apps you blocked are still blocked.
- Open a creative app that normally offers prompt-based tools, such as a drawing or photo editing app. Check whether the prompt tools are hidden or show a message that they are blocked.
- If you used the registry method, open Registry Editor again and go to the key from the registry steps. Confirm that the values are present and hold the data you set.
If a feature still appears, restart once more and check that you did not misspell the key or value names. Also check whether another account on the PC has different settings, since per-user settings can differ.
Was this guide helpful?

About the Author
Richard
Tech Writer, IT Professional
Richard is a writer at Geek Rewind who turns complex IT tasks into clear, step-by-step guides. He draws on years of hands-on experience in system administration and enterprise IT operations, focusing on Windows, Linux and WordPress: the problems people actually run into, and the fixes that work. His server and WordPress guides come from systems he runs himself. Richard builds and maintains the platform behind Geek Rewind, from its Ubuntu servers and Nginx configuration to its custom WordPress plugins. Many new tutorials start with readers' questions, and he's always glad to answer them in the comments.


No comments yet — be the first to share your thoughts!