How to Restrict Application Microphone Permissions Globally in Windows 11 Privacy Settings

Windows 11 lets you block microphone access for every installed program at once with a single switch. On Windows 11 version 22H2 and later, the master toggle in the privacy settings stops all software from listening through your microphone. That protects your personal data from unwanted eavesdropping.
The switch is a quick safety shield when you want total peace of mind. You open Settings, go to Privacy & security, and cut off microphone access for the whole PC in seconds. Apps can no longer record your voice. The setting works the same on Windows 11 Home and Pro, and you do not need to restart.
Open Settings , press Win+I, go to Privacy & security, click Microphone, then turn off the Microphone access switch at the top. All apps lose microphone access immediately, no restart needed.
How to Access Privacy and Security Settings in 🪟 Windows 11
All the privacy controls live in the Settings app, and you can reach it from the Start menu or with a keyboard shortcut. Once you open Privacy & security in the sidebar, every permission and hardware control is listed in one place.
Follow these steps to open your privacy settings:
- Click the Start button at the bottom of your screen.
- Click the Settings icon, which looks like a small gear. You can also press the Win and I together to open Settings directly.

Windows 11 Start menu with Settings gear icon highlighted. - In the Settings window, look at the menu on the left and click Privacy & security. The right side now shows the privacy options for your PC.
Scroll down the right side and you will see a list of hardware and features that apps can use, such as your camera, your location and your microphone. This is the command center for all your privacy choices.
How to Restrict Application Microphone Permissions Globally
When you turn it off, all software and games lose access immediately.
Follow these steps to turn off the microphone globally:
- Open Settings by pressing the Windows key and I together.

Settings - Click Privacy & security on the left menu.
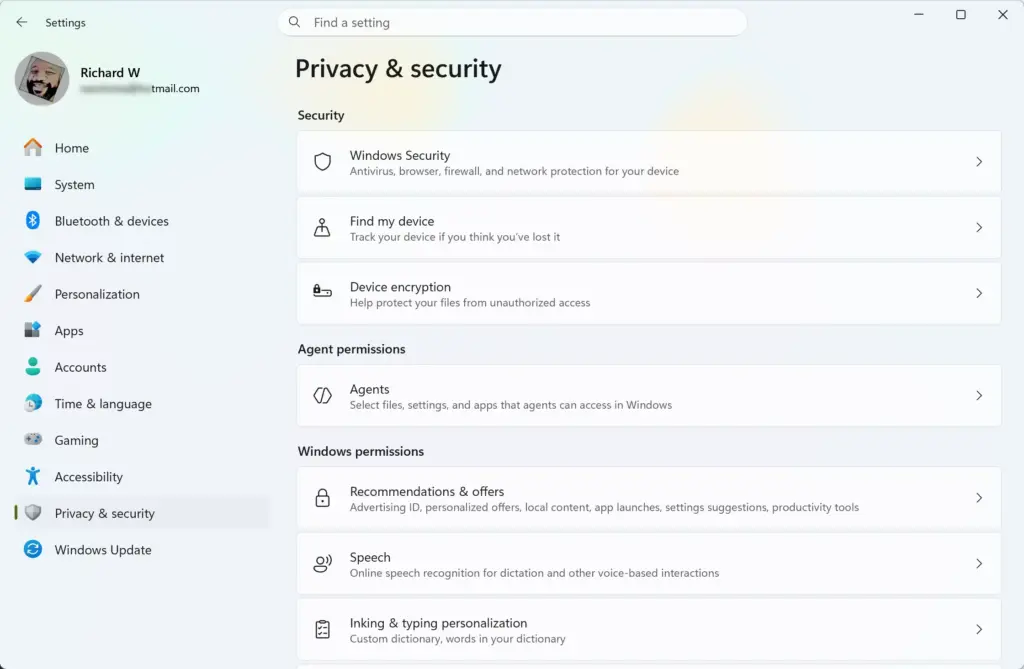
Settings › Privacy & security - Scroll down the right side of the screen and click Microphone. The Microphone page opens with the master switch at the top.
- Find the switch labeled Microphone access.
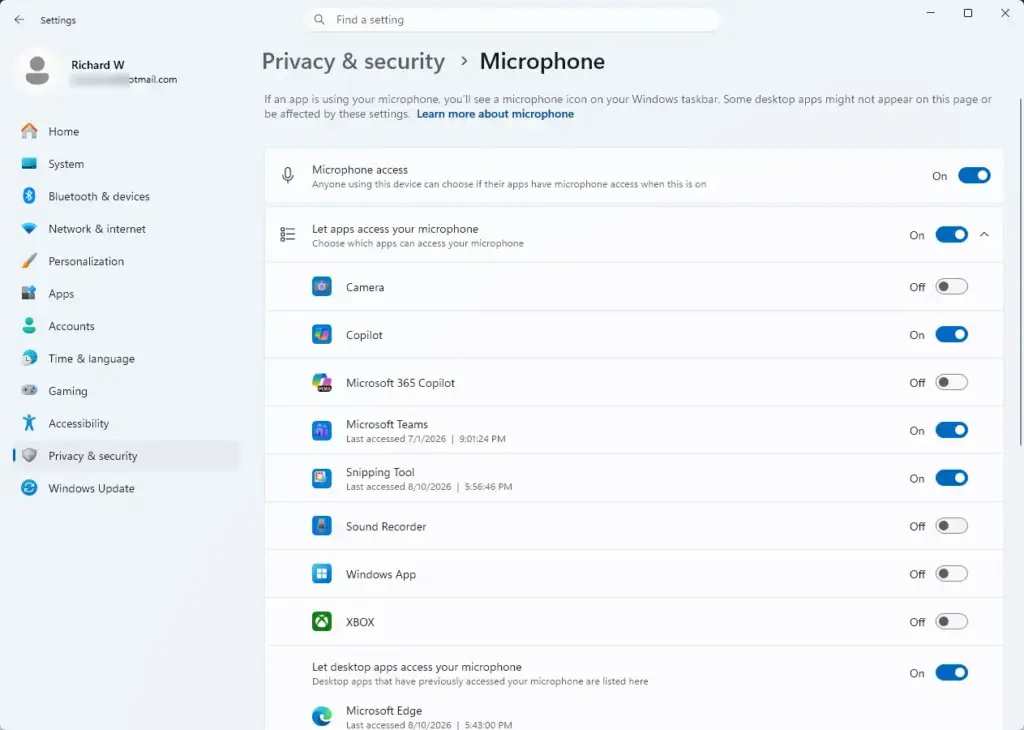
Settings › Privacy › Microphone - Click this switch to turn it from On to Off. The label changes to Off, and Windows now blocks microphone access for the whole device.
This applies even if individual programs have permission further down the page, because the master switch overrides them all. No program can turn on your microphone until you turn the switch back on.
To undo the change, return to the same page and set Microphone access back to On. If an app was already open when you changed the setting, close it and reopen it so it notices the change. If the switch is greyed out, or you see a message that some settings are managed by your organization, your PC is controlled by a work or school policy. In that case only your administrator can change it.
How to Control Microphone Access for Individual Apps
You do not have to block everything. You can block specific programs and keep your favorite video chat tools working. The Microphone page has an individual switch for each app that has asked to use your microphone.
Follow these steps to choose which programs can use your microphone:
- Open Settings by pressing the Windows key and I.
- Click Privacy & security on the left side.
- Click Microphone.
- Make sure the main Microphone access switch is turned On. If it is off, the per-app switches below it will not work, and they may be greyed out.
- Scroll down to the switch labeled Let apps access your microphone and turn it On. The list of apps below it becomes available.
- Scroll down further to see a long list of programs installed on your computer.
- Find a program in the list and click its switch to turn it On or Off. The change takes effect right away.
By managing this list, you give permission only to trusted programs. Unknown or untrusted programs stay blocked from hearing you. If a program stops working after you block it, come back to this list and switch it on again. An app only shows up in the list after it has asked for the microphone, so a newly installed program may not appear until you open it.
Understanding Desktop Apps Versus Microsoft Store Apps
Windows treats downloaded desktop software differently from Microsoft Store software, and that affects how you manage microphone permissions. Store apps appear individually in the list. Traditional desktop programs are grouped under a single permission.
Traditional desktop programs are the ones you download from regular websites with your browser. Windows treats them a little differently from apps from the Microsoft Store. Windows does not list each desktop program separately. It controls them with the one switch labeled Let desktop apps access your microphone, which sits below the app list. If you turn that switch off, Windows blocks microphone access for a large group of desktop programs all at once.
This means you cannot always toggle desktop programs one by one the way you can toggle Microsoft Store apps. To block them, use that desktop apps switch or the global Microphone access master switch.
Advanced Privacy Tip: Checking Recent Microphone Activity
Windows 11 keeps a record of which programs recently used your microphone. Checking it is a good way to spot rogue software, or a game, accessing your microphone without your knowledge.
Follow these steps to check your recent microphone activity:
- Open Settings by pressing the Windows key and I.
- Click Privacy & security on the left menu.
- Click Microphone.
- Look near the top of the page for the Recent activity section and click it to expand the list. On some builds, the last-access time appears under each app in the list instead.
You will see timestamps showing when programs last accessed your microphone. If you see a program you do not recognize, or one you have not used today, change its permission right away or block that program from running. Check this list now and then, especially after installing new software.
Summary
Protecting your privacy on Windows 11 comes down to managing the hardware switches and app permissions correctly. You can turn off microphone access globally, block specific programs, or check your recent activity list to keep your computer private. Every change here can be undone by flipping the same switch back on.
Have a question about this guide?
Answered by AI from this guide. Good questions may be added to this page — please don't include personal details.
Did this guide fix your problem?

About the Author
Richard
Tech Writer, IT Professional
Richard is a writer at Geek Rewind who turns complex IT tasks into clear, step-by-step guides. He draws on years of hands-on experience in system administration and enterprise IT operations, focusing on Windows, Linux and WordPress: the problems people actually run into, and the fixes that work. His server and WordPress guides come from systems he runs himself. Richard builds and maintains the platform behind Geek Rewind, from its Ubuntu servers and Nginx configuration to its custom WordPress plugins. Many new tutorials start with readers' questions, and he's always glad to answer them in the comments.
No comments yet — be the first to share your thoughts!