Managing camera permissions in Windows 11 lets you control which apps can use your webcam and stops unwanted software from recording you. You can turn off camera access for the whole computer or change the setting for individual programs.
Advertisement
Windows treats apps from the Microsoft Store differently from traditional desktop programs downloaded from websites. Store apps get their own on/off switch each, while desktop apps are controlled by one shared switch. Checking both sets of privacy settings helps you block background video streams and keep your camera secure.
⚡ Quick Answer
Open Settings›Privacy & security›Camera, then switch the Camera access toggle to Off to block all apps, or toggle individual Store app switches to On or Off. For desktop apps, scroll to Let desktop apps access your camera and toggle it on or off.
Advertisement
Checking Current Global Camera Access
The global camera setting is the quickest way to turn your webcam on or off for every program at once. If you suspect an app is misusing your camera, switch this off first and investigate afterwards. You can turn it back on at any time.
Press the Win+I to open Settings. Windows 11 Start menu with Settings gear icon highlighted.
Select Privacy & security from the left-hand menu.
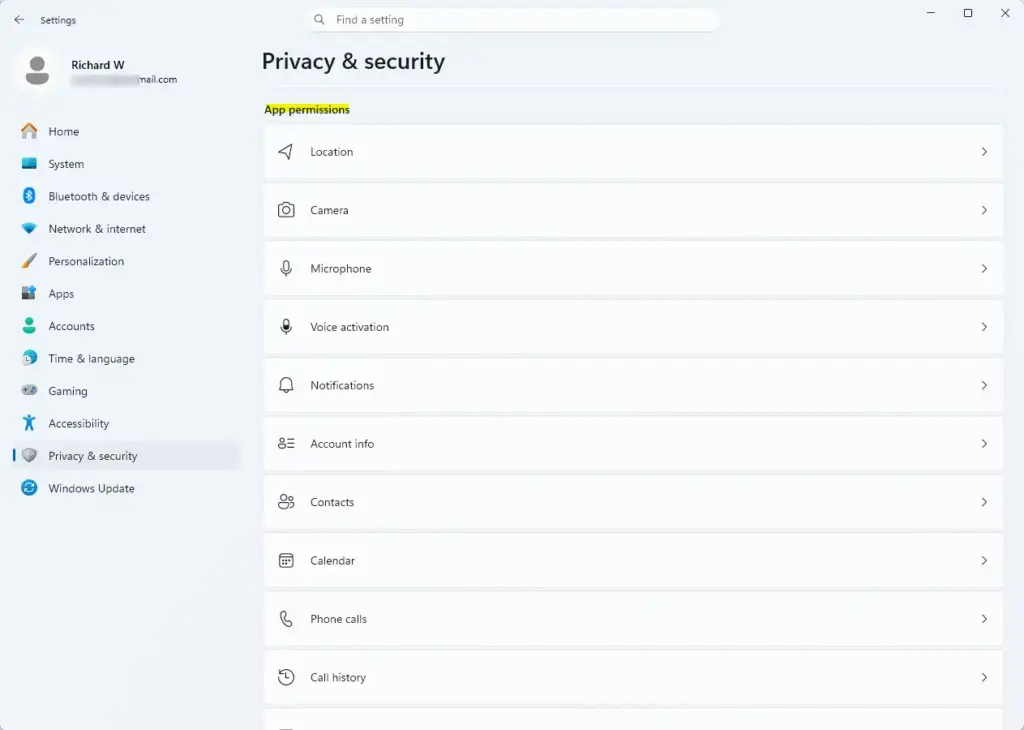
Scroll to the App permissions section and click Camera. Settings › Privacy & security › App permissions You should now see the camera page with a set of toggles at the top.
Find the Camera access toggle near the top of the page.
Switch the toggle to Off to block all apps and services from using the camera, or to On to allow access. When it is off, the other camera settings on the page are greyed out or have no effect.
📝Good to KnowChanging the device-wide Camera access setting normally needs an administrator account.
If you are signed in with a standard account, Windows may ask for admin credentials or leave the toggle locked. On a work or school PC, your organization may control this setting, and you will see a message saying some settings are managed.
Configuring Individual App Permissions
Per-app permissions let you choose exactly which Microsoft Store apps can use your webcam. When you change the switch for one app, Windows immediately allows or blocks the camera for that app only. Every other program keeps its current setting.
Open Settings and select Privacy & security.
Click Camera. Settings › Privacy & security › Camera
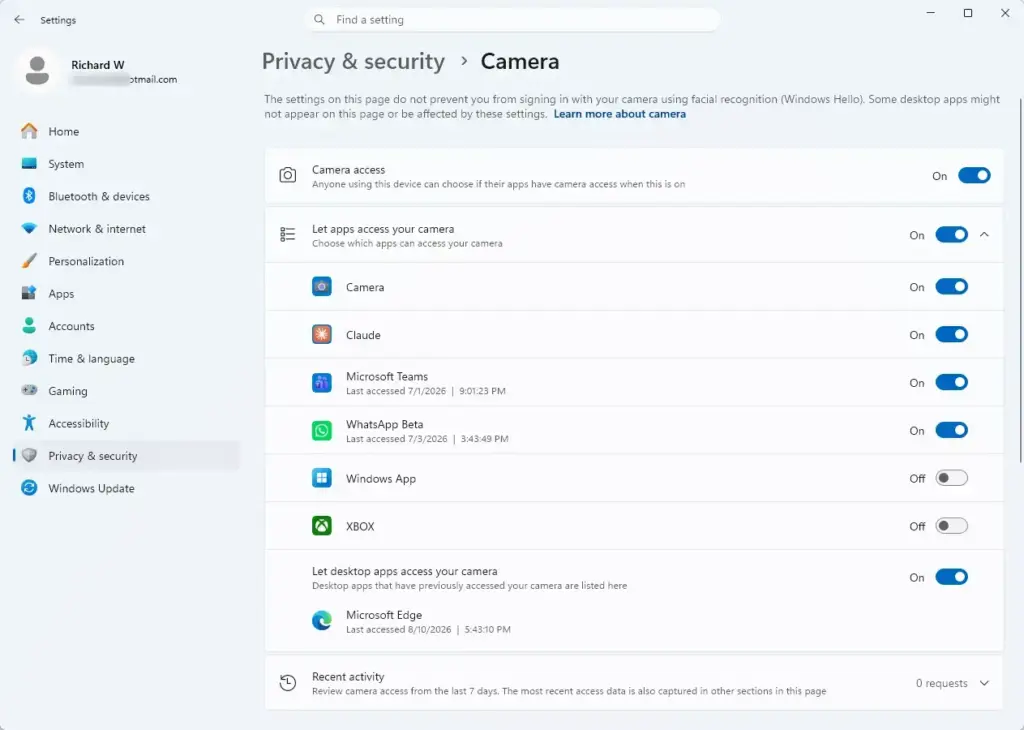
Make sure Camera access and Let apps access your camera are both set to On. If either is off, the per-app switches below will not work.
Scroll down to the list of apps on your device. If the list is collapsed, expand it.
Find the app you want to change.
Toggle the switch next to the app name to On or Off. The change applies straight away, with no restart or Save button. Some apps may need to be closed and reopened before they notice the change.
If an app is not in the list, it has probably never asked for the camera. Apps normally appear here after their first request.
Advertisement
Managing Traditional Desktop App Access
Traditional desktop programs, such as video-call clients or older software installed from a downloaded file, are handled separately from Store apps. They do not show the usual permission prompt, so one master switch decides whether they can use the camera at all.
Open Settings and select Privacy & security.
Click Camera.
Scroll down to Let desktop apps access your camera.
Set the toggle to On to let desktop programs use the camera, or Off to block them all. You cannot allow one desktop program and block another from this page. It is all or nothing.
Expand the list under the toggle to see which desktop programs have used the camera. Each entry shows when the app last accessed it, so you can spot anything that should not be using your webcam.
Many browsers and meeting tools run as desktop apps, so turning this switch off can stop them from seeing your camera. If a program stops working after you change it, check this setting first.
Troubleshooting Camera Access Issues
Sometimes an app cannot find your camera even though the privacy settings look right. The cause is usually a disabled device, a physical switch, or a driver problem. Working through the checks below in order resolves most cases. Enabling a device in Device Manager needs administrator rights.
Open Settings, go to Privacy & security, and click Camera. Confirm that Camera access, Let apps access your camera, the toggle for your app, and Let desktop apps access your camera (if the app is a desktop program) are all On.
Check for a physical block. Some laptops have a privacy shutter over the lens or a function key that disables the camera. External webcams need a working USB connection, so try another port.
Press the Windows key, type Device Manager, and press Enter. The Device Manager window opens.
Expand the Cameras or Imaging devices category. If neither appears, Windows is not detecting the camera at all, which points to a hardware or driver fault.
Right-click your webcam and select Enable device if it appears disabled. If you see Disable device instead, the camera is already enabled.
Restart your computer to apply the hardware state change, then test the camera again in the app.
If the camera still does not work, try the Windows Camera app to see whether the problem affects every program or just one. If it fails everywhere, update or reinstall the camera driver from your PC maker's website.
Advertisement
Advanced Permission Management Using the Registry
⚠️WarningAdvanced users and administrators can enforce camera settings across several PCs using policies or registry configuration.
This is mainly useful in managed environments, and it can override what users see in Settings. Back up the registry or create a restore point before changing anything there. For daily use on a single PC, the Settings app remains the safest and most reliable method.
What to do next
With your camera permissions configured, the next step is to secure your audio by managing microphone permissions for apps in Windows. That gives you the same control over your microphone as you now have over your camera.
Frequently asked questions
How do I turn off camera permissions for an app?
Open Settings, select Privacy & security, then click Camera under App permissions. Find the app under “Let apps access your camera” for Microsoft Store apps, or under “Let desktop apps access your camera” for other programs. Switch its toggle to Off. The app can no longer use your webcam. You can turn it back on at any time.
How to allow app permission in 🪟 Windows 11?
Open Settings, go to Privacy & security, and click Camera. Make sure Camera access is switched on at the top of the page. Then switch on the toggle for the app under “Let apps access your camera” or “Let desktop apps access your camera”. The app can use your webcam the next time it asks.
Advertisement
How do I see what apps are using my camera in 🪟 Windows 10?
Open Settings, select Privacy, then click Camera. Scroll to the lists under “Choose which Microsoft Store apps can access your camera” and the desktop app section. Apps with their switch set to On can use your webcam. Windows 10 does not keep a full log of camera use, so check these lists regularly.
How to use a camera in a laptop?
Press the Windows key, type Camera, and open the Camera app from the results. If Windows asks for permission, select Yes. The preview shows what your webcam sees. Click the camera icon to take a photo or the video icon to record. Video call apps such as Microsoft Teams use the same camera.
Still have a question?
Answered by AI from this guide. Good questions may be added to this page — please don't include personal details.
📬 Get new Windows tips in your inbox
One email when we publish something worth your time. No spam, unsubscribe anytime.
Richard is a writer at Geek Rewind who turns complex IT tasks into clear, step-by-step guides. He draws on years of hands-on experience in system administration and enterprise IT operations, focusing on Windows, Linux and WordPress: the problems people actually run into, and the fixes that work.
His server and WordPress guides come from systems he runs himself. Richard builds and maintains the platform behind Geek Rewind, from its Ubuntu servers and Nginx configuration to its custom WordPress plugins.
Many new tutorials start with readers' questions, and he's always glad to answer them in the comments.
One email when we publish a guide worth your time — new Windows features, the fixes that actually
work, and a heads-up when Microsoft breaks something. Unsubscribe in one click.
📬 Get new Windows tips in your inbox
One email when we publish something worth your time. No spam, unsubscribe anytime.




No comments yet — be the first to share your thoughts!