How to Secure Your Windows 11 Device Portal

The Windows 11 Device Portal is a built-in web tool that lets you manage and test your PC from another device, such as a phone or laptop. It runs as a small web server on your PC. If the portal is open to your whole network, anyone who can reach it and sign in can view system information or run commands. That is a real risk on shared Wi-Fi , in offices and in dorms.
Loopback-only mode fixes this by blocking all outside connections. The portal then answers only requests that come from your own computer, so nobody else on your network can change settings on your PC without permission. This tutorial shows you how to turn it on, what you should see at each step, and how to undo it.
Open Settings System For developers, turn on Developer Mode, enable Device Portal, then toggle Restrict to loopback connections only to On. The portal now accepts requests only from your PC, blocking all network access.
What is Device Portal?
It is mainly meant for developers, but it is available to anyone who turns on Developer Mode. By default, other devices on the network can reach it. You can restrict it to loopback connections, which means only your own computer can open the portal page.
Network devices can normally access the Windows 11 Device Portal. To keep it private and secure, you can restrict access. Restricting access means only your own computer can use the portal. Loopback is the address a computer uses to talk to itself, so a request from another device never matches it and is refused.
Why Restrict Device Portal to Loopback Connections?
Restricting Device Portal to loopback connections stops hackers and other users on your network from opening your device management page remotely. Only someone sitting at your keyboard, or signed in to your PC, can view or change these settings. If you leave the portal open, you are relying on its sign-in alone to keep strangers out. Loopback mode removes that exposure completely.
Locking Device Portal to local access makes it much safer. Only a person using the computer itself can open the portal, which prevents remote unauthorized access. This is a good habit even on a home network, because you rarely know every device connected to it.
How to Restrict Device Portal to Loopback Connections Only
You open the developer settings page and turn on the switch that limits browser access to your local computer. You need an administrator account, or the administrator password, because each of the main switches asks for admin rights. The steps are the same on Windows 11 Home and Pro.
- Open the Windows Settings app: Click the Start menu button, then click Settings. Or press
Windows key + Ion your keyboard. Learn more about opening Settings. The Settings window should open with a list of categories on the left.
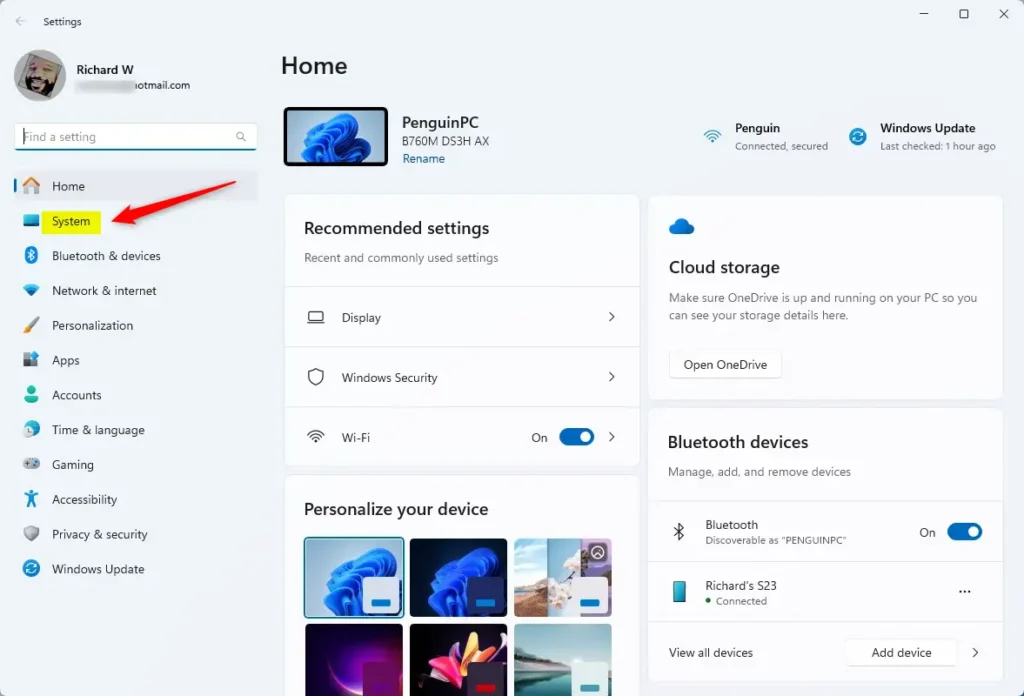
System in the Settings app - Go to the System section: When Settings opens, click System on the left side. The right pane should now show system options such as Display, Sound and Notifications.
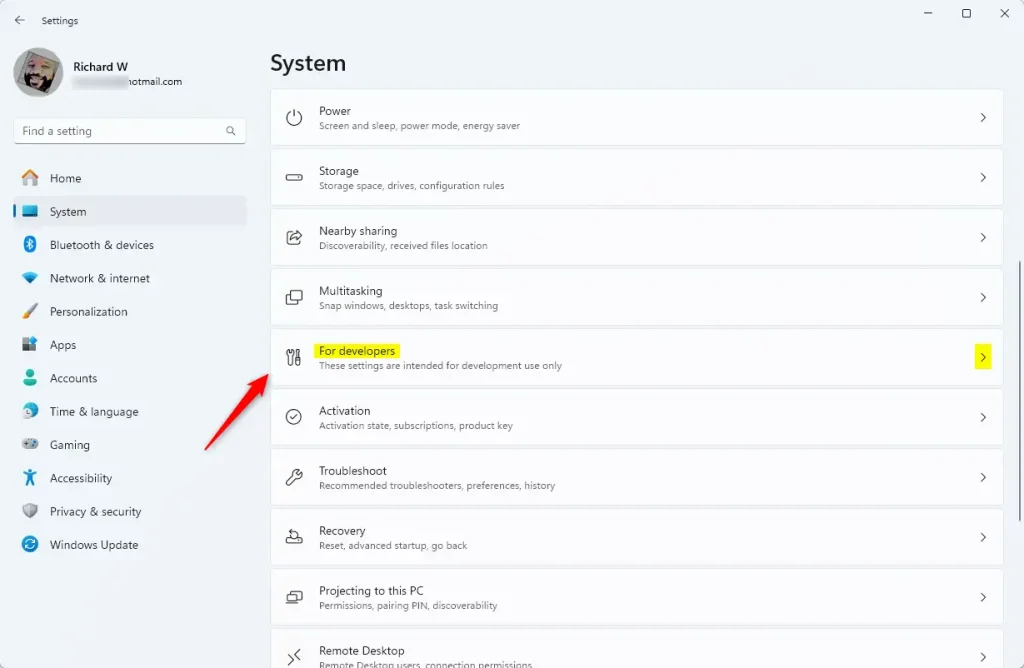
For developers in the Settings app - Open the For developers settings: On the right, click the For developers tile. You may need to scroll down to find it. The page that opens lists the developer options, including Developer Mode and Device Portal. If you cannot find the tile or the Device Portal option, check your Windows 11 version in Settings. Developer options vary slightly between builds, and your organization's policy can hide them on a work PC.
- Turn on Developer Mode: Make sure the "Developer Mode" switch is turned on. If it was off, Windows may show a confirmation prompt, and you should click Yes to continue. Windows may also take a moment to install developer components. Device Portal stays unavailable or greyed out until Developer Mode is on. ⚙️ Requires admin privileges
- Enable Device Portal: Find "Device Portal" and toggle the switch to On. More options should appear under the switch. ⚙️ Requires admin privileges
- Restrict access to loopback connections only: Below the Device Portal switch, turn on the option that says Restrict to loopback connections only. The switch should now read On. ⚙️ Requires admin privileges
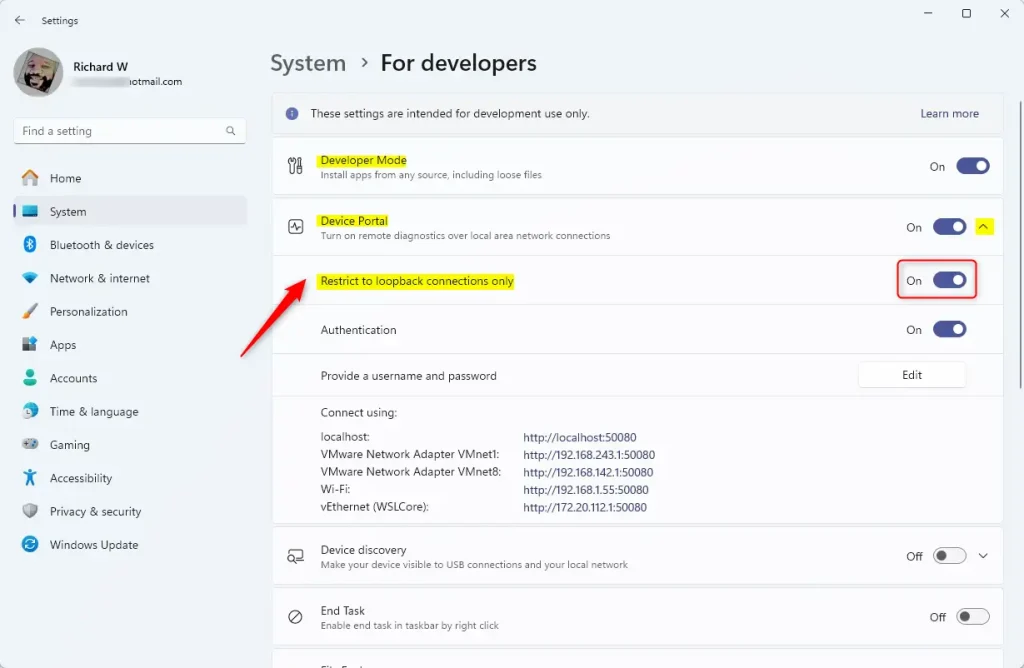
Windows Device Portal loopback address only
Once you have done these steps, only your own computer can access the Device Portal, and you can close the Settings app. The change normally applies straight away. If you want to be sure it has taken effect, restart the PC. To undo it, return to System, then For developers, and turn off Restrict to loopback connections only. You can also turn off Device Portal entirely if you no longer need it.
Summary
Restricting Device Portal to loopback connections is a quick way to block outside network access and keep your Windows 11 computer secure. This one setting means only your local computer can connect to the management page, which keeps remote intruders away from it.
This setting makes sure only your local computer can connect to Device Portal. If you do not use the portal at all, turning it off is the safest choice.
Following the steps above protects your device quickly, and you can reverse the change at any time from the same settings page.
If you want to learn more about Device Portal or developer features in Windows 11, visit the full guide here.
Did this guide fix your problem?

About the Author
Richard
Tech Writer, IT Professional
Richard is a writer at Geek Rewind who turns complex IT tasks into clear, step-by-step guides. He draws on years of hands-on experience in system administration and enterprise IT operations, focusing on Windows, Linux and WordPress: the problems people actually run into, and the fixes that work. His server and WordPress guides come from systems he runs himself. Richard builds and maintains the platform behind Geek Rewind, from its Ubuntu servers and Nginx configuration to its custom WordPress plugins. Many new tutorials start with readers' questions, and he's always glad to answer them in the comments.
No comments yet — be the first to share your thoughts!