How to Reset Windows Security App in Windows 11

Windows Security is the built-in app that protects Windows 11 from viruses, malware, and other threats. Resetting it clears broken cache files and restores the app’s default settings. This helps when the app won’t open, shows a blank window, or reports that protection features aren’t working.
Start with the Settings method, since it needs no commands and fixes most glitches. If that fails, you can run a command in Windows Terminal to reset the security package from scratch. A third method does the same for every user profile on the PC, and it needs administrator rights.
A reset can’t be undone. Any preferences you changed inside the app may go back to their defaults, so you may need to set them again afterwards. It is quick, though, and you don’t normally need to restart the PC.
Reset the Windows Security app by going to Settings Apps Apps & features, finding Windows Security, clicking the three dots, selecting Advanced options, and then clicking Reset. This clears app data and fixes issues without affecting your personal files.
Method 1Reset Windows Security Using the Settings App
This method resets the app through the Settings menu, with no commands. It resets the app for your own account only.
Step 1Open the Settings App
You can open Settings in two ways:
- Press the Win and the I key together.
- Or click the Start button, then click the gear icon (the Settings cog).
The Settings window should now be open, with a list of categories down the left side.
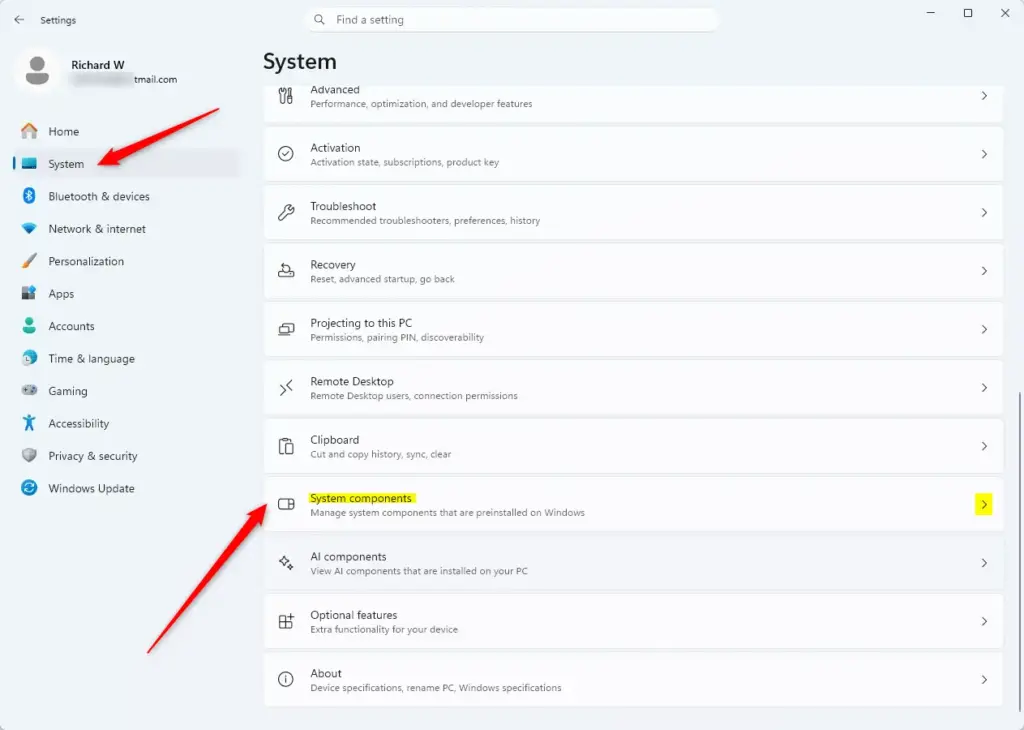
Step 2Go to System Components
- In the left sidebar, click System.
- On the right, scroll down and click System components.
You should now see a list of the built-in components installed on your PC.
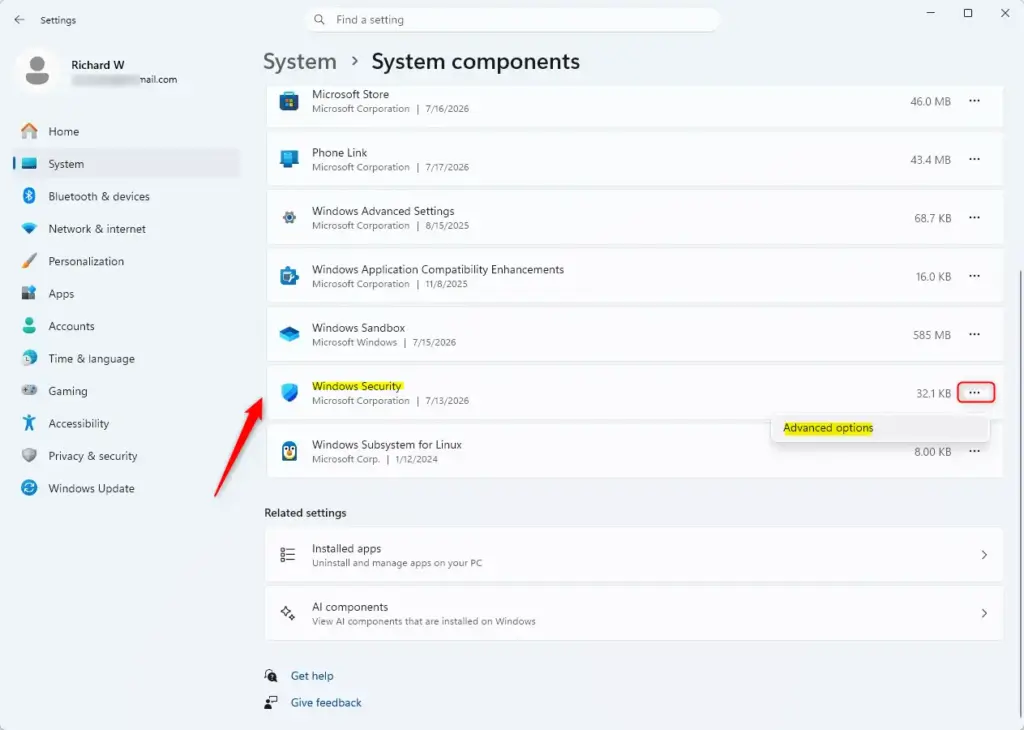
Step 3Find Windows Security's Advanced Options
- Find Windows Security in the list. The list is alphabetical, so scroll down if you don't see it.
- Click the three-dot icon to the right of Windows Security.
- Click Advanced options in the small menu that appears.
If you don't see System components under System, your version of Windows 11 may be older. In that case, go to Settings Apps Installed apps, find Windows Security there, and use the same three-dot menu.
Step 4Start the Reset
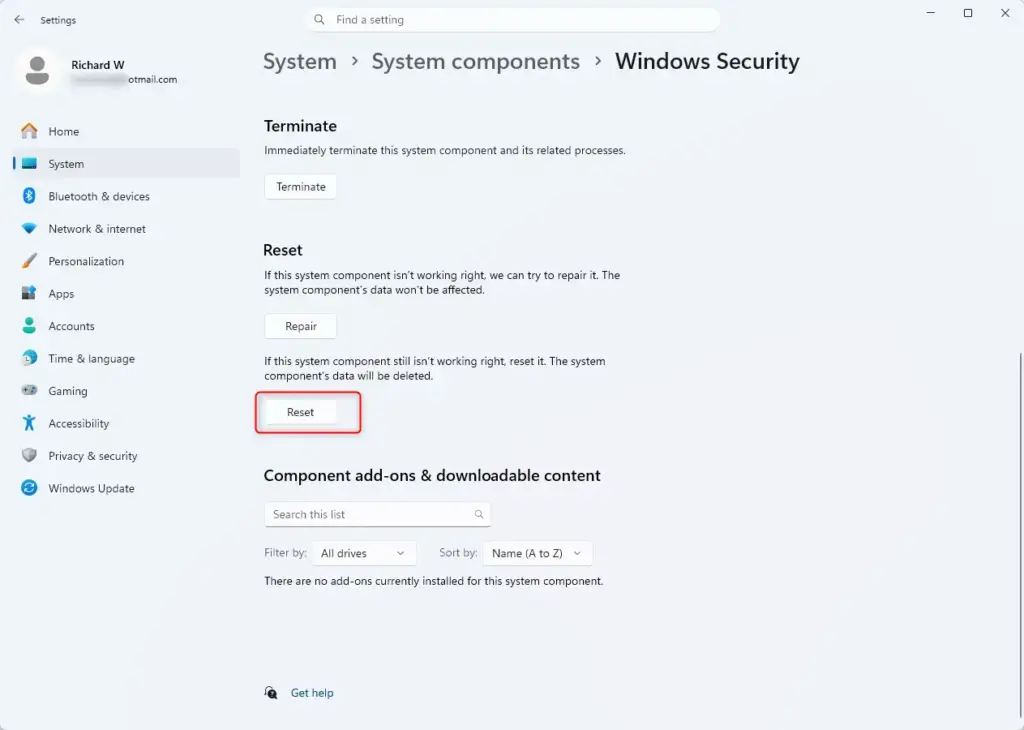
- On the Advanced options screen for Windows Security, scroll down to the Reset section.
- Click Reset. A message pops up asking if you're sure.
- Click Reset again in the message to confirm.
Windows now clears the app's data. This only takes a few seconds.
Step 5Confirm the Reset
After you confirm, a small checkmark appears next to the Reset button. That means the Windows Security app has been reset, and you can close the Settings window.
Open Windows Security from the Start menu to check that it works. If it still fails to open or behaves the same way, restart the PC once and try again. If that doesn't help, move on to the Windows Terminal method.
Method 2Reset Windows Security for Your Account Using Windows Terminal
Use this method if the Settings app didn't fix the problem, or if you prefer working with commands. It also resets the app for your current account only, so you don't need administrator rights.
Step 1Open Windows Terminal
- Click the Start button.
- Type Windows Terminal and select the app when it appears.
- Check the tab at the top. Terminal usually opens to PowerShell. If it opened to something else, make sure Windows PowerShell is selected.
You should see a PowerShell window with a prompt waiting for input.
Step 2Paste and Run the Reset Command
- Type or paste this command exactly as shown:
Get-AppxPackage *Microsoft.SecHealthUI* | Reset-AppxPackage - Press Enter.
PowerShell now runs the command. Pasting is safer than typing because one wrong character can make the command fail.
Step 3Wait for the Command to Finish
To tell when the command has finished, watch the prompt. When the reset is done, the cursor drops to a new line with a fresh prompt, and you can safely close the window. Red error text means something went wrong. In that case, check that you copied the command exactly and run it again.
A single wrong character can cause errors. Always check that you copied the command perfectly.
Method 3Reset Windows Security for All Users (Requires Administrator)
This method resets Windows Security for every user profile on the PC at once. It is useful on a shared computer, or when the problem shows up for more than one account. It requires administrator privileges.
Performing this action requires administrator privileges. If you are signed in with a standard account, you will be asked for an administrator password.
Step 1Open Windows Terminal as an Administrator
- Click the Start button and type Windows Terminal.
- Right-click the result and select Run as administrator.
- If a User Account Control (UAC) prompt asks for permission, click Yes.
Windows Terminal should now open with administrator rights. If the Run as administrator option is missing, make sure you right-clicked the Windows Terminal result, not a different app.
Step 2Choose Windows PowerShell
- Check that you are on the Windows PowerShell tab. The title bar may say Administrator: Windows Terminal, which confirms you have admin rights.
- If you are on a different tab, click the small arrow next to the plus sign (+) and select Windows PowerShell.
You should now see a PowerShell prompt in the administrator window.
Step 3Enter the 'All Users' Reset Command
This command is similar to the last one, but it affects all users.
- Copy and paste this command into the administrator PowerShell window:
Get-AppxPackage -AllUsers *Microsoft.SecHealthUI* | Reset-AppxPackage - Press Enter.
Step 4Let the Command Finish
PowerShell runs the command. You'll know it has finished when a new command line appears. That means Windows Security has been reset for all users on the computer. Close the Windows Terminal window when you're done.
If you see red error text instead, check that the window really is running as administrator and that the command was pasted in full.
Summary
Feature updates or a later system repair may set the app's configuration back to its defaults. If problems continue after a reset, open Windows Security and run a manual scan to test the protection features. Restart the PC and run the scan again if the app still fails to open or the scan won't start.
Was this guide helpful?

About the Author
Richard
Tech Writer, IT Professional
Richard is a writer at Geek Rewind who turns complex IT tasks into clear, step-by-step guides. He draws on years of hands-on experience in system administration and enterprise IT operations, focusing on Windows, Linux and WordPress: the problems people actually run into, and the fixes that work. His server and WordPress guides come from systems he runs himself. Richard builds and maintains the platform behind Geek Rewind, from its Ubuntu servers and Nginx configuration to its custom WordPress plugins. Many new tutorials start with readers' questions, and he's always glad to answer them in the comments.

Windows Security App was not found/ listed in Apps. How can we fix this?
I have the same problem. Can you please answer it?
I also have the same problem where the Windows Security App was not found
To resolve the issue with the app no longer appearing. Run the below in an elevated powershell.
Get-AppxPackage Microsoft.SecHealthUI -AllUsers | Reset-AppxPackageThis worked perfectly. Thank you.
Thank you for the fix!
This is what fixed it for me as well!
Only Home option is showing in windows security app with blank screen and nothing else, when opened from windows search. But from settings app not able to open windows security. Tried the above code in powershell but of no use, same issue.
Upgraded from win 10 to win 11
Worked like a charm. Thanks
Thanks Richard.
Your post here resolved my Windows 11 missing Security App.
Regards.
[…] the search box on the taskbar, type Windows Security and select Windows Security in the results […]
[…] Windows Security app […]
[…] the search box on the taskbar, type Windows Security and select Windows Security in the results […]
[…] Protection history page in the Windows Security app is where you can view actions that Microsoft Defender Antivirus has […]
[…] Protection history page in the Windows Security app is where you can view actions that Microsoft Defender Antivirus has […]
[…] the search box on the taskbar, type Windows Security and select Windows Security in the results […]
[…] First, open the Windows Security app. […]
[…] the LSA feature is disabled by default. However, you can turn it on and off anytime using the Windows Security app, Windows Registry editor, and the Local Group Policy […]
[…] is how to turn Real-time Protection on or off in the Microsoft Defender Antivirus Windows Security app in Windows […]
[…] is how to turn On or Off controlled folder access in Microsoft Defender Antivirus in Windows Security app in Windows […]
[…] One way to check a device’s Secure Boot status is to use the Windows Security app. […]
[…] First, open the Windows Security app. […]
[…] article describes steps to view or identify their device’s security providers in the Windows Security app when using Windows […]
[…] article describes steps to hide or show the Windows Security app Family options section in Windows […]
[…] article describes steps to hide or show the Windows Security app Device security section in Windows […]
[…] article describes steps to hide or show the Windows Security app App & browser control section in Windows […]
[…] article describes steps to hide or show the Windows Security app Account Protection section in Windows […]
[…] article describes steps to hide or show the Windows Security app Firewall & Network Protection section in Windows […]
[…] article describes steps to hide or show the Windows Security app Virus & Threat Protection section in Windows […]
[…] article describes steps to enable or disable the Windows Security app Account protection notifications in Windows […]
[…] article describes steps to enable or disable the Windows Security app Virus & threat protection notifications in Windows […]
[…] article describes steps to enable or disable Windows Security app Firewall & Network Protection notifications in Windows […]
[…] the search box on the taskbar, type Windows Security and select Windows Security in the results […]
[…] the search box on the taskbar, type Windows Security and select Windows Security in the results […]
[…] the search box on the taskbar, type Windows Security and select Windows Security in the results […]
[…] the search box on the taskbar, type Windows Security and select Windows Security in the results […]
[…] the search box on the taskbar, type Windows Security and select Windows Security in the results […]
[…] the search box on the taskbar, type Windows Security and select Windows Security in the results […]
[…] First, open the Windows Security app. […]
[…] installing, open the Windows Security […]
[…] the search box on the taskbar, type Windows Security and select Windows Security in the results […]
[…] open the Windows Security […]
[…] First, open the Windows Security app. […]
[…] article explains how to enable the new “Administrator Protection” feature in the Windows Security app on Windows […]
[…] the search box on the taskbar, type Windows Security and select Windows Security in the results […]
[…] First, open the Windows Security app. […]
[…] First, open the Windows Security app. […]
[…] Starting with Windows 11, the Microsoft Vulnerable Driver Blocklist feature is enabled by default. However, you can turn it on and off using the Windows Security app. […]
[…] First, open the Windows Security app. […]
[…] A Guide to Resetting the Windows Security App in Windows 11 […]
[…] the search box on the taskbar, type Windows Security and select Windows Security in the results […]
[…] One way is to use the Windows Security app. […]
[…] One way is to use the Windows Security app. […]
[…] on the Windows Security app from the […]
[…] on the Windows Security app when it […]
[…] Open the Windows Security app: Click the Start button (Windows icon on the bottom-left), type Windows Security, and press Enter. Or, you can click this link to learn more about the Windows Security app: Windows Security app guide. […]
[…] Windows 11 computer uses the Windows Security app to help keep you safe. One part of this app is called Firewall & Network Protection. It can […]
[…] Open Windows Security. […]
[…] Open the Windows Security app: Click the Start button (Windows icon) and type Windows Security, then press Enter. Or click this link to learn how: Open Windows Security app […]
[…] the Windows Security app. You can find it by clicking the Start menu and typing “Windows […]