How to Access Protection History in Windows 11


Protection history in Windows 11 is the log of threats Microsoft Defender Antivirus found and dealt with on your PC. Microsoft Defender Antivirus is the security program built into Windows. It runs in the background all the time and scans for malicious software, so you don’t need to install anything extra.
Think of the log as a diary of security events. You’ll find it in the Windows Security app under Virus & threat protection, then Protection history. It works the same on Windows 11 Home and Pro, and you don’t need an administrator account just to read it.
Each entry shows the name of the threat, what Defender did about it (for example, quarantined it, removed it or blocked it), and when it happened. A threat that Defender removed on October 26, 2023 will be listed with that date. Selecting an entry expands it to show more detail, such as the affected item and its severity.
Open the Windows Security app from your taskbar , click Virus & threat protection on the left, then select Protection history to see a list of threats Microsoft Defender found and blocked, with dates and actions taken.
Why check 🪟 Windows 11 Protection History?
So why check the log? It tells you what Microsoft Defender has been doing in the background to keep malware off your computer. It also shows whether something needs your attention. Some entries only report that a threat was handled. Others say Defender is waiting on you to choose an action.
What happens when you are done?
When you finish, you’ll know whether your PC is clean and whether any security warnings still need action. A quick look every few weeks is enough to catch a problem early. Left alone, a pending threat can slow the system down or leave a risk in place.
How to view your security history
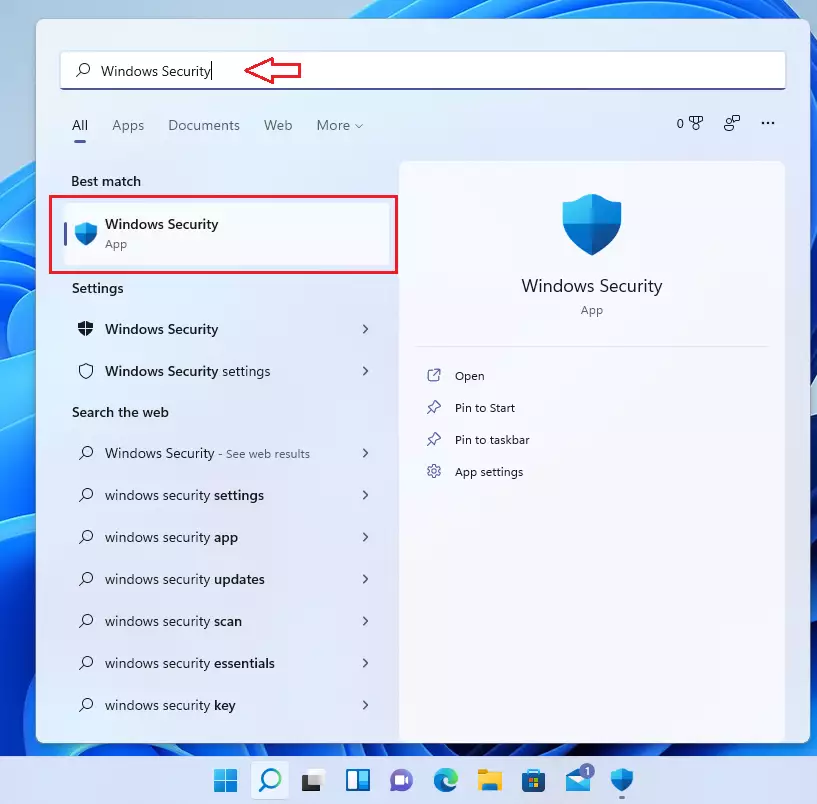
Protection history lets you look back at past scans and blocked threats. The short route is to type Windows Security into the taskbar search box and open the app. Then select Virus & threat protection and open Protection history to see the recent actions Defender took. The steps below walk through it, and the screen should change after each one.
- Click the search box on your taskbar.
- Type Windows Security and click the app.
- Click Virus & threat protection on the left.
- Click Protection history.
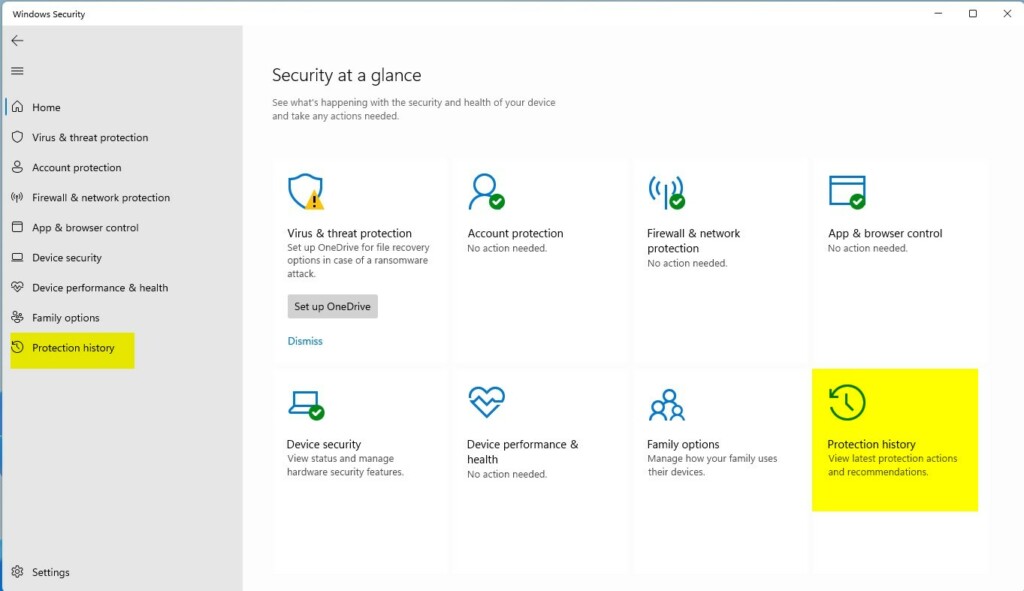
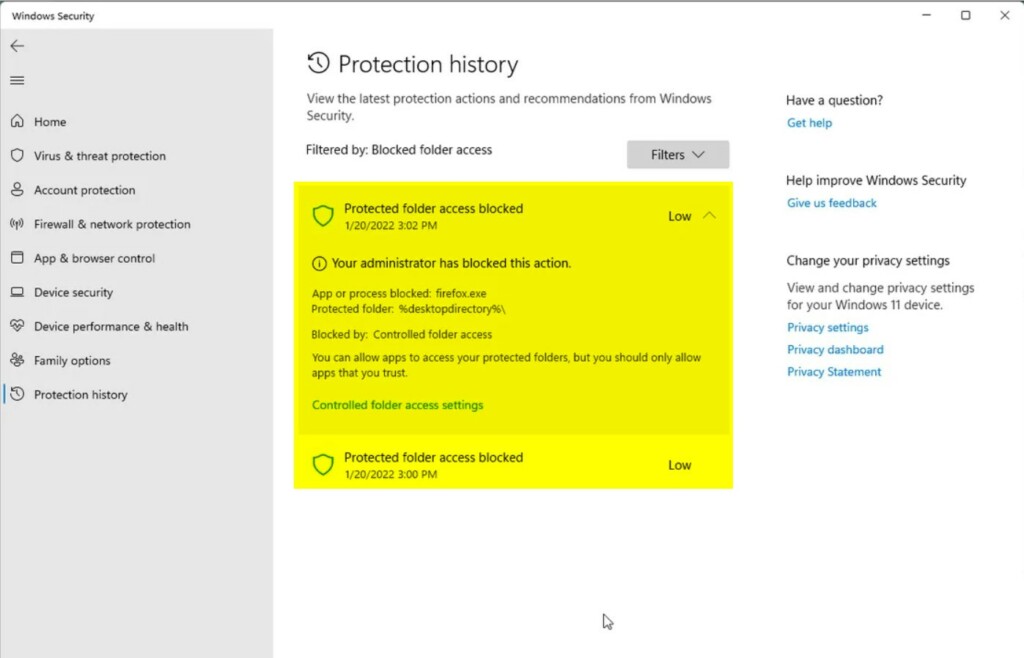
You'll now see a list of recent actions, newest first. Look at the badge on each entry:
- A red badge means a serious issue. Open the entry and deal with it first.
- A yellow badge means you should look into it soon, though it is less urgent.
If it offers an Actions menu, you can choose what to do with the item there. Only restore or allow a file if you are certain it is safe. If you're unsure, leave it quarantined.
Managing Protection History logs
The list can get long over time. You can clear out old entries to tidy it up and free some space. Windows Security has no obvious button for this, so the cleanup is done in File Explorer. You need administrator privileges, because the log files sit in folders deep inside the Windows Defender directory. If Windows asks for permission, click Continue or enter your administrator password.
Deleted entries can't be brought back.
[ADMIN PRIVILEGES REQUIRED]- Open File Explorer.
- Navigate to C:\ProgramData\Microsoft\Windows Defender\Scans\History\Service\DetectionHistory.
- Delete all files inside this folder.
This clears the history shown in the Windows Security app. You don't need to restart for this to take effect, but you may need to close and reopen Windows Security to see the empty list. Keep in mind that the Windows Defender Service will create new logs as it finds new threats, so the list will start filling again.
Understanding threat statuses
- Quarantined: The file is locked in a safe folder. It cannot run or harm your PC.
- Blocked: The threat was stopped before it could start.
- Remediation Incomplete: The system tried to fix the issue but needs your help. You may need to restart your PC.
Advanced settings and troubleshooting
If Protection history looks empty when it shouldn't be, or the page won't open, first confirm that your core security services are running properly. Then check that Tamper Protection is turned on. Tamper Protection is a setting that stops unwanted changes to your security settings, so malicious apps can't switch Defender off or alter its configuration.
To find it, open Windows Security and go to Virus & threat protection. Select Manage settings under Virus & threat protection settings, then make sure the Tamper Protection switch is on. If the switch is greyed out, your device is probably managed by an organization, and your IT administrator controls it. Controlled folder access is a separate feature that can stop programs from changing your files without permission. You can turn it on under Ransomware protection in the same app.
Summary
Protection history is a simple but useful tool. It records the security actions Microsoft Defender has taken, so you can see which threats were blocked or quarantined. Checking it now and then keeps you informed about the health of your PC.
How do I delete old protection history logs in 🪟 Windows 11?
Why does Windows Security show a threat that I already removed?
Can I recover files from the Protection History quarantine?
Have a question about this guide?
Answered by AI from this guide. Good questions may be added to this page — please don't include personal details.
Did this guide fix your problem?

About the Author
Richard
Tech Writer, IT Professional
Richard is a writer at Geek Rewind who turns complex IT tasks into clear, step-by-step guides. He draws on years of hands-on experience in system administration and enterprise IT operations, focusing on Windows, Linux and WordPress: the problems people actually run into, and the fixes that work. His server and WordPress guides come from systems he runs himself. Richard builds and maintains the platform behind Geek Rewind, from its Ubuntu servers and Nginx configuration to its custom WordPress plugins. Many new tutorials start with readers' questions, and he's always glad to answer them in the comments.
No comments yet — be the first to share your thoughts!