How to Clear Recent Device Search History in Windows 11


Clearing your recent device search history in Windows 11 deletes the list of apps, settings, and files you typed into the taskbar search box . Windows keeps a record of up to 100 recent searches to show you quick suggestions as you type.
Removing this history stops other people who use your PC from seeing what you looked for, and it keeps your search suggestions tidy. You can clear it in a few clicks from the Privacy & security page in Settings. This guide covers two ways: wiping the whole list at once, or removing single items.
Open Settings , navigate to Privacy & security, then Search, and click the “Clear device search history” button. Alternatively, open the Windows Search bar (Win+S), hover over a recent item, and click the X to remove individual entries.
Why clear your search history?
Privacy is the main reason to clear this data, especially if several people share the same computer. Anyone who opens the search box can see recent entries. That can include the names of files, apps, or settings you would rather keep to yourself.
A shorter list also makes the suggestions more useful. Old, one-off searches stop showing up ahead of the things you actually use.
What happens when done?
Clearing recent device search history removes all items from the recent search list. Windows will then stop suggesting those specific past searches. Your files, apps, and settings are not touched. Only the record of what you searched for is deleted.
This applies to the history stored on this device. It does not remove search history that a web service, such as Bing, keeps against your Microsoft account. That is managed separately on your Microsoft account’s privacy page.
Reference: Windows Search and privacy - Microsoft Support
Option 1Clear All Recent Device Search History in Settings
Use this method to clear the whole list in one step. It removes every past search query that Windows stores on this device. It works the same on Windows 11 Home and Pro, and you do not need to restart afterwards.
- Open Settings by pressing the Win+I keys on your keyboard. The Settings window opens with a list of categories on the left.
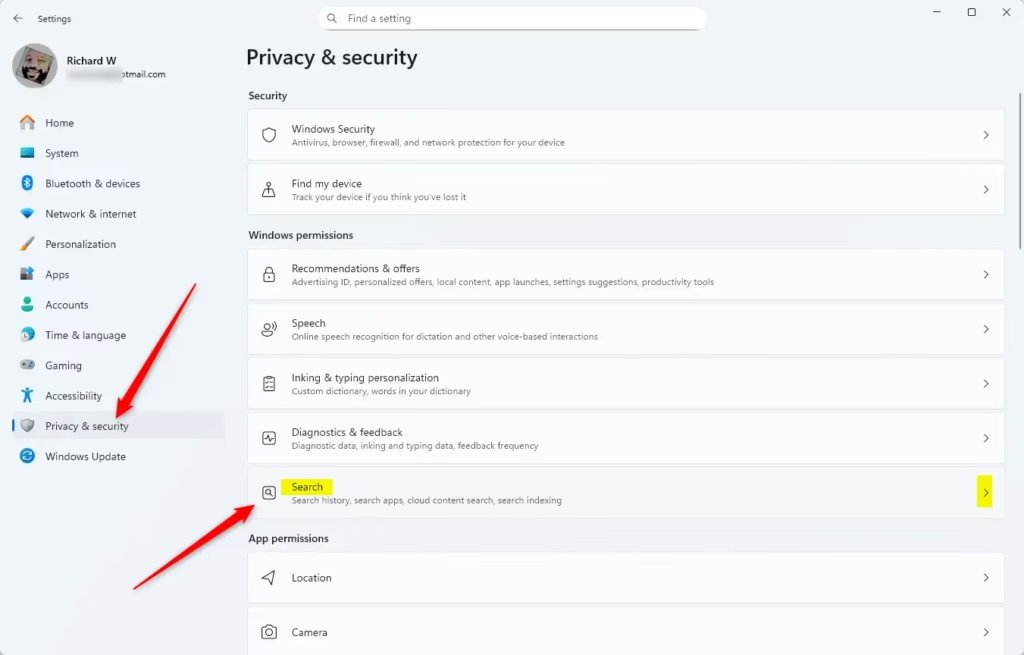
- Click Privacy & security on the left. The privacy options appear on the right.
- Click Search on the right. On some Windows 11 builds this entry is labelled Search permissions. It is the same page. You should now see the search privacy options, including the history settings.
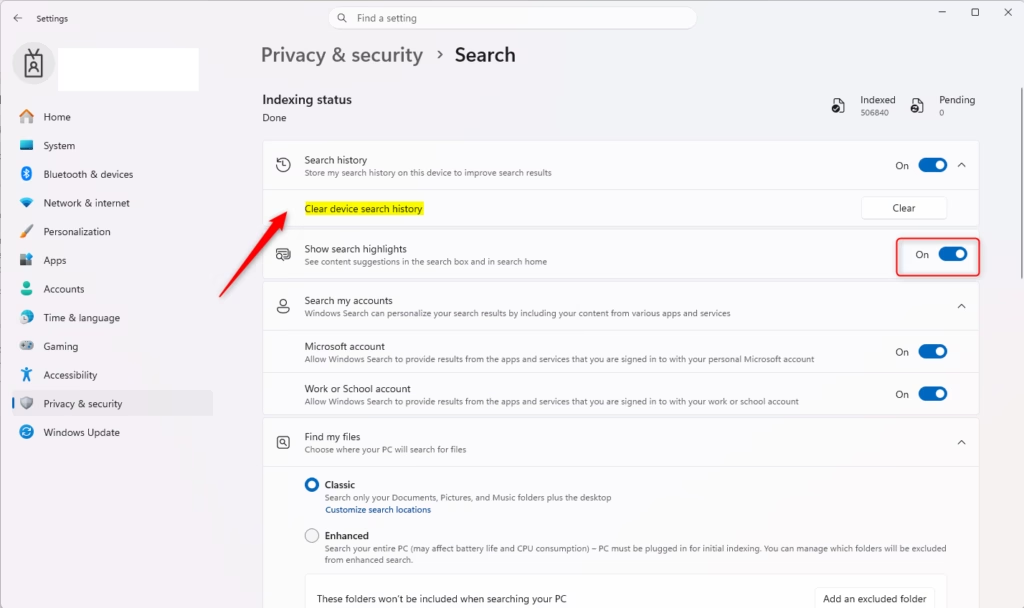
- Look for the Search history section. On some builds the heading reads History. You may need to scroll down to reach it. It also has a toggle for keeping search history on this device. Leave it on if you want Windows to keep suggesting recent searches. Turn it off if you do not want new searches recorded.
- Click the Clear device search history button. Windows deletes the stored searches straight away. There is usually no confirmation prompt, and you cannot undo it.
- Close the Settings window when you are finished. To check it worked, press Win+S. The recent searches you had before should be gone.
Option 2Clear Specific Recent Device Search History
You can also remove single items straight from the search window, without deleting your entire list. This is useful when you only want to get rid of one or two entries and keep the rest. What you see here depends on your Windows 11 build. If you do not see a Recent list at all, use the Settings method above instead.
- Open Windows Search by pressing the Win+S keys on your keyboard. The search window opens with a search box at the top.
- Find the item in your Recent list that you want to remove.
- Hover your mouse over the item and click the X button that appears. The item disappears from the list.
- Repeat this for any other items you wish to delete.
Summary
Windows 11 search history helps keep your search results useful, but it can also expose what you have been looking for. To remove everything at once, use Clear device search history in the Privacy & security settings. To remove single entries, click the X next to each item in the search menu. If you would rather Windows did not keep a history at all, turn off the search history toggle on the same Settings page. You can switch it back on later.
Have a question about this guide?
Answered by AI from this guide. Good questions may be added to this page — please don't include personal details.
Did this guide fix your problem?

About the Author
Richard
Tech Writer, IT Professional
Richard is a writer at Geek Rewind who turns complex IT tasks into clear, step-by-step guides. He draws on years of hands-on experience in system administration and enterprise IT operations, focusing on Windows, Linux and WordPress: the problems people actually run into, and the fixes that work. His server and WordPress guides come from systems he runs himself. Richard builds and maintains the platform behind Geek Rewind, from its Ubuntu servers and Nginx configuration to its custom WordPress plugins. Many new tutorials start with readers' questions, and he's always glad to answer them in the comments.
No comments yet — be the first to share your thoughts!