How to Turn On or off Recent Search History in Windows 11

Recent search history in Windows 11 saves the apps, files, and web searches you type into the taskbar search box so you can find them again quickly. Microsoft turns this feature on by default on both Windows 11 Home and Pro, which means your PC logs what you look for unless you change the setting.
You can turn off recent search history at any time. People usually do it for privacy, especially on a shared PC, or to keep the search panel from filling up with old entries. Windows stops recording new searches as soon as you switch the setting off in your privacy settings. You do not need to restart the PC.
Open Settings , go to Privacy & security Search, and toggle Search history on this device to Off. Windows stops saving your searches immediately without requiring a restart, though past searches remain until you manually clear them.
What Is Recent Search History?
Why Search History Matters
Think of Windows 11 search history as a log of everything you search for on your computer, such as specific apps or files. It saves you typing when you repeat a search. It also means anyone who sits down at your signed-in PC can see what you looked for.
It only stops new ones from being saved. You need to clear the existing history yourself. In the same Search settings page, look for the button that clears the history stored on this device.
Quick Link to Official Microsoft Info
For official details on Windows Search and privacy, consult Windows Search and privacy – Microsoft Support.
Method 1Turn On or Off Recent Search History in Settings
Managing your Windows 11 search history takes a few clicks in the Settings app. The main privacy switch controls whether your computer remembers past searches. When it is off, the system stops saving what you type into the taskbar search box. Other people who use your PC can no longer see your recent activity there. This method works the same on Windows 11 Home and Pro, and you do not need administrator rights to change it for your own account.
Follow the numbered steps below. At the end you should be looking at the search history toggle on the Search settings page.
- Open Settings: Press Win + I on your keyboard.
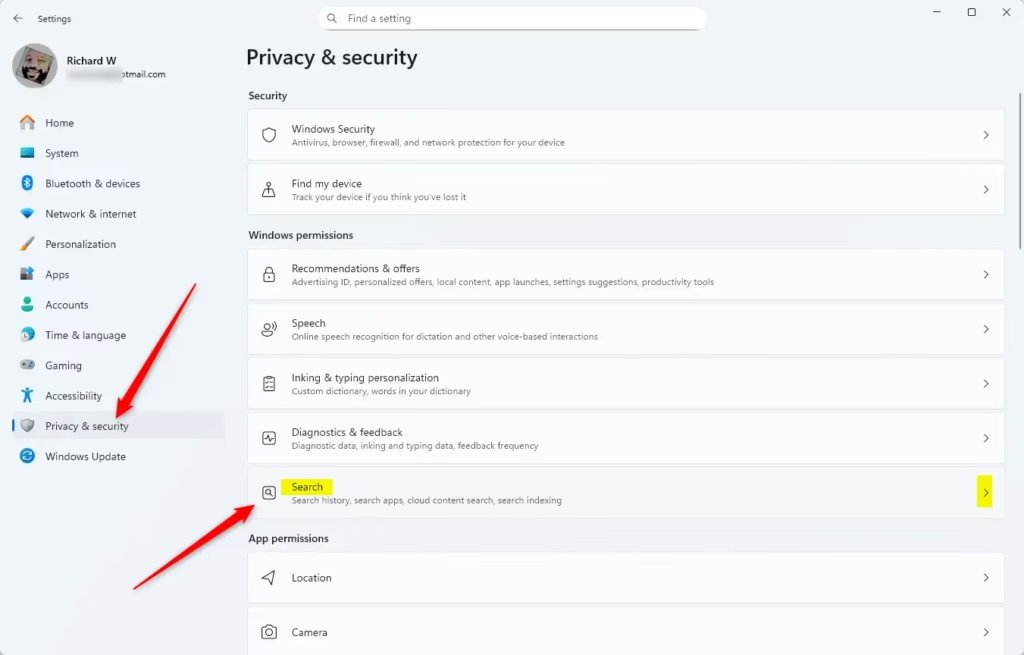
- Click Privacy & security on the left menu.
- Click Search on the right side.
- Find the option called Search history on this device.
- Toggle it On to save your recent searches or Off to stop saving them.
To skip the clicking, use this link to go straight to Search settings. It opens the main Settings window: Open Search settings
Here is what the toggle looks like. When it is on, the switch is filled and reads On. When it is off, the switch is empty and reads Off:
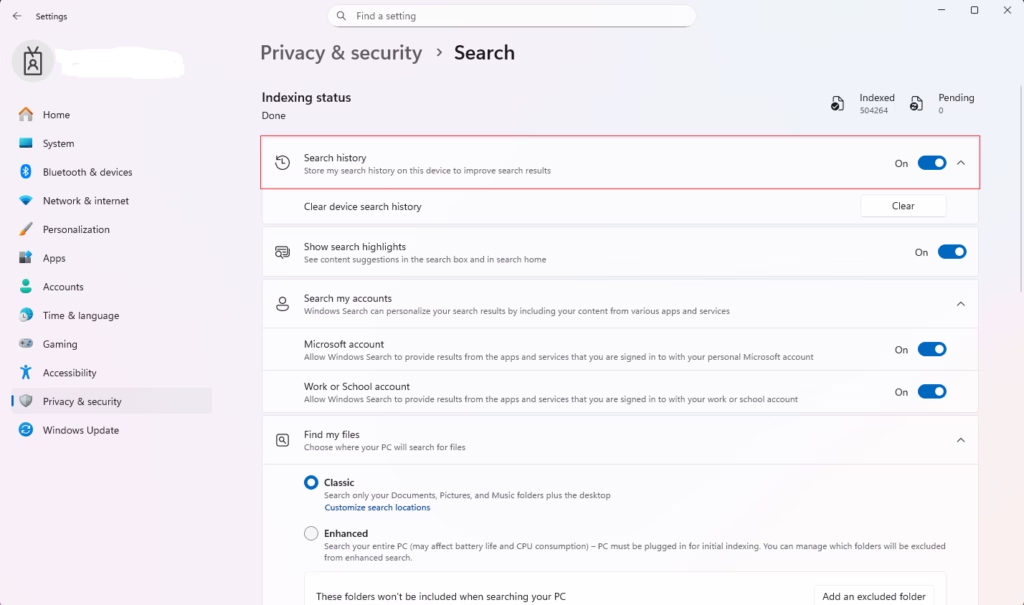
The change applies immediately, so there is no Save button to press. Close the Settings window once you are finished. To undo the change, open the same page and flip the switch back on. Windows will then start saving new searches again.
Method 2Turn On or Off Recent Search History Using Registry (Advanced Users)
You can also change this setting in the Windows Registry, a central database that holds system and app settings. This method is for advanced users. It is useful when you want to apply the change by editing a value directly instead of clicking through Settings. A specific registry key controls whether Windows 11 saves your recent search activity. The steps and values for it are below.
Turn On Recent Search History
reg add "HKEY_CURRENT_USER\Software\Microsoft\Windows\CurrentVersion\SearchSettings" /v IsDeviceSearchHistoryEnabled /t REG_DWORD /d 1 /f
Turn Off Recent Search History
reg add "HKEY_CURRENT_USER\Software\Microsoft\Windows\CurrentVersion\SearchSettings" /v IsDeviceSearchHistoryEnabled /t REG_DWORD /d 0 /f
After you change the value, close Registry Editor. If the Settings toggle or the search panel does not reflect the change right away, sign out and back in, or restart the PC. To undo the change, set the value back to what it was before, or import the backup you made.
Always back up your registry before making changes. In Registry Editor, you can do this with File Export. Save the backup file somewhere you can find it later.
Summary
- Easy Control: You can turn search history on or off anytime in Settings.
- Privacy: Turning off search history helps keep your recent searches private.
- Better Search: Keeping it on helps Windows show better results based on what you searched before.
- Simple Interface: Windows 11 has a clear and easy way to manage search settings.
- Don't Worry: Turning off search history doesn’t delete what’s already saved.
Controlling your Windows 11 search history gives you a quick way to balance privacy and convenience on your computer. Keeping it turned on helps the system show faster, more relevant suggestions based on terms you typed before. Turning it off keeps your personal searches private, though you will lose those quick autocomplete suggestions when you search again. If you change your mind, you can switch the setting back at any time.
Was this guide helpful?

About the Author
Richard
Tech Writer, IT Professional
Richard is a writer at Geek Rewind who turns complex IT tasks into clear, step-by-step guides. He draws on years of hands-on experience in system administration and enterprise IT operations, focusing on Windows, Linux and WordPress: the problems people actually run into, and the fixes that work. His server and WordPress guides come from systems he runs himself. Richard builds and maintains the platform behind Geek Rewind, from its Ubuntu servers and Nginx configuration to its custom WordPress plugins. Many new tutorials start with readers' questions, and he's always glad to answer them in the comments.



No comments yet — be the first to share your thoughts!