How to Clear Windows Security History in Windows 11

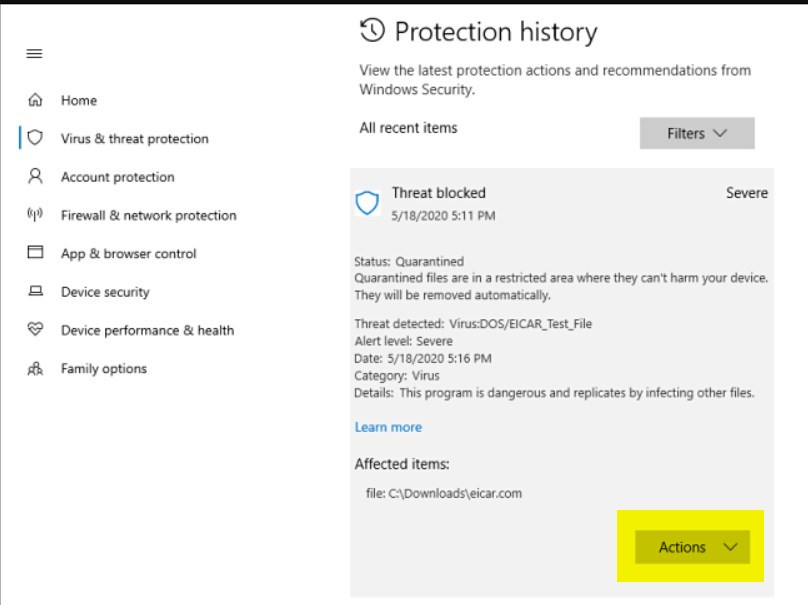
Clearing Windows Security history in Windows 11 deletes past threat records and warning messages from Microsoft Defender Antivirus, the built-in Windows malware protection tool. This security log stores details about blocked viruses and items found on your PC over the past 15 days.
Old alerts often stay stuck in your dashboard even after you fix the problems. Deleting them gives you a clean slate and makes it easier to spot new threats. This guide covers two ways to do it: deleting the Service folder in File Explorer , or running one command in PowerShell. Both start with turning off Tamper Protection. You need an administrator account for all of it.
Open Windows Security, go to Virus & threat protection Manage settings, and toggle Tamper Protection to Off. Then open File Explorer , paste 📁C:\
Prerequisites: Tamper Protection
Tamper Protection is a security setting that blocks apps and users from changing your security settings. You must turn it off before you can clear Windows Security history. While it is on, Windows blocks you from deleting past scan records, and the delete step later in this guide can fail.
The setting is in the Windows Security app under Virus & threat protection Manage settings The steps below walk through it. The screens are the same on Windows 11 Home and Pro.
- Open the Windows Security app. Click Start, type Windows Security, and press Enter. The Windows Security home page opens, with a row of protection areas.
- Go to Virus & threat protection. You can click it on the home page or in the left sidebar. The page that opens shows your current threats and your scan options.
- Click Manage settings under Virus & threat protection settings. A list of switches appears, including Real-time protection and Tamper Protection. You may need to scroll down to find Tamper Protection.
- Toggle Tamper Protection to Off. Windows asks for permission in a User Account Control prompt. Click Yes. The switch now reads Off, and Windows may show a warning that your device is vulnerable. That warning is expected for now. If the switch is greyed out or you can’t change it, your PC is probably managed by an organization, and your administrator controls this setting.
Method 1Manual File Path Deletion
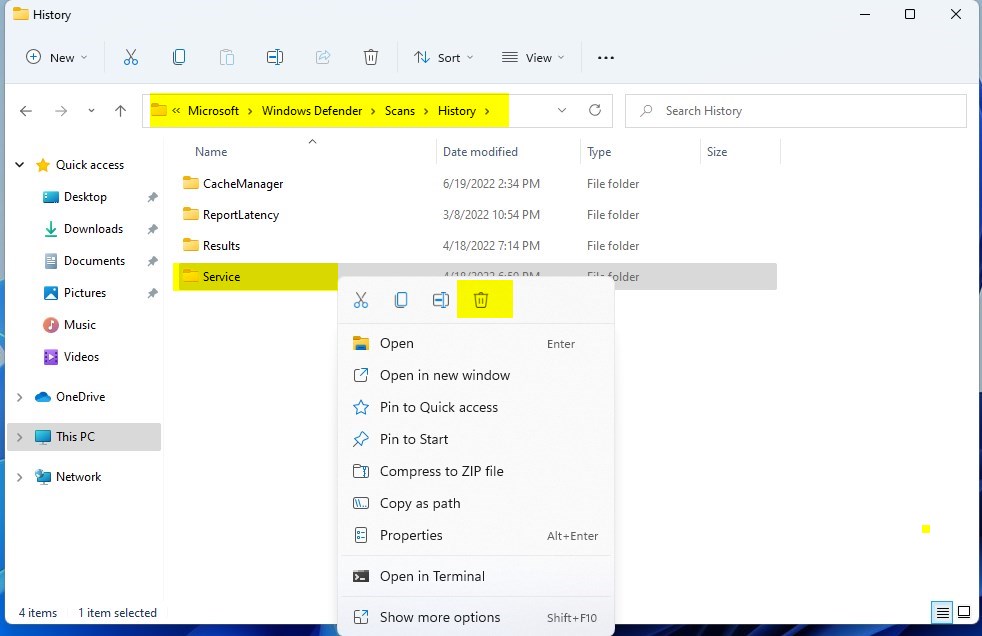
Deleting scan logs directly through File Explorer is the most direct way to clear Windows Security history. You wipe out all past threat records by removing the Service folder from the Windows Defender directory. The folder sits in 📁C:\
Once you delete the Service folder and restart, the history is gone.
- Open File Explorer by pressing Win+E. A File Explorer window opens.
- Copy and paste this path into the address bar, then press Enter:
C:\ProgramData\Microsoft\Windows Defender\Scans\History. The History folder opens. If Windows says you don’t have permission, click Continue to allow access with your administrator account. - Locate the Service folder. It is the folder that holds the stored scan history.
- Right-click the Service folder and select Delete. If Windows asks you to confirm, approve it. If it says the folder is in use or access is denied, check that Tamper Protection is off and try again. The folder disappears from the list.
- Restart your computer to finish the process. After you sign back in, open Windows Security and check that the old entries are gone.
Method 2PowerShell Automation
PowerShell lets you clear Windows Security history with a single administrative command instead of digging through File Explorer folders. This method automates the deletion of past scan logs, and it suits you if you prefer the command line. You must open the window as an administrator, or the command can’t remove the files. As with the File Explorer method, turn off Tamper Protection first.
- Right-click the Start button and select Terminal (Admin) or PowerShell (Admin). Which one you see depends on your Windows 11 version. Click Yes at the User Account Control prompt. A window opens with a prompt ready for typing.
- Copy and paste the following command:
Remove-Item -Path "C:\ProgramData\Microsoft\Windows Defender\Scans\History\Service\*" -Recurse -Force. Check that the whole command appears on the line before you go on. - Press Enter. The command runs. If a red error message appears, confirm that the window is running as administrator and that Tamper Protection is off, then run it again. Afterward, restart your PC and check Windows Security to confirm the history is gone.
Summary
Clearing your Windows Security history takes a few steps. First, turn off Tamper Protection. Then delete the files in the Service folder, using either File Explorer or a PowerShell command. This gives you a fresh look at your security dashboard without compromising your PC's safety.
Leaving it off weakens your protection against malware that tries to disable your security tools.
Have a question about this guide?
Answered by AI from this guide. Good questions may be added to this page — please don't include personal details.
Did this guide fix your problem?

About the Author
Richard
Tech Writer, IT Professional
Richard is a writer at Geek Rewind who turns complex IT tasks into clear, step-by-step guides. He draws on years of hands-on experience in system administration and enterprise IT operations, focusing on Windows, Linux and WordPress: the problems people actually run into, and the fixes that work. His server and WordPress guides come from systems he runs himself. Richard builds and maintains the platform behind Geek Rewind, from its Ubuntu servers and Nginx configuration to its custom WordPress plugins. Many new tutorials start with readers' questions, and he's always glad to answer them in the comments.
No comments yet — be the first to share your thoughts!