How to Reset Default Firewall Settings in Windows 11

Resetting default firewall settings in Windows 11 clears all custom rules and returns Microsoft Defender Firewall to its original factory state in just a few clicks. This removes broken or overly strict rules that block apps from connecting to the internet.
You lose any custom rules you added, but you get a fresh security setup that often solves stubborn connection problems. Before you start, note any rules you want to recreate later. The Advanced Security method below also lets you export your current rules as a backup.
Open Settings Privacy & security Windows Security, click Firewall & network protection, scroll to the bottom, click Restore firewalls to default, then click Restore defaults and confirm with Yes. Your firewall rules return to factory settings immediately with no restart required.
Why Reset Your Firewall?
Resetting the firewall puts your computer’s protection back to its original factory state. Reset it if you accidentally blocked a safe app, changed security rules by mistake, or see odd network behavior caused by blocked traffic. A reset removes the broken rules and gets your protection working properly again.
It deletes custom inbound and outbound rules, including rules that apps created for themselves when you installed them. It also returns the settings for the Domain, Private and Public network profiles to their defaults. Some apps, such as games, chat tools or file-sharing software, may ask for firewall permission again the next time they connect to the network. Allow them if you trust them. A restart is normally not needed.
You can turn it on or off at any time. Resetting needs administrator rights. If the PC is managed by your workplace or school, some firewall options may be greyed out or the reset may be blocked. In that case, ask your IT department.
Method 1Using the Windows Security App
The Windows Security app is the fastest way to restore the default rules without advanced tools. It clears your custom changes and returns all network protection settings to how they were when you first set up the PC. It works the same on Windows 11 Home and Pro.
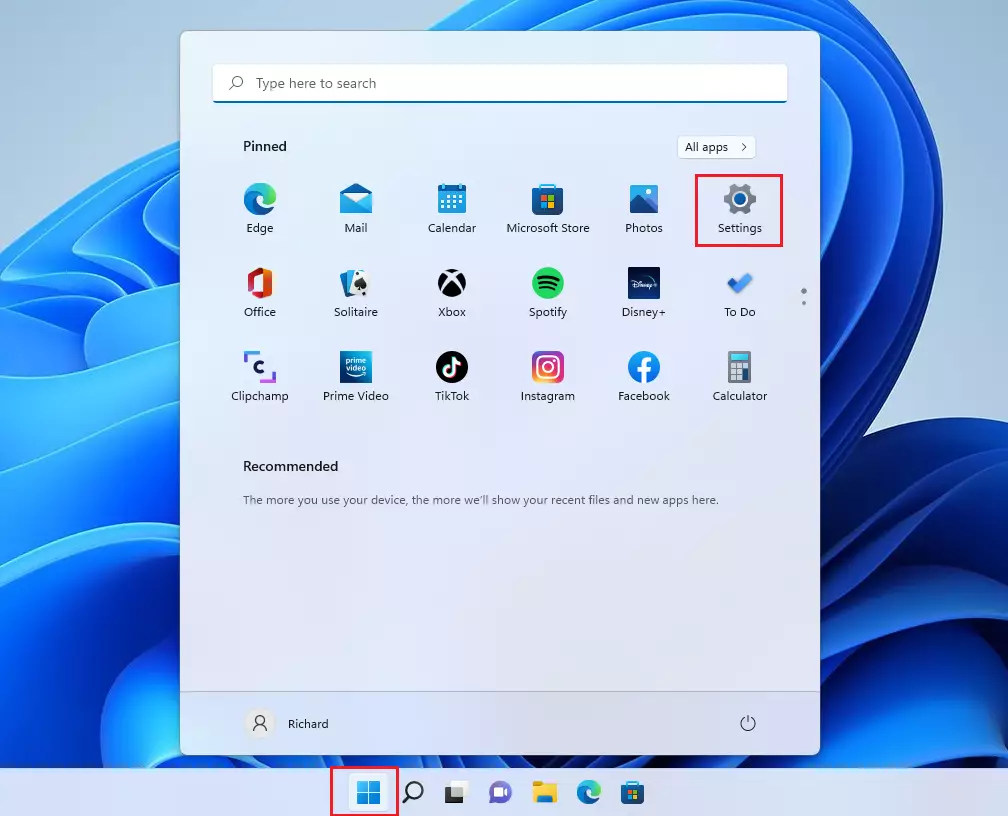
- Click Start and select Settings from the Start menu. You can also press the Windows key + I. The Settings app opens.
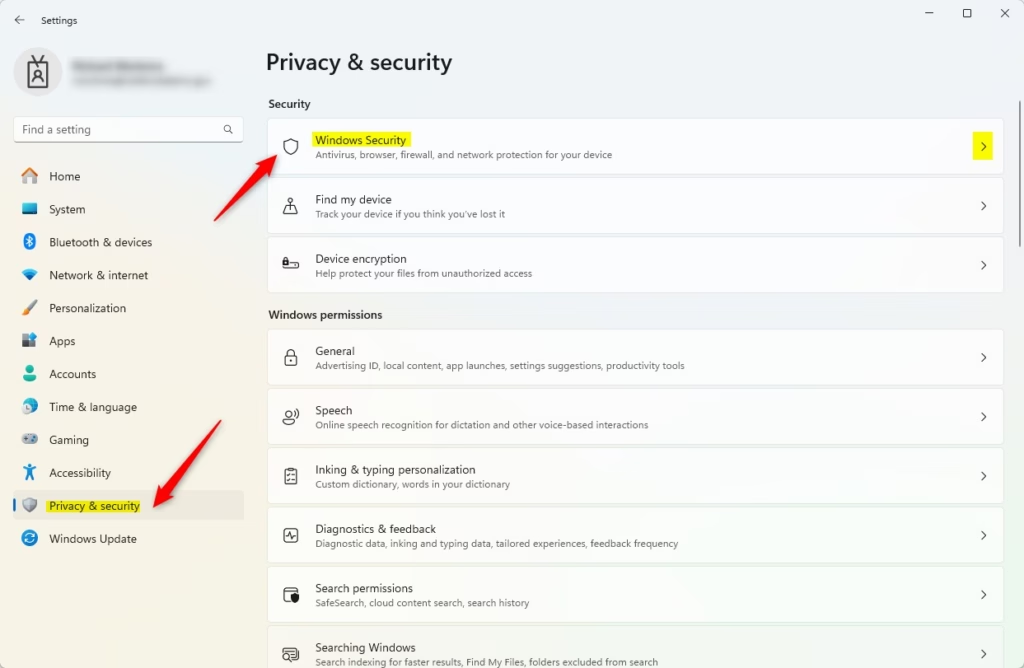
- In the Settings app, click Privacy & security and then click the Windows Security tile. The Windows Security overview page appears.
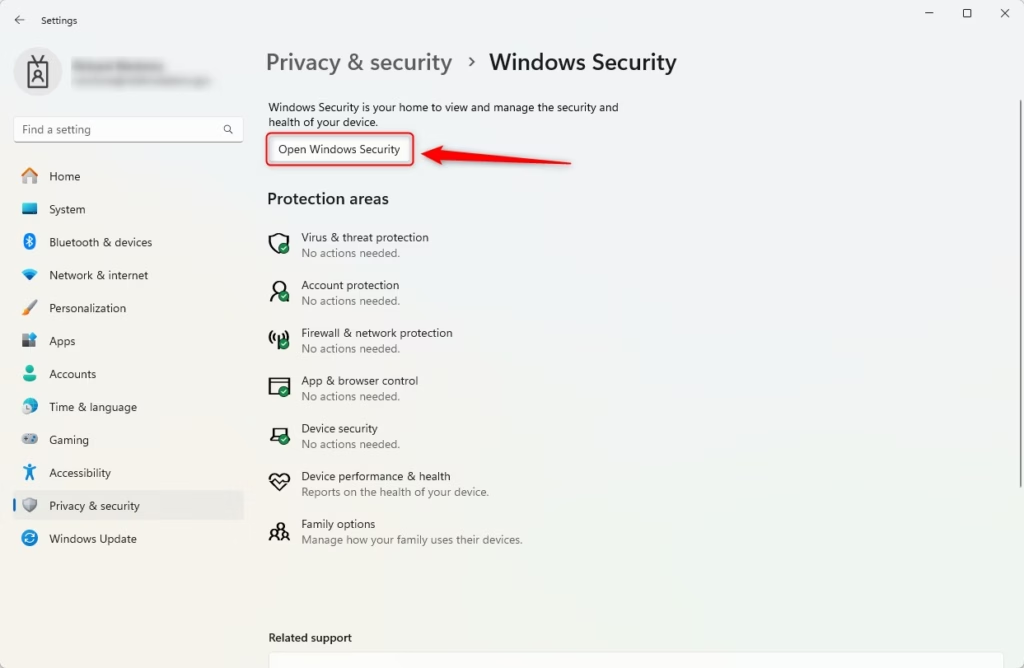
- Click the Open Windows Security button. The Windows Security app opens in its own window.
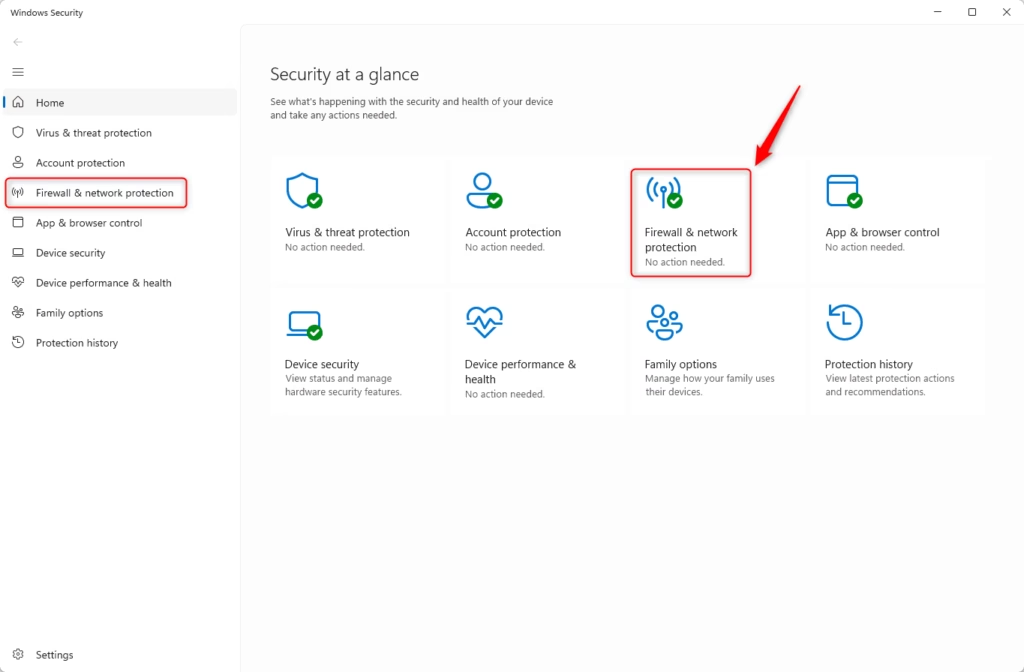
- In the Windows Security app, select Firewall & network protection or use this shortcut: Firewall & network protection. You now see the Domain, Private and Public network profiles.
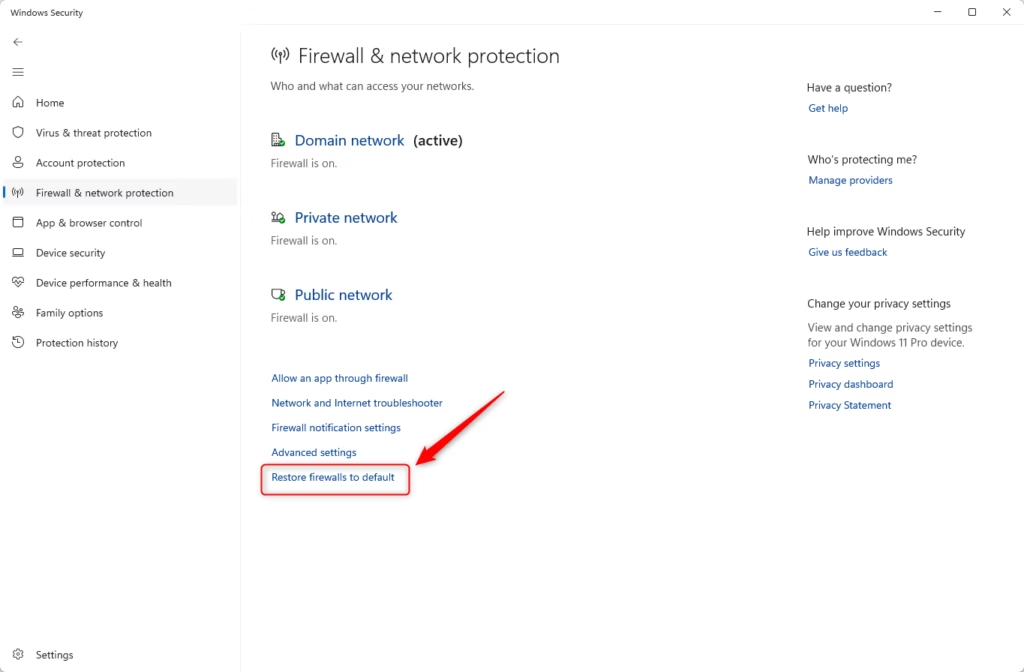
- Scroll to the bottom of the page and click the Restore firewalls to default link. If you don't see it, scroll further down, as it sits below the other links.
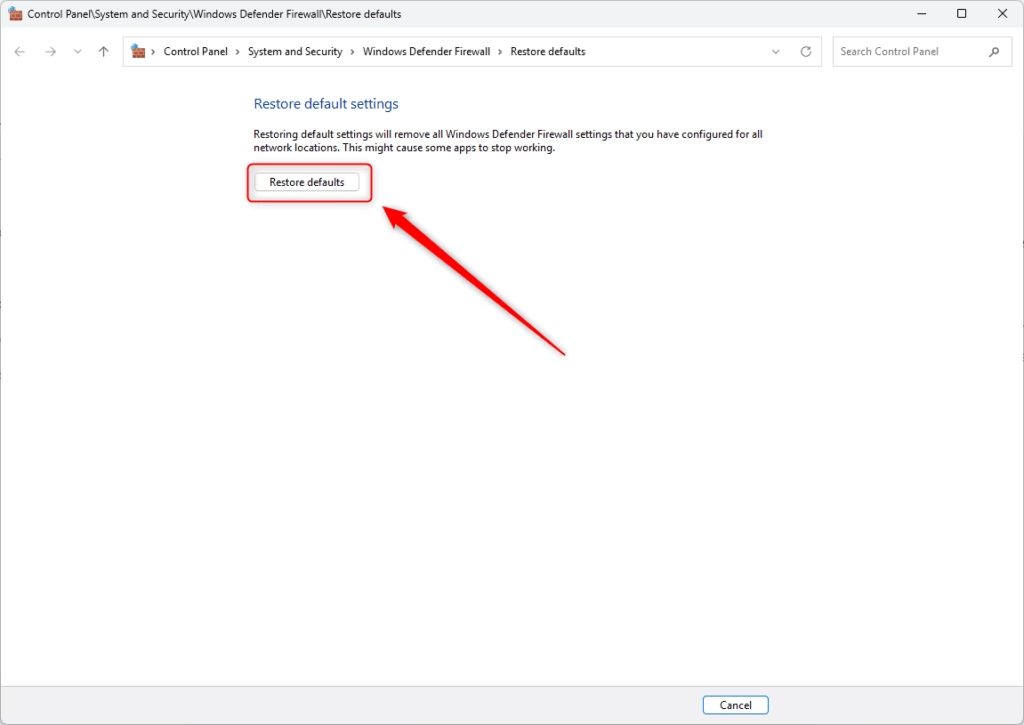
- In the pop-up window, click Restore defaults to restore the firewall settings. The window warns that all firewall settings will be returned to their defaults.
- Click Yes when asked if you want to reset the firewall to default. The firewall is now back to its default settings. If you need to, check your apps and allow any that ask for network access again.
Method 2Using Windows Defender Firewall with Advanced Security
Windows Defender Firewall with Advanced Security gives you deeper control over your network rules. Use this console when you want to restore the default policy and also look at the inbound and outbound rules for your programs and connections. It is available in Windows 11 Home as well as Pro.
- Open Windows Defender Firewall with Advanced Security (type
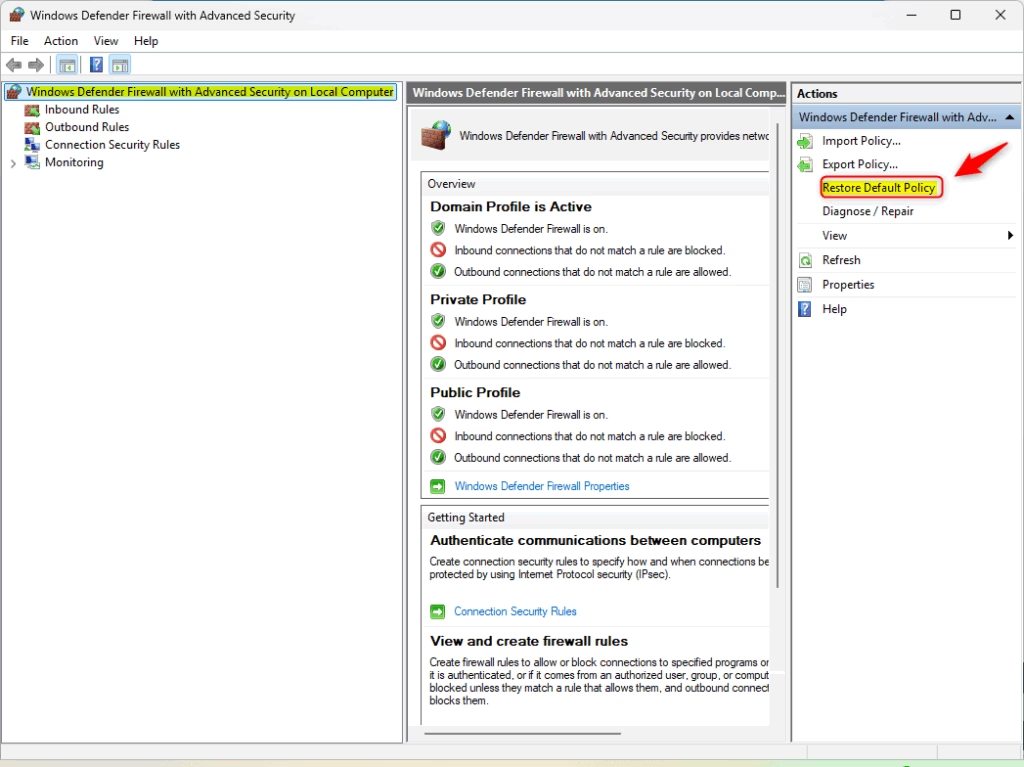
wf.mscin the search box). The console opens with a tree on the left and an Actions pane on the right. - On the left side, select Windows Defender Firewall with Advanced Security on Local Computer.
- Optional: if you want a backup, click Export Policy under Actions and save the file. To undo the reset later, use Import Policy in the same list and select that file.
- On the right side under Actions, click Restore Default Policy to restore the firewall to its defaults. Windows asks you to confirm. Click Yes to continue.
Method 3Using Command Prompt
Run a quick command in Command Prompt to reset the firewall. This is useful on remote sessions or when the Windows Security app won't open.
- ⚠️ Admin Required: Open Command Prompt as administrator. Search for it in the Start menu, right-click the result and choose Run as administrator. If you use Terminal, select the Command Prompt tab.
- Type and run this command:
netsh advfirewall resetThis command resets the firewall to its default settings. If the command reports success, the reset is done. If you get an "access denied" message, the window isn't running as administrator. Close it and reopen it with elevated rights.
Method 4Using PowerShell
Run the reset command using PowerShell instead. It has the same effect as the other methods, so pick the one you prefer.
- ⚠️ Admin Required: Open PowerShell as administrator. Search for it in the Start menu, right-click the result and choose Run as administrator. If you use Terminal, select the PowerShell tab.
- Type and run this command:
(New-Object -ComObject HNetCfg.FwPolicy2).RestoreLocalFirewallDefaults()That's it! Your firewall is now reset to default. Open Firewall & network protection in Windows Security to confirm that the firewall is on for each network profile.
Summary
You can reset the firewall with the Windows Security app, the Advanced Security console, Command Prompt or PowerShell. All four restore your original security rules and fix blocked apps, so pick the one that matches how comfortable you are with Windows settings.
- Windows Security App: The easiest method. Just click a few buttons.
- Advanced Security: Offers more detailed options for advanced users, including exporting your rules first.
- Command Prompt: A quick method using a simple command (requires admin rights).
- PowerShell: Another command-line option (requires admin rights).
Why This Matters: Resetting your firewall helps protect your computer from unauthorized access and threats. If unwanted changes were made to your firewall, these methods let you quickly fix the problem and get your security back on track.
Choose whichever method you feel most comfortable with. All four work equally well and will get your firewall back to normal. After the reset, test the app or connection that was giving you trouble. If it still fails, the cause is probably not the firewall.
Was this guide helpful?

About the Author
Richard
Tech Writer, IT Professional
Richard is a writer at Geek Rewind who turns complex IT tasks into clear, step-by-step guides. He draws on years of hands-on experience in system administration and enterprise IT operations, focusing on Windows, Linux and WordPress: the problems people actually run into, and the fixes that work. His server and WordPress guides come from systems he runs himself. Richard builds and maintains the platform behind Geek Rewind, from its Ubuntu servers and Nginx configuration to its custom WordPress plugins. Many new tutorials start with readers' questions, and he's always glad to answer them in the comments.
No comments yet — be the first to share your thoughts!