How to Enable Microsoft Defender Periodic Scanning in Windows 11
This guide explains how to manage periodic scanning with Microsoft Defender in Windows 11.
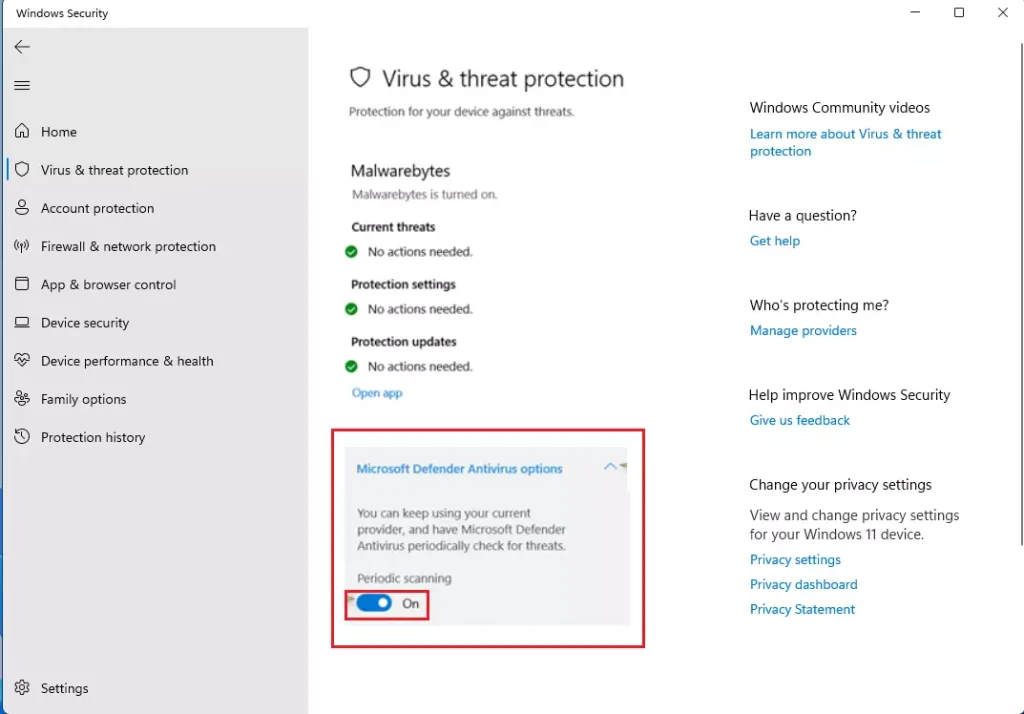
Navigate to Windows Security, then Virus & threat protection. Under Microsoft Defender Antivirus options, toggle the Periodic scanning switch to On. This enables background scans as a secondary security layer.
What is Microsoft Defender Periodic Scanning?
Microsoft Defender periodic scanning is an extra security check that runs automatically in the background on your Windows 11 PC. It acts like a backup safety net, finding threats your main antivirus might miss. When it’s on, your computer does light, automated scans without slowing things down, helping to keep your system safe.
Periodic scanning acts as a safety net within Microsoft Defender. This feature finds threats that your main antivirus might miss, offering an extra layer of protection.
What happens when done? Your computer runs light, automated scans in the background. This keeps your system safe without slowing you down.
Prerequisites
Before you begin, ensure you have the following:
- Administrator access to your computer.
- Windows 11 installed and updated.
- A third-party antivirus program installed (if you want to use this as a secondary scanner).
How to Enable or Disable Periodic Scanning
You can easily turn Microsoft Defender periodic scanning on or off using the Windows Security app. First, open the app by typing ‘Windows Security’ into the search bar on your taskbar and selecting it. Then, click on ‘Virus & threat protection’, find ‘Microsoft Defender Antivirus options’, and toggle the ‘Periodic scanning’ switch to your preferred setting.
- In the search box on your taskbar, type Windows Security and select Windows Security from the list.

open windows security app - Click on the Virus & threat protection tile.

open windows virus and protection - On the next page, look for Microsoft Defender Antivirus options and click it to see more settings.
- Toggle the Periodic scanning switch to On or Off.
turn on or off periodic scanning microsoft defender windows 11
Advanced Configuration Methods
Using the Windows Registry Editor
Microsoft Defender periodic scanning uses the Windows Registry Editor. Press the Windows key and 'R' together, type 'regedit', and press Enter. Go to HKEY_LOCAL_MACHINE\SOFTWARE\Microsoft\Windows Defender. Right-click in the right pane, select New > DWORD (32-bit) Value, name it PassiveMode, and set its value to 1. This action enables Microsoft Defender periodic scanning.
- Press Win + R, type regedit, and press Enter.
- Navigate to: HKEY_LOCAL_MACHINE\SOFTWARE\Microsoft\Windows Defender
- Right-click in the right pane, select New > DWORD (32-bit) Value.
- Name it PassiveMode and set the value to 1 to enable it.
Using PowerShell
Set-MpPreference -DisablePeriodicScanning 0
Troubleshooting: Why is the option missing?
Summary
Microsoft Defender periodic scanning adds an extra layer of security to your Windows 11 computer, helping to catch threats your main antivirus might miss.
Does Periodic Scanning affect my third-party antivirus performance?
No, it should not. Microsoft Defender is designed to be lightweight. It only runs scans during idle times when your computer is not busy. This ensures that your primary antivirus software continues to work at full speed without any interference or performance drops during your daily tasks.
Can I enable Periodic Scanning via Group Policy for multiple machines?
Yes, administrators can manage this across a network. You can use the Group Policy Object (GPO) editor to set the policy located under Computer Configuration Administrative Templates Windows Components Microsoft Defender Antivirus This is ideal for managing security settings across many computers in an office environment.
Was this guide helpful?

About the Author
Richard
Tech Writer, IT Professional
Richard, a writer for Geek Rewind, is a tech enthusiast who loves breaking down complex IT topics into simple, easy-to-understand ideas. With years of hands-on experience in system administration and enterprise IT operations, he’s developed a knack for offering practical tips and solutions. Richard aims to make technology more accessible and actionable. He's deeply committed to the Geek Rewind community, always ready to answer questions and engage in discussions.


I am currently user of Windows 11. Recently, when a Virus scanner linked to Windows 11 Microsoft Defender Antivirus asked me to renew it’s license, I preferred not to do so. So, I decided to uninstalled the virus scanner linked to Windows 11.
Now, my problem is, I could not open the Virus & threat protection settings whenever I want to use the Real-time protection for Quick scan, Full scan, and Customize scan.
What should I do? Please help me.
Thank you.
not there