Enable or Disable Firewall Notifications in Windows 11

Firewall notifications in Windows 11 are pop-up alerts from the Windows Security app. They tell you when the firewall blocks an app or when a network threat shows up. Windows turns them on by default so you stay informed about your PC’s safety. If the pop-ups get annoying, you can turn them off. The steps below also show how to turn them back on.
Changing this setting does not switch the firewall itself off. It only controls whether Windows shows you the alerts. No restart is needed, and the change takes effect right away.
To control firewall notifications in Windows 11, open the Windows Security app, click the Settings gear icon in the left pane, then click Manage notifications. Under Firewall & network protection notifications, toggle notifications on or off, or check the boxes for Domain firewall, Private firewall, and Public firewall to choose which network types send alerts. Changes take effect immediately without a restart.
How to Turn On or Off Firewall & Network Protection Notifications in 🪟 Windows 11
Everything happens inside the built-in Windows Security app. The path is Windows Security Settings Manage notifications. The steps are the same on Windows 11 Home and Pro.
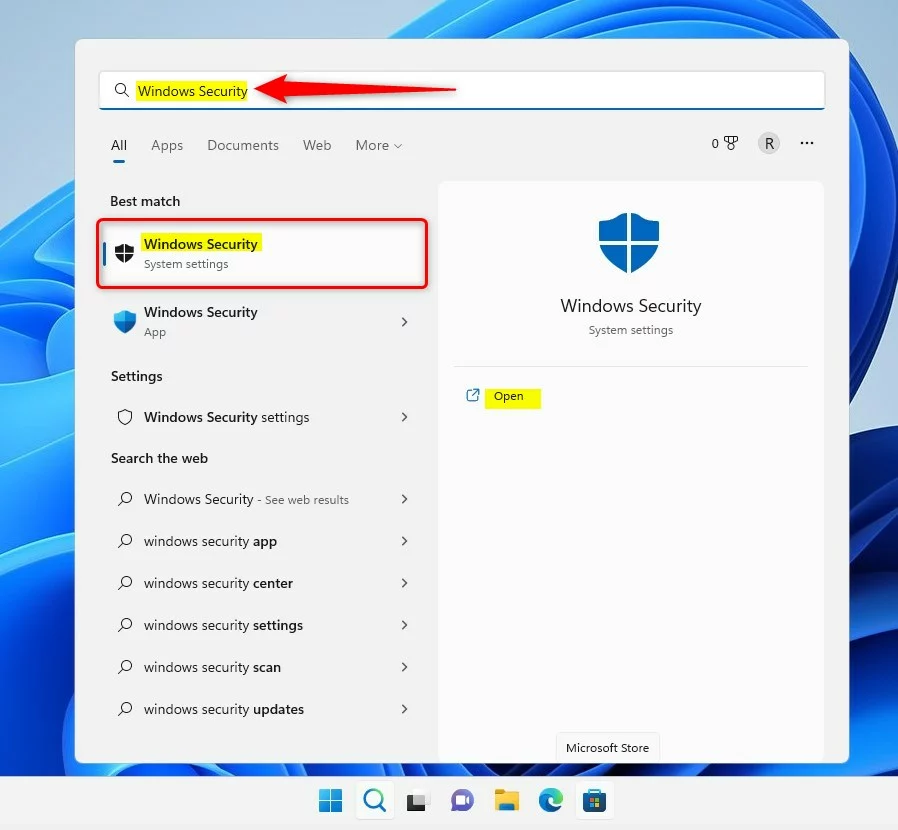
- Open the Start menu: Click the Start button (the Windows icon) on the taskbar. You should see the Start menu with a search box.
- Search for Windows Security: Type
Windows Securityinto the search box and click the Windows Security app in the results. The Windows Security window opens, showing your protection areas such as Virus & threat protection and Firewall & network protection.
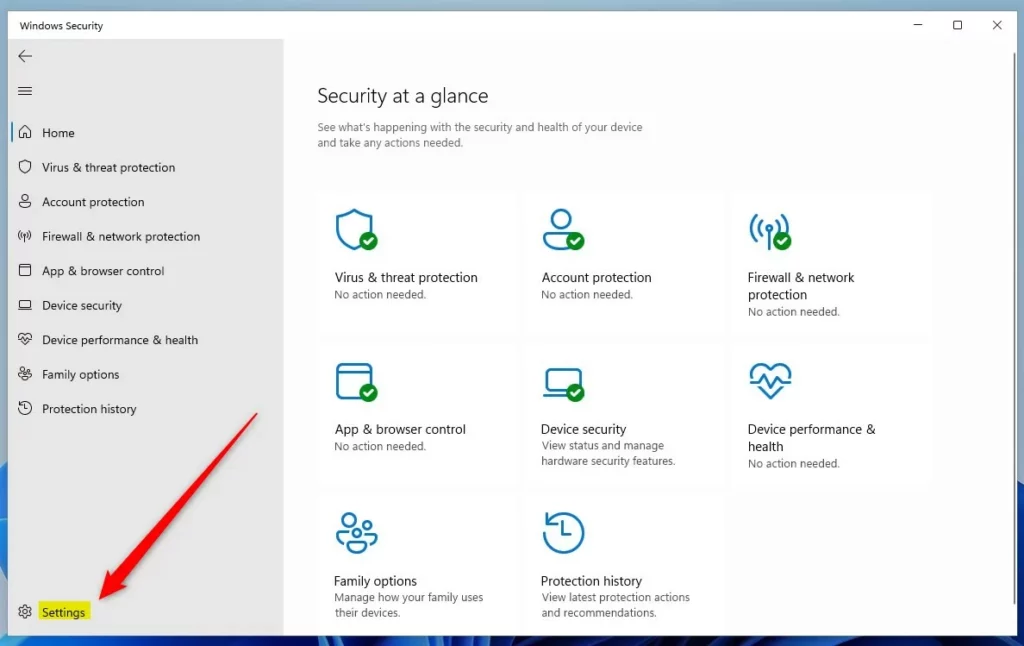
- Open app settings: In the Windows Security window, click the Settings button (the gear icon) in the left pane. The Settings page opens.
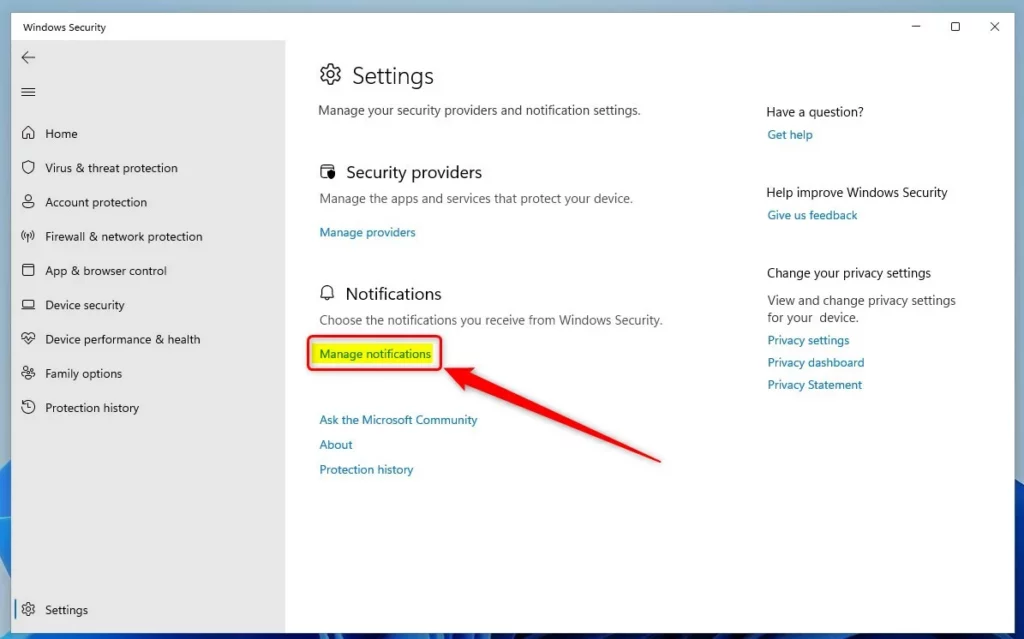
- Manage notifications: On the Settings page, find the Notifications section and click the Manage notifications link. The notification options for each protection area now appear.
- Turn notifications on or off: Under Firewall & network protection notifications, use the toggle switch to set notifications to Off or On. The toggle changes straight away. There is no Save or Apply button.
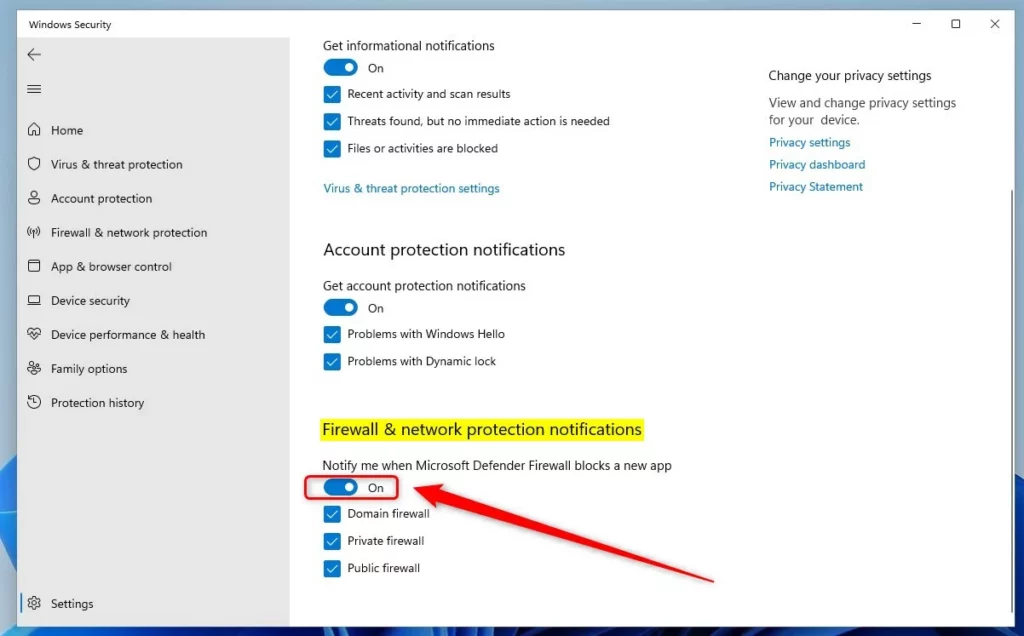
If you don’t want to silence everything, you can be more selective. Check or clear the options for Domain firewall, Private firewall and Public firewall. These are network profiles, and each one applies firewall rules based on the type of network you are connected to. For example, you might keep alerts for the Public profile, which covers networks like café Wi-Fi, and turn them off for your Private home network.
Firewall notifications in Windows 11 are now set the way you want them.
More Info
Official documentation covering notification management within Windows Security resides on the Microsoft.com – Hide Windows Security notifications resource page.
Summary
- You can turn firewall and network protection notifications on or off using the Windows Security app.
- These notifications help keep you informed about your computer’s security.
- Open Windows Security, go to Settings, then click Manage notifications.
- Choose which firewall notifications you want to see, or turn them off if you don’t want any messages.
- Windows will still alert you for urgent security issues no matter your notification settings.
Controlling firewall notifications in Windows 11 lets you stop unwanted pop-ups or make sure you never miss a security warning. You can change these alerts in the Windows Security app whenever you want, and no restart is needed.
Frequently asked questions
How to enable mobile hotspot in 🪟 Windows 11?
To enable a mobile hotspot in Windows 11, open Settings, go to Network & internet, and select Mobile hotspot. Turn on the toggle at the top. Then set a network name and password under Edit, and other devices can join with those details. Your PC must already be connected to the internet.
How to disable automatic updates in 🪟 Windows 11?
To pause automatic updates in Windows 11, open Settings, select Windows Update, and click Pause updates. Choose a date from the menu, up to five weeks away. Windows will skip updates until then. Turning off updates completely is not recommended, because your PC then misses security fixes.
How to manage notifications in 🪟 Windows 11?
To manage notifications in Windows 11, open Settings and select System, then Notifications. Here you can turn all notifications on or off. Scroll down to change alerts for each app, including whether it can show banners or play sounds. Changes take effect right away.
How to turn off notifications 🪟 Windows 11?
To turn off notifications in Windows 11, open Settings, select System, then Notifications. Switch off the Notifications toggle at the top to silence all alerts. To mute only certain apps, scroll down the same page and turn off those apps one at a time. No restart is needed.
Still have a question?
Answered by AI from this guide. Good questions may be added to this page — please don't include personal details.
Did this guide fix your problem?

About the Author
Richard
Tech Writer, IT Professional
Richard is a writer at Geek Rewind who turns complex IT tasks into clear, step-by-step guides. He draws on years of hands-on experience in system administration and enterprise IT operations, focusing on Windows, Linux and WordPress: the problems people actually run into, and the fixes that work. His server and WordPress guides come from systems he runs himself. Richard builds and maintains the platform behind Geek Rewind, from its Ubuntu servers and Nginx configuration to its custom WordPress plugins. Many new tutorials start with readers' questions, and he's always glad to answer them in the comments.
No comments yet — be the first to share your thoughts!