How to Enable or Disable Windows Security Notifications in Windows 11
You enable or disable Windows Security notifications in Windows 11 directly within the Windows Security application.
Windows Security notifications are those pop-ups that inform you about critical system health and potential threats, such as virus detections or firewall status changes.
You can customize these alerts to suit your needs, choosing precisely which security information you want to be notified about. For example, you might disable notifications for virus and threat protection if you prefer a less intrusive experience, provided you are actively monitoring your system.
You can manage Windows Security notifications in Windows 11 via Settings > System > Notifications, or by using the Local Group Policy Editor or Registry Editor for more advanced control. Adjusting these settings helps you receive only the security alerts that are important to you.
Why manage these notifications?
Managing Windows 11 security notifications helps reduce unwanted pop-ups, especially if you use a different antivirus program. Turning off these alerts means Windows won’t bother you with them, but you’ll need to remember to check your security status yourself.
Disclaimer: Disabling Windows 11 security notifications can hide critical alerts about your computer’s health, such as virus threats or firewall issues. Only disable these if you are an advanced user or have alternative security software installed. For official guidance, refer to Microsoft Support.
Method 1Standard Settings (Non-Technical Users)
The easiest way to manage Windows 11 security notifications is through the regular Settings app, which is safe and simple for anyone. You can stop alerts from appearing in the Notification Center by going to System > Notifications, then finding Windows Security in the list and toggling the switch to Off.
- Open Settings and go to System > Notifications.
- Scroll down to find Windows Security in the list of apps.
- Toggle the switch to Off to stop notifications from appearing in the Notification Center.
Method 2Local Group Policy Editor (IT Admin Context)
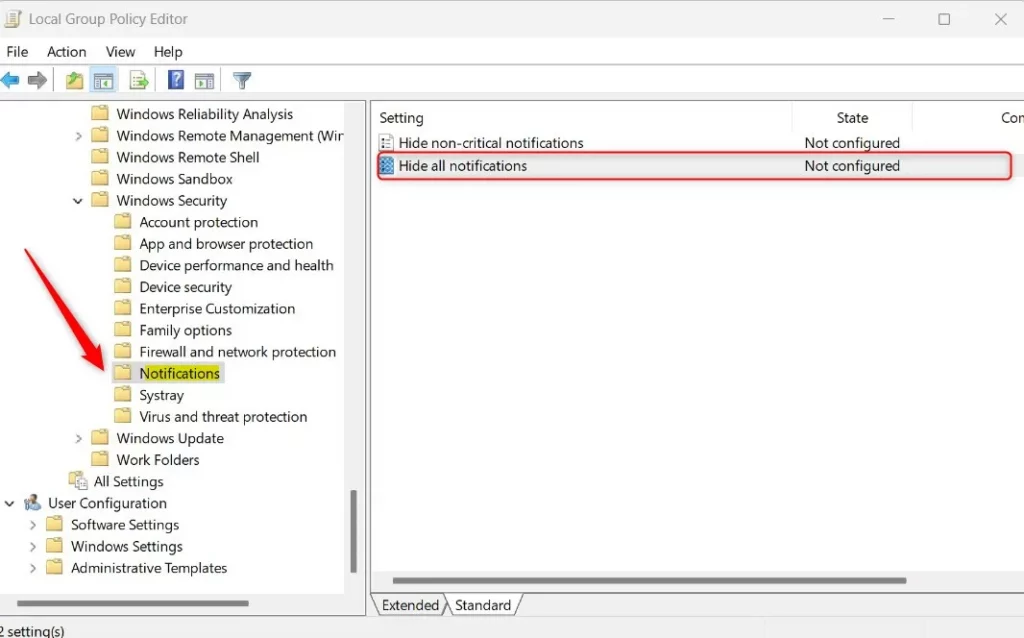
IT pros can turn off Windows 11 security notifications across many computers using the Local Group Policy Editor. This tool lets you control system settings for multiple devices at once, including whether security alerts show up. Open it by pressing `Windows Key + R`, typing `gpedit.msc`, and pressing Enter.
To open the Local Group Policy Editor, press `Windows Key + R` to open the Run dialog, then type `gpedit.msc` and press Enter. Navigate to: Computer Configuration\Administrative Templates\Windows Components\Windows Security\Notifications.
Method 3Registry Editor
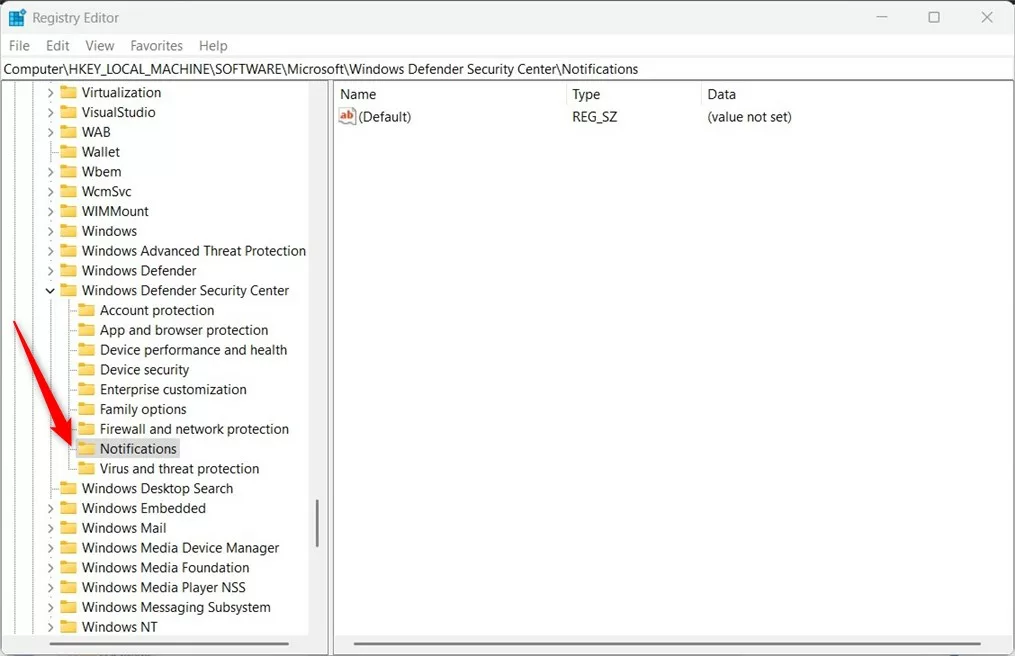
Advanced users can disable Windows 11 security notifications by carefully editing the Registry Editor. This method involves making specific changes to system files to control alert behavior. Open the Registry Editor by typing `regedit` in the Run dialog (press `Windows Key + R`) and navigate to: 🗝️HKEY_LOCAL_MACHINE\SOFTWARE\Policies\Microsoft\Windows Defender Security Center\Notifications.
Open the Registry Editor by typing `regedit` in the Run dialog (press `Windows Key + R`) and navigate to: HKEY_LOCAL_MACHINE\SOFTWARE\Policies\Microsoft\Windows Defender Security Center\Notifications.
In the right pane, right-click, choose New > DWORD (32-bit) Value, and name it: DisableNotifications. Set its value to 1 to hide alerts.
Troubleshooting and Common Issues
If notifications still aren’t disabling, double-check that you’re logged in with an administrator account. Check if a Group Policy is overriding your registry settings. If you see Windows Defender SmartScreen alerts, these are separate from general security notifications and should generally remain enabled to protect against malicious websites.
Summary
Managing Windows 11 security notifications helps keep your PC clutter-free. You can use the Settings app for simple changes or the Group Policy/Registry Editor for system-wide control. Always remember that these alerts are designed to keep your device safe, so proceed with caution.
Is it safe to disable all Windows Security notifications?
It is generally not recommended. Disabling these notifications means you will not be alerted if your firewall is turned off or if a virus is detected. Only disable them if you have a reliable third-party security suite that provides its own status alerts and protection.
How do I re-enable Windows Security notifications?
To re-enable them, return to the Local Group Policy Editor or Registry Editor. In Group Policy, set the status to ‘Not Configured’. In the Registry, change the ‘DisableNotifications’ value back to ‘0’ or delete the entry entirely. Restart your computer to apply the changes.
Was this guide helpful?

About the Author
Richard
Tech Writer, IT Professional
Richard, a writer for Geek Rewind, is a tech enthusiast who loves breaking down complex IT topics into simple, easy-to-understand ideas. With years of hands-on experience in system administration and enterprise IT operations, he’s developed a knack for offering practical tips and solutions. Richard aims to make technology more accessible and actionable. He's deeply committed to the Geek Rewind community, always ready to answer questions and engage in discussions.


No comments yet — be the first to share your thoughts!