How to Unsubscribe from Emails in Outlook: Web, Desktop, and Mobile

Unsubscribing in Outlook stops newsletters and promotional messages from piling up in your inbox. Outlook has built-in tools for this on the web, in the desktop app and on mobile, and each one usually takes only a few clicks or taps. The steps below cover all three, plus what to do when a message has no unsubscribe option.
In Outlook, go to Settings, then Mail, and select Subscriptions to find and unsubscribe from unwanted senders. On mobile, look for unsubscribe links at the top of marketing emails or use the Block option. For suspicious emails, always use the Block Sender feature instead of clicking unsubscribe links.
Why should you do this?
Over time, an inbox collects newsletters nobody reads anymore. Clearing out these subscriptions makes the messages that matter easier to spot, and it makes the inbox quicker to scan and keep tidy.
What happens when you are done?
Canceling a subscription stops that sender’s mailings at the source, so you don’t have to delete the same messages every week. Do this once for each sender and you save a few minutes of sorting every day. Unsubscribing is a better habit than deleting, because deleted mail just keeps coming.
Security Warning: Phishing Risks
Be careful with messages from senders you don’t recognize. Phishing scams are fraudulent emails that pretend to come from a trusted company in order to steal your data. A fake “unsubscribe” link is a common trick. Clicking it can confirm to the scammer that your address is active, send you to a page that asks for your password, or install harmful software.
Only use unsubscribe links in mail from senders you actually signed up with. For anything else, skip the link and use the Block option described later.
How to Unsubscribe in Outlook for Windows
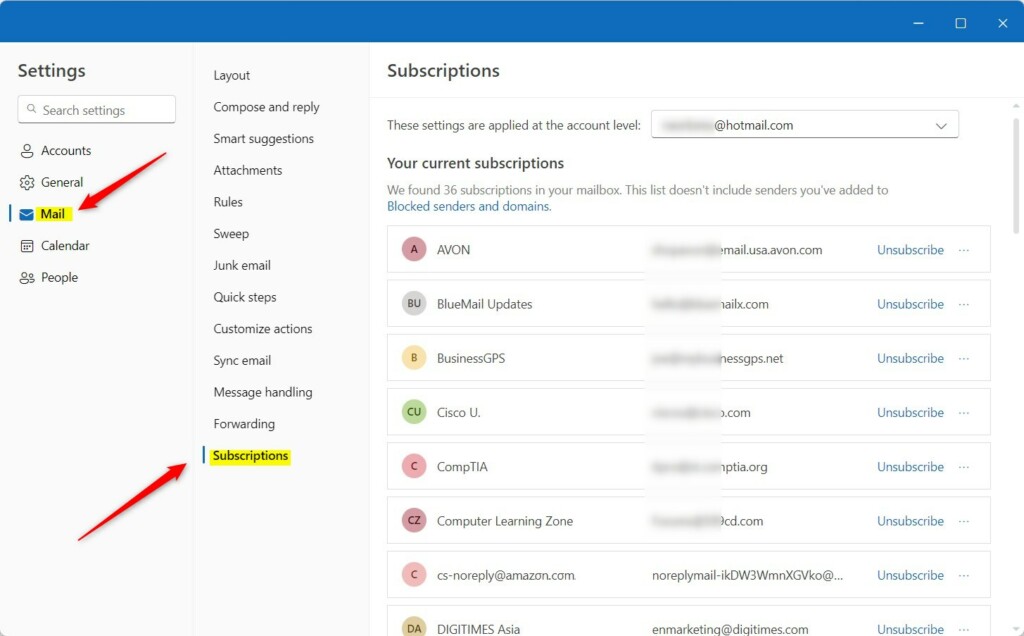
This method uses the Subscriptions page in the Outlook desktop app. The Settings gear and Subscriptions page are part of the new Outlook for Windows. Classic Outlook has a different layout, which is covered at the end of these steps.
- Open the Outlook app on your desktop.
- Click the Settings gear icon in the top right corner. The Settings window opens.
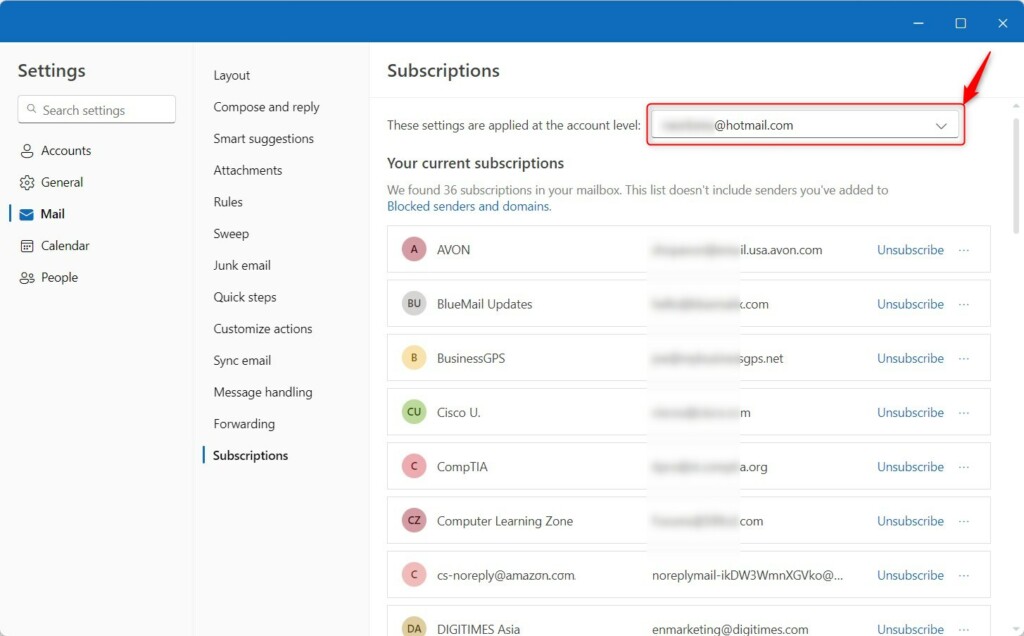
- Go to Settings Mail Subscriptions You should see a list of senders that Outlook has identified as newsletters or promotional mail.
- Find the sender you want to remove.
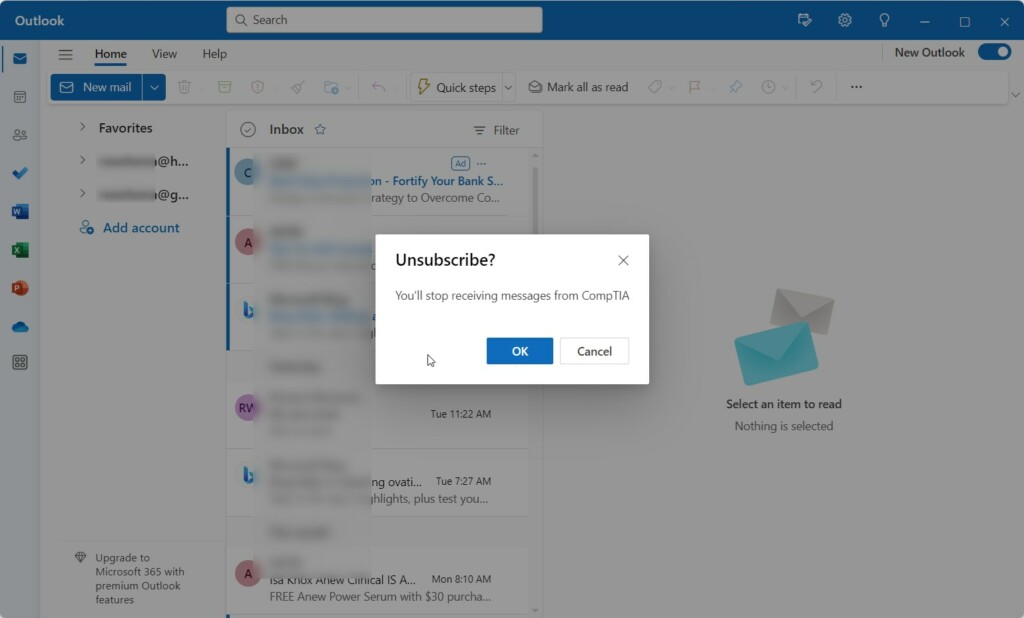
- Click the Unsubscribe button next to that sender. Outlook asks you to confirm, and the sender then leaves the list.
If you don’t see the Subscriptions page, you are probably in classic Outlook. In that version, open a message from the sender and look for an Unsubscribe link in the message header, if one is shown. If there isn’t one, use the Block steps further down. Also, a brand-new account may show an empty list until Outlook has seen enough mail to identify subscriptions.


Managing Subscriptions on Outlook Web
The web version works the same way and needs no installation. It is also the easiest option if you can’t use the desktop app.
- Log in to Outlook.com in your browser.
- Click the Settings gear icon in the top right corner.
- Go to Settings Mail Subscriptions You should see the list of active newsletters that Outlook has detected.
- Review the list and decide which senders you no longer want.
- Click the Unsubscribe button next to each unwanted sender, and confirm if asked.
The unsubscribe request goes to the sender, and some senders take a few days to process it. A message or two may still arrive after you unsubscribe. If mail keeps coming after a week or so, block the sender instead.
Using the Outlook Mobile App
On a phone or tablet, the steps depend on the message. Many marketing emails show a direct unsubscribe link at the very top of the message, so check there first.
- Launch the Outlook app on your mobile device.
- Open the message from the sender you want to stop hearing from.
- Look at the top of the message for an unsubscribe link, and tap it if it’s there. Follow any confirmation prompt.
- If there is no link, tap the three-dot menu in the message and choose Block.
You can also tap the profile icon or menu button to reach the Settings gear for general mail options. The exact wording and layout of the menus can vary a little between iPhone, Android and app versions.
How to Block Senders (Secondary Solution)
Some emails have no unsubscribe link at all. This is common with spam, and in that case blocking the sender is the right move.
- Open the email.
- Click the three dots (More Actions) in the message toolbar.
- Select Block. Outlook may ask you to confirm the sender's address.
Future messages from that address go straight to the Junk folder instead of your inbox. They are not lost, so check Junk now and then. To undo a block, open Settings and look in the blocked senders list in the Junk email settings, then remove the address. Blocking affects one address only, so a sender who uses a different address can still get through.
Summary
In short, use the Subscriptions page for legitimate newsletters you signed up for, and use Block for spam and unknown senders. Never click unverified links in messages you don't trust, even when they claim to offer a way out.
Have a question about this guide?
Answered by AI from this guide. Good questions may be added to this page — please don't include personal details.
Did this guide fix your problem?

About the Author
Richard
Tech Writer, IT Professional
Richard is a writer at Geek Rewind who turns complex IT tasks into clear, step-by-step guides. He draws on years of hands-on experience in system administration and enterprise IT operations, focusing on Windows, Linux and WordPress: the problems people actually run into, and the fixes that work. His server and WordPress guides come from systems he runs himself. Richard builds and maintains the platform behind Geek Rewind, from its Ubuntu servers and Nginx configuration to its custom WordPress plugins. Many new tutorials start with readers' questions, and he's always glad to answer them in the comments.
[…] app has many features, including support for subscription management, email forwarding, setting default From address, backing up your mailbox, changing the reading […]
[…] app has many features, including support for subscription management, email forwarding, setting default From address, backing up your mailbox, changing the reading […]
[…] app has many features, including support for subscription management, email forwarding, setting default From address, backing up your mailbox, changing the reading […]
[…] app has many features, including support for subscription management, email forwarding, setting default From address, backing up your […]
[…] app has many features, including support for subscription management, email forwarding, setting default From address, backing up your mailbox, changing the reading […]
[…] app has many features, including support for subscription management, email forwarding, setting default From address, backing up your mailbox, changing the reading […]
[…] app has many features, including support for subscription management, email forwarding, setting default From address, backing up your […]
[…] app has many features, including support for subscription management, email forwarding, setting default From address, backing up your mailbox, changing the reading […]
[…] app has many features, including support for subscription management, email forwarding, setting default From address, backing up your mailbox, changing the reading […]
[…] app has many features, including support for subscription management, email forwarding, setting default From address, backing up your mailbox, changing the reading […]
[…] app has many features, including support for subscription management, email forwarding, setting default From address, backing up your mailbox, changing the reading […]
[…] app has many features, including support for subscription management, email forwarding, setting default From address, backing up your mailbox, changing the reading […]
[…] app has many features, including support for subscription management, email forwarding, setting default From address, backing up your […]
[…] email accounts, setting out-of-office automatic replies, email sorting, subscription management, email forwarding, setting default From address, backing up your […]
[…] app has many features, including support for subscription management, email forwarding, setting default From address, backing up your mailbox, changing the reading […]
[…] email accounts, setting out-of-office automatic replies, email sorting, subscription management, email forwarding, switching layout ribbons, and […]
[…] signatures, external email accounts, setting out-of-office automatic replies, email sorting, subscription management, email forwarding, Blind Carbon Copy (Bcc), and […]
[…] The app has many features, including support for email signatures, external email accounts, setting out-of-office automatic replies, email sorting, and subscription management. […]
[…] app has many features, including support for subscription management, email forwarding, setting default From address, backing up your […]
[…] like email signatures, external email accounts, out-of-office automatic replies, email sorting, subscription management, and email […]
[…] email signatures, external email accounts, setting out-of-office automatic replies, email sorting, subscription management, email forwarding, setting default From address, backing up your mailbox, changing the reading […]
[…] app includes many helpful features, such as subscription management, email forwarding, setting default From address, backing up your mailbox, changing the reading […]