How to Pin or Unpin Emails in Outlook on Windows 11

Pinning an email in Outlook on Windows 11 moves it to the top of your message list. It works like a sticky note. Urgent tasks, a project update, or a message you still need to answer stay in view above the daily clutter.
A pinned message stays at the top of its folder until you unpin it. New mail keeps arriving below it, so important notes don’t get buried. That helps when you get dozens of messages a day and can’t answer them all right away. Pinning only changes how the list is sorted. It doesn’t change the message itself.
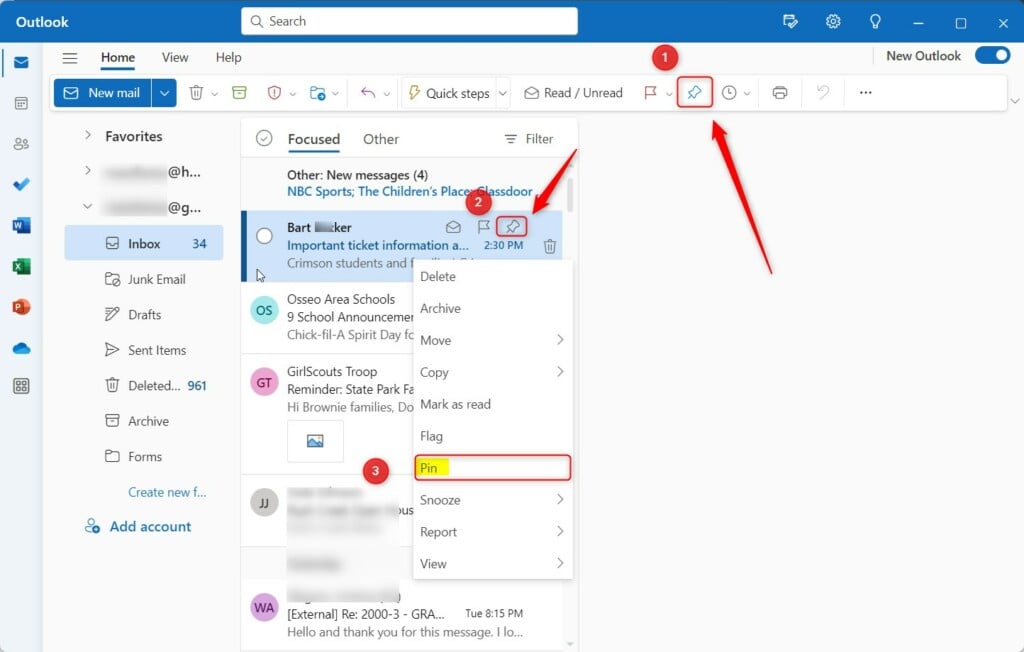
Right-click an email in the New Outlook message list and select Pin, or hover over the message and click the Pin icon on the right. You can also select the email and click Pin on the ribbon. The message moves to the top of the folder and stays there until you choose Unpin.
Platform Version Discrepancies
The feature works in the New Outlook for Windows, Outlook on the Web, and some Microsoft 365 builds. In Outlook Classic the pin command often doesn’t appear at all.
If you can’t find Pin anywhere, check which app you opened before you hunt for a setting that isn’t there. Outlook Classic usually shows a New Outlook toggle at the top right of the window. Turn it on to switch to the New Outlook. From the New Outlook you can switch back with the same toggle. If you don’t see the toggle, your organization may have turned it off, so ask whoever manages your Microsoft 365 account.
Moving to a supported version is the only fix for a missing command. Outlook on the Web in your browser is a quick way to test, because it signs into the same mailbox and shows you whether pinning works for your account.
Disclaimer: Availability depends on your app version. The feature works in the New Outlook for Windows, Outlook on the Web (OWA), and certain Microsoft 365 releases. It typically doesn’t appear in Outlook Classic, because older and newer versions handle mail server sync differently. The steps below assume the New Outlook. Menu names in OWA are very similar, so you can follow along there too.

How to pin an email
To pin an email in Outlook on Windows 11, use one of three methods: the top ribbon, the quick action icon that appears when you hover, or the right-click menu. All three do the same thing and stick the message to the top of your message list. Pick whichever fits how you work. Steps 4 and 5 below are alternatives to step 3, so you only need one of them.
- Open the New Outlook for Windows. Go to the folder that holds the email, such as your inbox. Your messages appear in the message list.
- Select the email you want to pin. Click it once in the message list. The message opens in the reading pane.
- Click the Pin button on the ribbon. The message should jump to the top of the list and show a pin icon.
- Hover over the email to use the quick action instead. Click the Pin icon that appears in the quick action pop-up on the right side of the message. This is the fastest method when you’re scanning a long inbox.
- Right-click the email to use the menu instead. Select the Pin command from the menu. Use this if the ribbon is collapsed or the hover icons don’t show.
- Check that the message sits at the top of the list. It should carry a pin icon. If you don’t see Pin in any of the three places, you are probably in a version that doesn’t support it.
To unpin an email, follow these steps:
- Find the pinned message at the top of the list. Select it, or right-click it, or hover over it.
- Click Unpin. On a pinned message the same command you used before changes to Unpin, in the ribbon, the hover pop-up and the right-click menu . The message returns to its normal place by date.
Pinning doesn’t delete or move the email to another folder, and no restart is needed in either direction.
Automating your pins
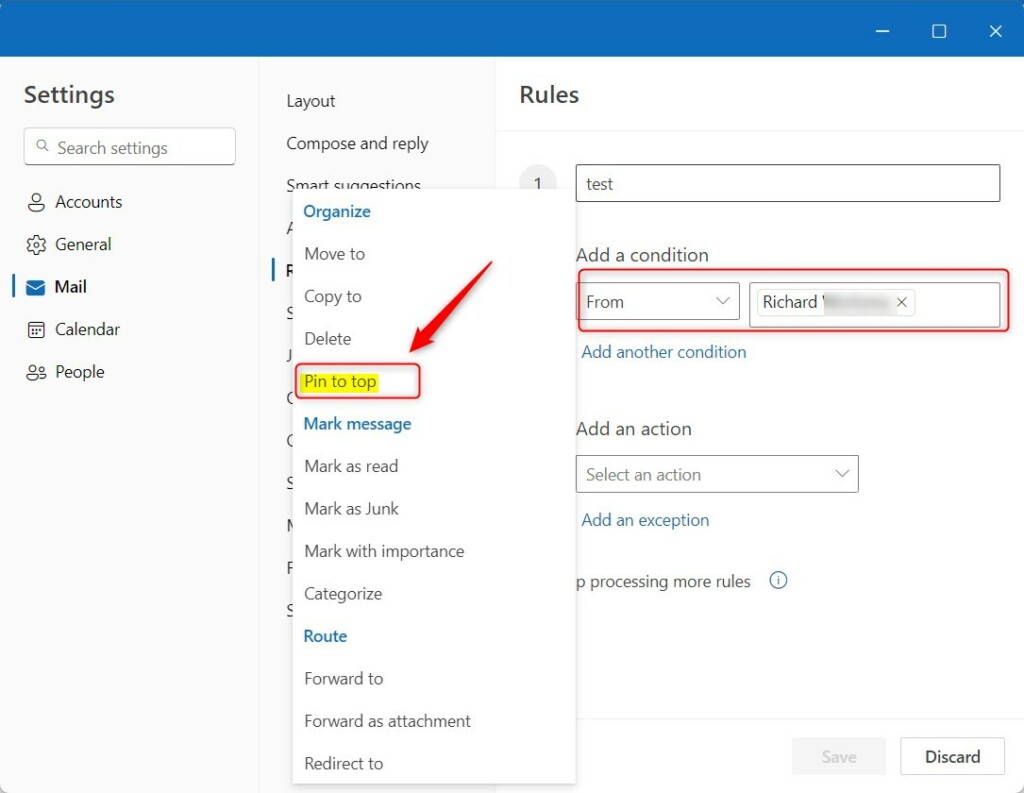
If you want certain senders or subjects pinned automatically, set up an inbox rule in the app settings. The rule applies a pin to incoming messages from the address you choose, so vital correspondence stays at the top without any clicking from you.
Rules run on new mail as it arrives. They won’t pin messages already in your inbox, so pin those by hand using the methods above. Here is how to set up the rule:
- Click the Settings button, the gear icon at the top right of the app. A settings window opens.
- Go to Mail, then select Rules. You should see any rules you already have, or an empty list.
- Create a new rule based on an email address. Enter the sender whose messages you want pinned. Check the spelling, because the rule only matches that exact address.
- Choose Pin to top as the action. If you don’t see this action, your version of Outlook may not support it in rules. Check the version notes earlier in this article.
- Save your changes. The rule now appears in the list, and the next message from that sender should arrive pinned.
To stop the automatic pinning, return to the same Rules page and turn off or delete the rule. Messages already pinned stay pinned until you unpin them one by one.
Flagging vs. Pinning
Flagging and pinning do different jobs, so don’t treat them as the same thing. Flagging puts a visual marker on a message and adds it to your To-Do list for task tracking. Pinning anchors the email to the top of the folder view so you see it immediately.
As a rule of thumb, flag a message when it’s a task with a due date, and pin it when you simply need it in front of you. You can use both on the same email. Removing one doesn’t remove the other.
Troubleshooting and Syncing
If a pin shows on one device but not another, the cause is usually an account mismatch. Check that every device signs into Outlook with the same Microsoft 365 credentials, so the pin state can sync. A second, personal account on one device is a common culprit.
Also confirm that each device is running a version that supports pinning. A client that doesn’t support it, such as Outlook Classic, won’t show the pin even when the account is correct. If one device still looks wrong, open Outlook on the Web and see whether the message is pinned there. That tells you whether the problem is the pin or the app.
Keyboard Shortcuts
| Action | Shortcut |
|---|---|
| Pin/Unpin | Ctrl + Shift + P |
See Also
Summary
Pinning keeps your most important messages at the top of the inbox, so you can find them quickly and spend your attention on what matters. Pin what you need today, unpin it when you're done, and use a rule for senders you always want to see. If the command is missing, check your Outlook version first.
Have a question about this guide?
Answered by AI from this guide. Good questions may be added to this page — please don't include personal details.
Did this guide fix your problem?

About the Author
Richard
Tech Writer, IT Professional
Richard is a writer at Geek Rewind who turns complex IT tasks into clear, step-by-step guides. He draws on years of hands-on experience in system administration and enterprise IT operations, focusing on Windows, Linux and WordPress: the problems people actually run into, and the fixes that work. His server and WordPress guides come from systems he runs himself. Richard builds and maintains the platform behind Geek Rewind, from its Ubuntu servers and Nginx configuration to its custom WordPress plugins. Many new tutorials start with readers' questions, and he's always glad to answer them in the comments.
No comments yet — be the first to share your thoughts!