How to Keep Declined Meetings in Outlook


A declined meeting in Outlook is an invite you have said no to. Normally it drops off your calendar. With the right setting, it stays visible instead. Keeping these entries lets you look back at the invite details, notes and attached files later, and it helps you see what else is happening at that time so you don’t double-book.
These steps are for the new Outlook app on Windows 11. The classic Outlook desktop app has a different settings layout, so you won’t find the same menus there.
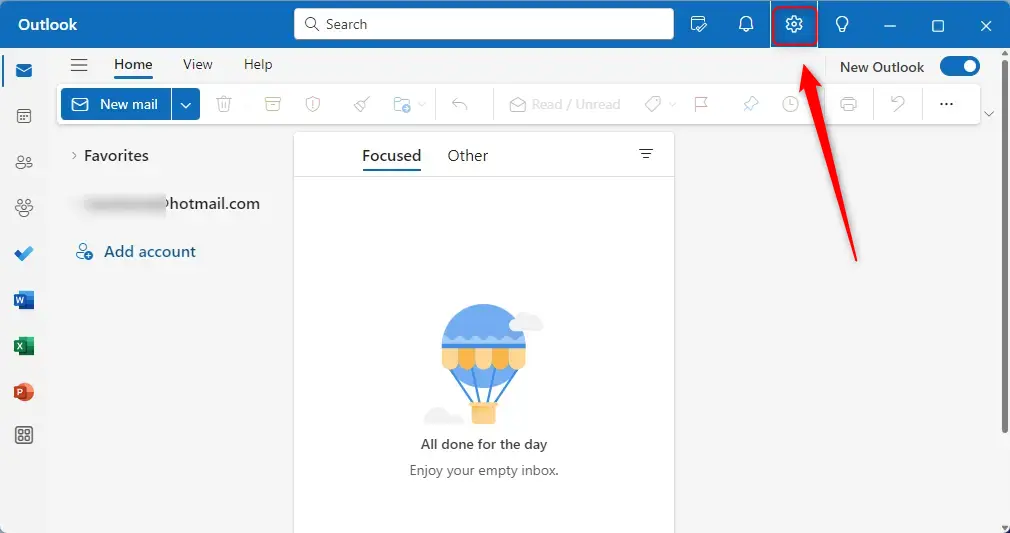
Open Outlook and click the gear icon in the top-right corner. Select Calendar, then Event and Invitations, find “Save declined events,” and check the box next to “Show declined events on your calendar.” Click Save. Declined meetings now stay visible on your calendar.
Keep declined event or meeting request on your Outlook calendar
The setting is in your calendar options. Once it’s on, rejected invites no longer vanish from your schedule. You can still see who sent the invite and what the meeting was about, even though you aren’t attending.
Here’s how to configure it.
- Open Outlook from the Start menu. Wait for your mailbox to load.
- Click the gear icon in the top-right corner. The Settings pane opens.
- Select Calendar in the left-hand navigation, then click Event and Invitations. The options for how invites are handled appear on the right. On some builds the entry may be worded slightly differently, such as “Events and invitations”.
- Find the “Save declined events” section. Check the box next to “Show declined events on your calendar – you will show as being free”. Your declined meetings will now stay on the calendar, and you will show as free during those times, so they won’t block anyone from booking you.
Also check that your account isn’t managed by an organization. Work or school accounts can have settings restricted by an administrator.
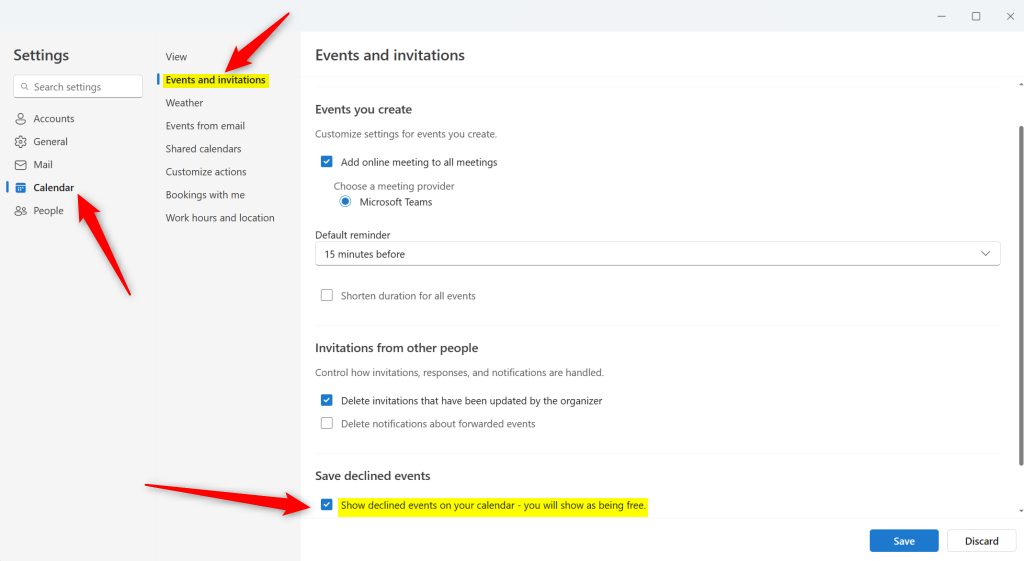
- Click the Save button to apply the change. The settings pane keeps the new choice, and you can close it.
Your calendar will now show future declined meetings without cluttering your active schedule. You don’t need to restart Outlook, and the setting works the same on Windows 11 Home and Pro.
Declined meetings will go back to disappearing from your calendar.
Reference:
Keeping rejected meetings visible gives you a complete history of past invitations while your active schedule stays easy to read.
- This article showed how to enable or disable keeping declined events on your calendar in Outlook on Windows 11.
- The new Outlook app offers a modern interface and features that streamline email and calendar management.
- By keeping declined events or meeting requests on the calendar, you can still reach related information, documents and chats.
- For further questions or suggestions, use the comments section below the article.
- For additional information on Outlook's features, visit the Microsoft.com reference link provided.
Have a question about this guide?
Answered by AI from this guide. Good questions may be added to this page — please don't include personal details.
Did this guide fix your problem?

About the Author
Richard
Tech Writer, IT Professional
Richard is a writer at Geek Rewind who turns complex IT tasks into clear, step-by-step guides. He draws on years of hands-on experience in system administration and enterprise IT operations, focusing on Windows, Linux and WordPress: the problems people actually run into, and the fixes that work. His server and WordPress guides come from systems he runs himself. Richard builds and maintains the platform behind Geek Rewind, from its Ubuntu servers and Nginx configuration to its custom WordPress plugins. Many new tutorials start with readers' questions, and he's always glad to answer them in the comments.
No comments yet — be the first to share your thoughts!