How to Enable Automatic Translation in Outlook on Windows 11
Automatic translation in Outlook on Windows 11 helps you read emails sent in different languages.
Outlook's automatic translation feature changes incoming email messages into your preferred language directly within the app. This functionality helps you understand emails written in different languages, making communication easier by removing the need for external translation tools.
The new Outlook for Windows, a program supporting accounts like Microsoft 365, Outlook.com, and Gmail, includes a handy translation tool that automatically translates incoming messages.
You can choose to always translate, ask before translating, or never translate incoming messages.
Understanding emails in their original language is important for clear communication, especially for work.
Outlook automatically translates foreign language emails within the reading pane. Go to File > Options > Mail > Message options. Under “Translate messages,” check “Show the translate message options.
Turn on or off automatic translation of other languages in Outlook
You can set Outlook on Windows 11 to automatically translate emails into your language, making it easy to read messages from anyone. If you prefer to see emails in their original language, you can easily turn this automatic translation feature off in the app’s settings. This helps you communicate better with people no matter what language they speak.
You can turn off automatic translation in Outlook if you do not want Outlook to translate foreign languages. This setting prevents Outlook from translating emails written in languages other than your primary language.
Here’s how to do that.
First, open the new Outlook app on Windows 11.

When the app opens, click the Settings button (gear on the top right) to proceed.

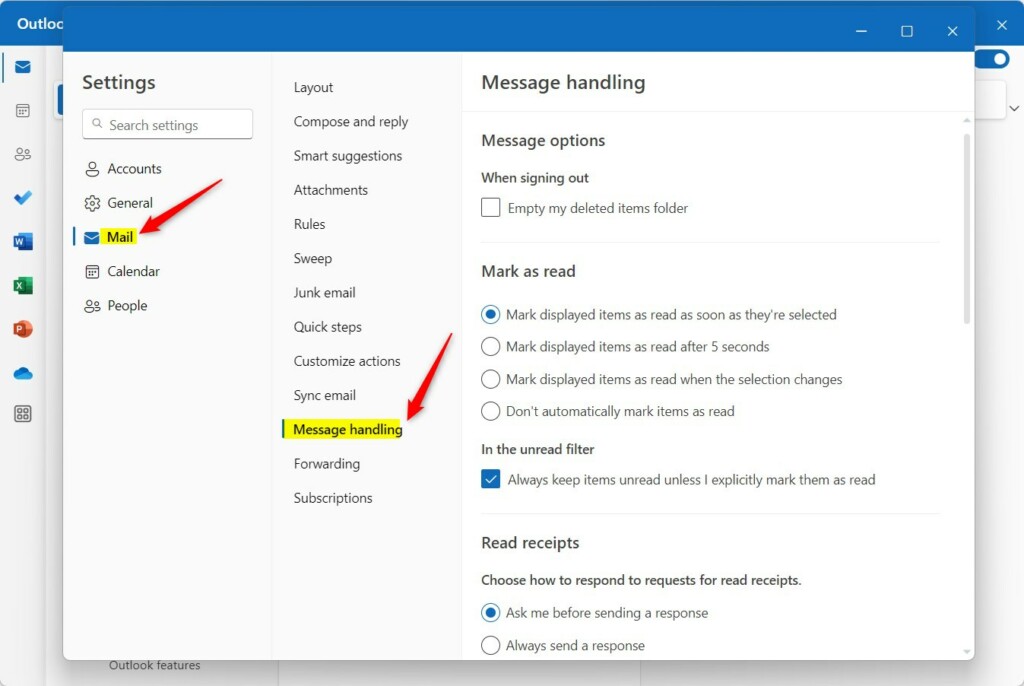
On the Settings page, click the Mail tab on the left sidebar and select Message handling on the right.
On the Message handling setting page, scroll down to the Translate section. Choose one of the options available:
- Always translate – Always translate messages received in other languages.
- Ask me before translating – Shows a message to confirm whether to translate messages received in other languages.
- Never translate – Never translate messages received in other languages.
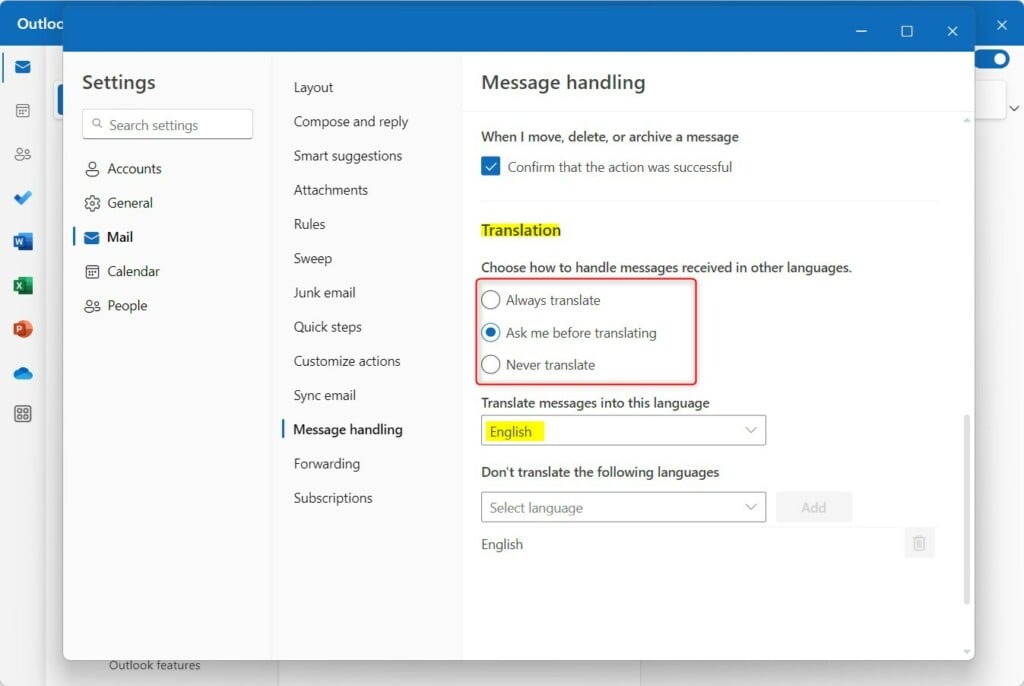
Once you select whether to translate foreign languages or not, choose the language you want to translate into. By default, it’s the default language set in Windows.
That should do it!
Conclusion:
- The new Outlook for Windows brings modern design and supports various email accounts, including Exchange-backed Microsoft 365 work or school, Outlook.com, Hotmail, and Gmail.
- Users can access features like email signatures, out-of-office automatic replies, email sorting, subscription management, email forwarding, and more.
- With the ability to translate messages in Outlook automatically, users can improve their understanding of business communication or read messages in their preferred language.
- Following the steps outlined, users can easily configure the automatic translation feature according to their preferences.
Was this guide helpful?

About the Author
Richard
Tech Writer, IT Professional
Richard, a writer for Geek Rewind, is a tech enthusiast who loves breaking down complex IT topics into simple, easy-to-understand ideas. With years of hands-on experience in system administration and enterprise IT operations, he’s developed a knack for offering practical tips and solutions. Richard aims to make technology more accessible and actionable. He's deeply committed to the Geek Rewind community, always ready to answer questions and engage in discussions.


[…] up your mailbox, changing the reading pane, opening a new window for a message, language translations, turn text predictions on or off, and […]
[…] up your mailbox, changing the reading pane, opening a new window for a message, language translations, turn text predictions on or off, switch primary account, sharing a calendar, and […]
[…] The new Outlook for Windows makes your email look modern. It works with Microsoft 365, Outlook.com, Hotmail, and Gmail accounts. The app comes with many useful tools like email signatures, external email accounts, out-of-office automatic replies, email sorting, subscription management, email forwarding, setting default From address, backing up your mailbox, changing the reading pane, opening a new window for a message, and language translations. […]
[…] address, backing up your mailbox, changing the reading pane, opening a new window for a message, language translations, turning text predictions on or off, switch primary account, sharing a calendar, changing […]