How to Change the Outlook Reading Pane in Windows 11

The Outlook Reading Pane in Windows 11 lets you preview emails without opening them.
This pane shows your email’s content immediately after you select a message in your inbox. It saves you from opening each email separately.
By default, the Reading Pane sits on the right side in Outlook for Windows. You can easily move it to the bottom or turn it off entirely.
For example, on a laptop with a smaller screen, moving the Reading Pane to the bottom makes your message list much easier to read and manage.
How to Change the Outlook Reading Pane
Changing how your Outlook reading pane looks in Windows 11 can make reading emails more comfortable. This guide shows you how to adjust the reading pane settings, whether you prefer it on the right, at the bottom, or hidden completely, fitting your personal email checking style.

Here’s how to change your view:
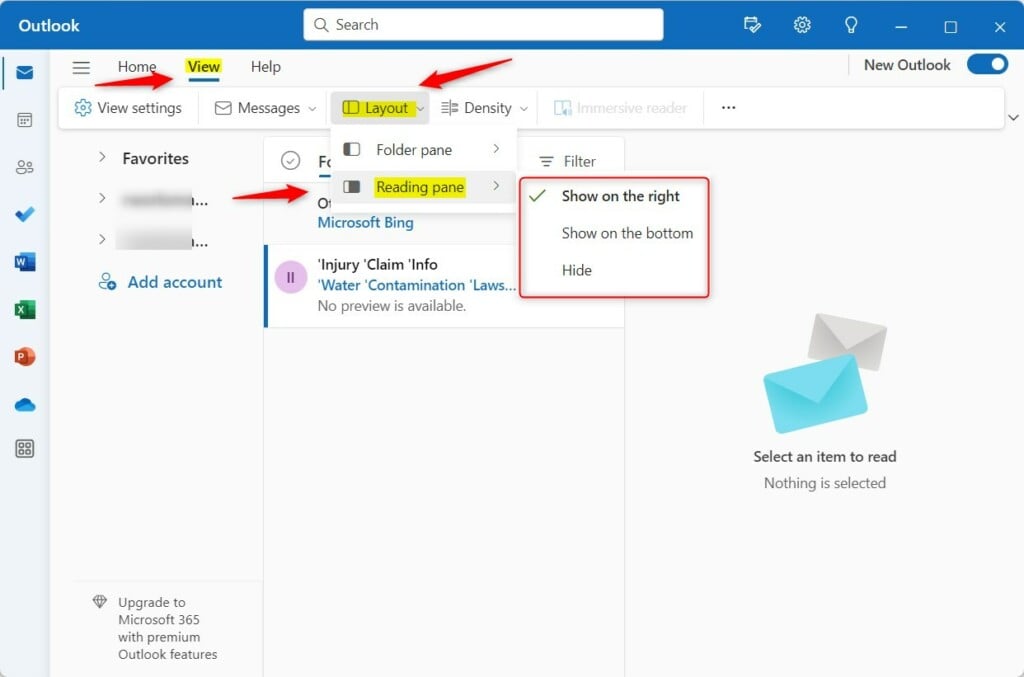
Simplified ribbon: Click View -> Layout -> Reading pane:
- Show on the right
- Show on the bottom
- Hide
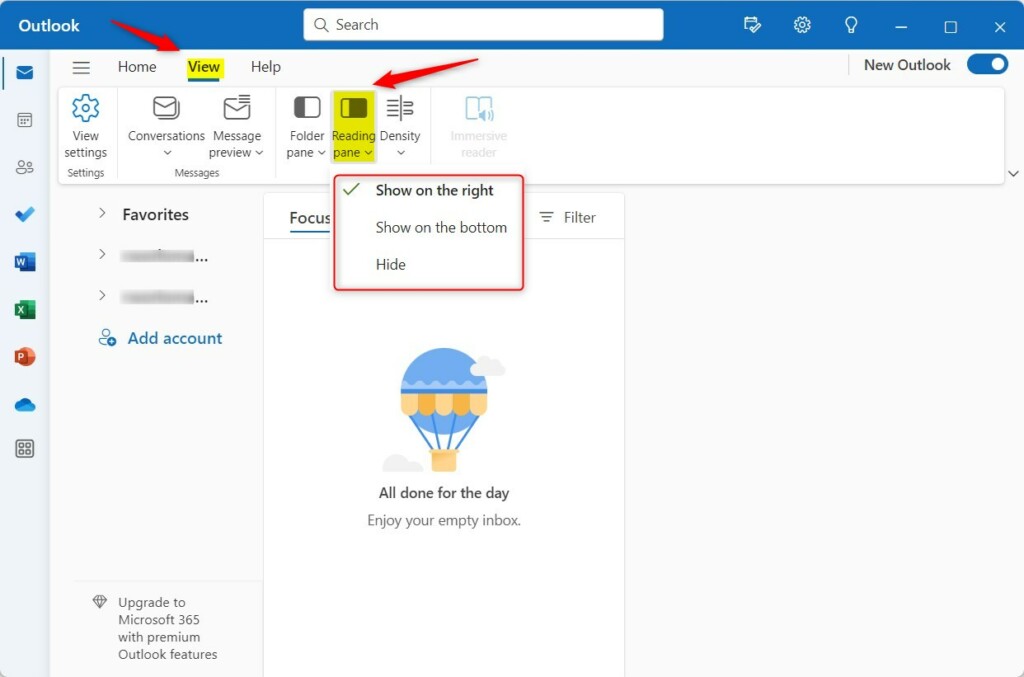
Classic ribbon: Click View -> Reading pane:
- Show on the right
- Show on the bottom
- Hide
Advanced Outlook View Settings
Beyond changing the reading pane’s position, explore advanced Outlook view settings to make your inbox work better for you.
Mark as Read Settings
Troubleshooting Reading Pane Issues
If your Outlook reading pane settings keep resetting or aren’t saving correctly, there are a few common troubleshooting steps you can try.
Summary
This guide shows how to adjust the reading pane in the new Outlook app, helping you customize your workspace for a smoother email routine.
How do I turn off the Reading Pane entirely?
To turn off the Reading Pane, navigate to the View tab in the ribbon, select Reading Pane, and choose the Hide option. This will display your inbox in a list format, requiring you to double-click an email to open it in a separate window, which is great for focus.
Can I preview attachments without opening them?
Yes, you can preview attachments without opening them by using the Reading Pane in Outlook.
Was this guide helpful?

About the Author
Richard
Tech Writer, IT Professional
Richard, a writer for Geek Rewind, is a tech enthusiast who loves breaking down complex IT topics into simple, easy-to-understand ideas. With years of hands-on experience in system administration and enterprise IT operations, he’s developed a knack for offering practical tips and solutions. Richard aims to make technology more accessible and actionable. He's deeply committed to the Geek Rewind community, always ready to answer questions and engage in discussions.


[…] management, email forwarding, setting default From address, backing up your mailbox, changing the reading pane, and […]
[…] forwarding, setting default From address, backing up your mailbox, changing the reading pane, opening a new window for a message, language translations, turning text predictions […]
[…] management, email forwarding, setting default From address, backing up your mailbox, changing the reading pane, opening a new window for a message, language translations, turning text predictions on or […]
[…] management, email forwarding, setting default From address, backing up your mailbox, changing the reading pane, opening a new window for a message, language translations, turning text predictions on or […]
[…] management, email forwarding, setting default From address, backing up your mailbox, changing the reading pane, opening a new window for a message, language translations, turning text predictions on or […]
[…] forwarding, setting default From address, backing up your mailbox, changing the reading pane, opening a new window for a message, language translations, turning text predictions […]
[…] management, email forwarding, setting default From address, backing up your mailbox, changing the reading pane, opening a new window for a message, language translations, turning text predictions on or […]