Why Is My Laptop Battery Draining so Fast After the Latest Windows 11 Update

Sudden laptop battery drain after a Windows 11 update usually happens when new system files or background tasks force your processor to stay awake instead of resting. These updates can reset your power plans, restart file indexing, or leave hardware drivers stuck in endless loops that burn through power.
When your battery life drops fast right after installing an update, your system is likely working overtime on hidden tasks behind the scenes. Finding and stopping these stuck background processes restores your normal battery runtime.
Work through the sections below in order. They go from the quickest checks to the more involved fixes. Change one thing at a time and watch your battery for a while before you move on. That way you know which change actually helped, and you can undo it if it didn’t.
Your battery is most likely draining fast because a Windows 11 update left background tasks or an app running when you are not using them. Open Settings , go to System Power & battery Battery usage to find the app using the most power. Then set its Background apps permissions to Never, or update or uninstall it.
Step 1Check Your Battery Usage in Settings
Windows keeps a record of which apps used your battery. After an update, one app that has started misbehaving is often the whole problem, so look here first. The Battery usage list only appears on devices that have a battery.
- Click the Start button and select Settings. You can also press the Win plus I.
- Click System in the left menu.
- Click Power & battery. The page shows your battery level graph and the power settings.
- Click Battery usage to open the full list. You should now see each app and service with the share of battery it used.
If the list has a time range option, switch between the last 24 hours and the last 7 days. Compare the period after the update with the days before it. Look for an app near the top of the list that you hardly used, or one you don’t recognize.
If a specific app is stuck or misbehaving, close it first and see whether the drain stops. If it comes back, update the app. If it still misbehaves after the update, uninstall it. Settings Apps Installed apps lets you do all of this. You can reinstall the app later if you need it.
Step 2Fix Background Apps Running Wild
Stopping background apps in Windows 11 prevents hidden programs from draining your laptop battery when you are not actively using them. Many applications continue running tasks like checking for messages after an update, but you can control and restrict these background programs through your system settings to save power.
This works on a per-app basis, so start with the app you found in the battery usage list.
- Open your Windows Settings.
- Click Apps in the left menu.
- Click Installed apps. You should now see a list of every app on the PC.
- Find the app that is using too much battery. You can type its name in the search box at the top of the list.
- Click the three dots next to the app name and select Advanced options.
- Look for the section called Background apps permissions.
- Change the setting from Always or Power optimized to Never.
The app will no longer run when you are not using it. The side effect is that it will not send notifications or sync in the background until you open it again. To undo the change, go back to the same screen and pick Power optimized or Always.
If you don't see the Background apps permissions section, the app is probably a traditional desktop program rather than a Store app. Windows doesn't offer this control for those. Use the startup apps method later in this guide, or close the program when you are done with it.
Step 3Update Your Graphics and Power Drivers
Updating your graphics and power drivers in Windows 11 resolves the hardware mismatches that frequently cause rapid battery drain after a system update. Outdated drivers prevent your laptop from communicating properly with its physical components, which leads to high power consumption until you install the latest versions.
Check for driver updates, especially for your display adapter and chipset.
- Right-click the Start button and select Device Manager. Changing drivers requires administrator privileges, so you may be asked to approve a prompt.
- Scroll down to Display adapters and click the small arrow next to it to expand the list. Outdated or buggy graphics drivers often cause your laptop battery to drain much faster after a major operating system update. Many laptops list two adapters, for example an Intel one and an NVIDIA or AMD one. Check both.
- Right-click your graphics card name and select Update driver.
- Choose Search automatically for drivers. Windows searches and installs a newer driver if it finds one. If it says the best drivers are already installed, that only means Windows has nothing newer. The manufacturer may still have one.
- Repeat these steps for any items listed under System devices if needed.
Restart the laptop if Windows asks you to, then watch your battery again.
You can also visit your laptop manufacturer's website to fix rapid battery drain after a Windows 11 update. Look up your exact laptop model on the manufacturer's website. Download and install the latest power management and chipset drivers provided by the manufacturer. Updating these specific drivers helps your hardware manage power correctly and often stops the battery from draining too fast. The model name is usually printed on the bottom of the laptop. You can also find it under Settings System About
Step 4Adjust Your Power Mode and Screen Brightness
Your screen and your processor are the two biggest battery users on your laptop. Changing how they use power can give you hours of extra battery life.
Change Your Power Mode
- Open Settings.
- Click System.

- Click Power & battery.
- Find the Power mode section.
- Change the setting from Best performance or Balanced to Best power efficiency.
Some versions of Windows 11 show two lists here, one for when the laptop is plugged in and one for when it runs on battery. Set the on-battery one. Best power efficiency lowers processor speed a little, so heavy tasks may feel slower. Switch back to Balanced whenever you need full speed. If you don't see the Power mode section, your laptop maker may control power plans with its own software. Check for a power or battery app from the manufacturer.
The same page also has a Battery saver section. You can turn it on when the charge gets low.
Lower Your Screen Brightness
Lowering your screen brightness is one of the fastest ways to stop your laptop battery from draining so quickly after a Windows 11 update. A display set to maximum brightness uses a lot of power, so turning it down instantly preserves your battery life.
- Press the brightness down key on your keyboard until your screen is comfortable to look at. It is often a function key with a sun icon, and you may need to hold the Fn key as well.
If your keys don't work, use the Quick Settings panel instead.
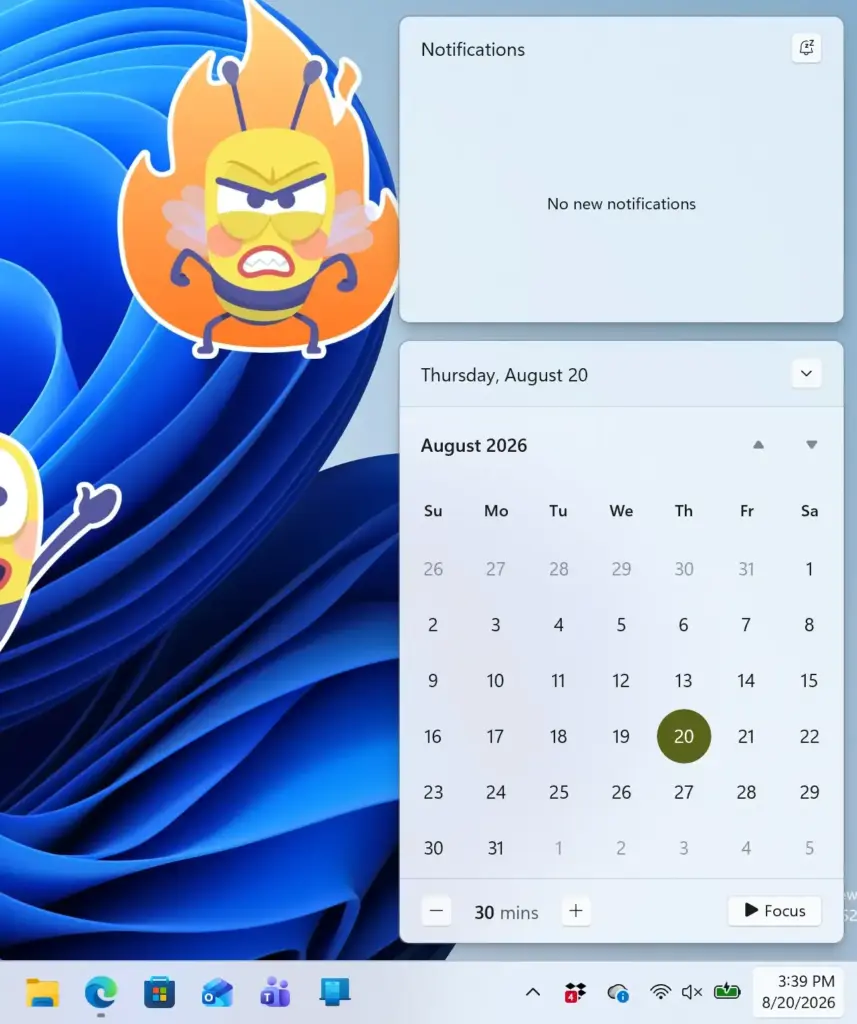
- Click the Wi-Fi, Sound, or Battery icons at the bottom right of your taskbar. The Quick Settings panel opens.
- Move the brightness slider to the left. The screen should dim as you drag.
Step 5Turn Off Fast Startup If It Is Causing Glitches
Turning off Fast Startup in Windows 11 fixes battery drain caused by buggy power states that stop your laptop from fully powering down or sleeping correctly. Fast Startup saves part of the system state to disk when you shut down so the next boot is quicker. After an update, that saved state can sometimes cause problems, so turning the feature off is a good test.
- Click the Start button, type Control Panel, and open it.
- Click Hardware and Sound, then click Power Options.
- Click Choose what the power buttons do on the left side of the Control Panel window. This applies to Windows 11 version 23H2 and the steps are the same on Home and Pro. You must be signed in with an administrator account to change this setting.
- Click the link at the top that says Change settings that are currently unavailable. This may prompt a security warning. Click Yes. The greyed-out options at the bottom should now be available.
- Uncheck the box next to Turn on fast startup (recommended) at the bottom of the window.
- Click the Save changes button.
If you don't see the Fast Startup option at all, hibernation is turned off on your PC, so Fast Startup isn't active. Look at other causes instead. To undo the change, tick the box again and save. Note that Restart already does a full shutdown and boot, while Shut down is the one affected by this setting.
Step 6Stop Unnecessary Startup Programs
Stopping unnecessary startup programs prevents extra apps from running automatically the moment you turn on your computer. Every one of them uses battery for as long as it stays open in the background. You can manage them in Task Manager.
- Press the Ctrl + Shift + Esc keys on your keyboard at the same time to open Task Manager.
- Click the Startup apps icon in the left menu. It is the symbol that resembles a gauge or speedometer. If you only see icons, or the menu is hidden, click the menu button at the top left to expand it. This page lists the programs that run automatically when you turn on your device. Disabling the ones you don't need helps stop hidden software from draining your laptop battery after the latest Windows 11 update.
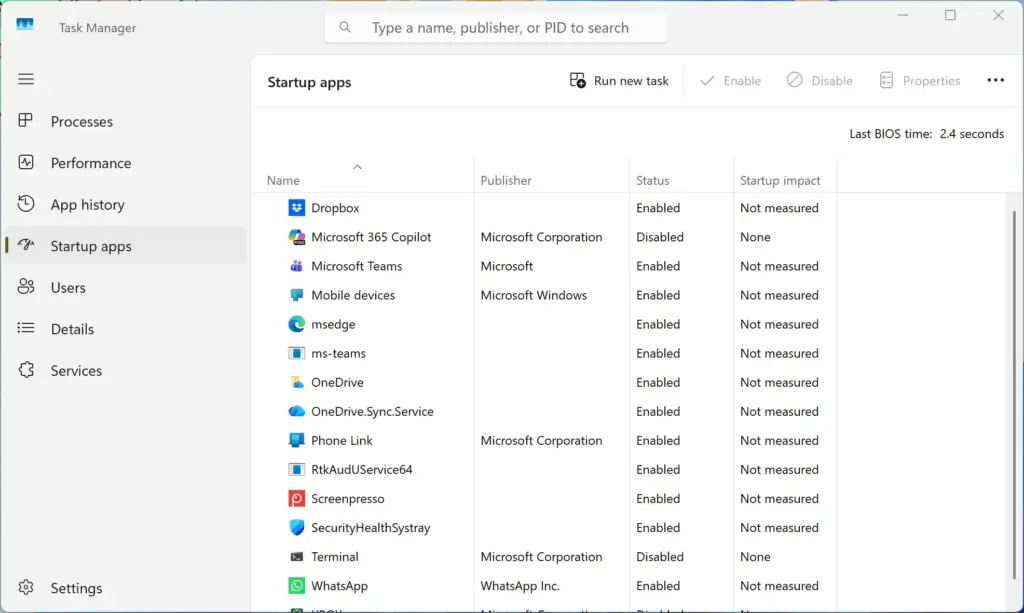
- Look through the list of programs. Find apps that you do not need to run as soon as your computer turns on. The Startup impact column shows which ones weigh the most.
- Right-click an app you want to stop and select Disable. The status column should now say Disabled.
You can still open the app by hand, and you can right-click it and choose Enable to undo the change. Leave security software and hardware items, such as touchpad or audio tools, alone unless you know what they do. The changes take effect the next time you sign in.
Step 7Run the Built-In Power Troubleshooter
Running the built-in power troubleshooter in Windows 11 scans your system settings and tries to fix common power problems that waste battery. It won't catch everything, but it takes only a minute.
- Click the Start button and open Settings.
- Click System and then click Troubleshoot.
- Click Other troubleshooters.
- Find the Power option in the list and click Run next to it. This step requires administrator privileges, so sign in with an administrator account to complete the repair.
- Follow any instructions that appear on your screen to let Windows fix the issues.
When it finishes, Windows lists what it found and what it changed. Restart your laptop afterwards so the changes apply.
Unique Expert Tips: Hidden Battery Drains Most People Miss
If you tried all the steps above and your battery still drains too fast, your laptop might be suffering from less obvious issues. Here are two expert tips that most troubleshooting guides miss.
Unique Angle 1: Check for Connected USB Devices and Bluetooth Gremlins
Connected USB devices and Bluetooth accessories can cause a hidden power drain that keeps your laptop from resting properly after a Windows 11 update. Unplugging idle hardware and turning off Bluetooth when you don't need it stops your ports and radio from constantly supplying power in the background.
- Unplug all USB flash drives, external mice, and charging cables when you are not using those devices.
- Turn off Bluetooth in your Windows 11 settings if you are not actively using wireless headphones or other wireless accessories. Go to Settings Bluetooth & devices and switch the Bluetooth toggle to Off.
- Use the laptop on battery for a while and check whether the drain has slowed.
If battery life improves, plug the devices back in one at a time to find the one causing the drain.
Unique Angle 2: Clear Out Stuck Windows Update Cache Files
Stuck update files can trap your computer in a background processing loop that drains your battery. Deleting these leftover temporary installation files gives your operating system a clean slate and restores normal power consumption.
It requires administrator privileges and careful attention, and you should not do it while Windows is installing updates. Only delete the contents of the folder named below, nothing else.
- Click the Start button, type Services into the search box, and open the Services app from the results list. You may need to enter your administrator password to make changes. This tool lets you stop background programs that drain your laptop battery after a system update.
- Scroll down to find Windows Update in the list.

- Right-click Windows Update and select Stop.
- Open File Explorer and go to the following folder path: C:\Windows\SoftwareDistribution
- Open the Download folder inside SoftwareDistribution and delete all the files and folders inside it. Click Continue if Windows asks for administrator permission. Delete only what is inside the Download folder and leave the folder itself in place.
- Go back to the Services app, right-click Windows Update, and select Start.
- Restart your laptop.
Windows downloads any update files it still needs the next time it checks for updates, so nothing is lost by clearing the folder. If a file refuses to delete, make sure you stopped the Windows Update service first.
What to Do If Nothing Works
If none of the fixes help, your battery may simply have reached the end of its natural life. A battery report shows your hardware's current capacity and tells you whether the physical battery is the cause.
- Click the Start button, type Command Prompt, and open it.
- Type powercfg /batteryreport and press Enter. Windows saves the report as a file and prints the location where it was saved.
- Open that file in your web browser and look at the installed battery details.
The powercfg /batteryreport command creates a detailed report showing your original battery capacity, called design capacity, versus your current full charge capacity. If the current capacity is very low compared with the original, you should replace the physical battery. If the two numbers are close, the battery is healthy and the cause is more likely software, so go back over the earlier sections.
Summary
Fixing rapid battery drain after a Windows 11 update involves checking your battery usage, stopping background apps, updating system drivers, and adjusting power settings. While updates often trigger power issues by altering system files or creating hardware mismatches, you can restore normal battery life by following these troubleshooting steps. Make one change at a time, restart the laptop, and give it some time on battery before you decide whether it worked. If the battery report shows a worn battery, replacing it is the real fix.
Have a question about this guide?
Answered by AI from this guide. Good questions may be added to this page — please don't include personal details.
Did this guide fix your problem?

About the Author
Richard
Tech Writer, IT Professional
Richard is a writer at Geek Rewind who turns complex IT tasks into clear, step-by-step guides. He draws on years of hands-on experience in system administration and enterprise IT operations, focusing on Windows, Linux and WordPress: the problems people actually run into, and the fixes that work. His server and WordPress guides come from systems he runs himself. Richard builds and maintains the platform behind Geek Rewind, from its Ubuntu servers and Nginx configuration to its custom WordPress plugins. Many new tutorials start with readers' questions, and he's always glad to answer them in the comments.
No comments yet — be the first to share your thoughts!